
EmpowerID Quick Start
Welcome to EmpowerID! Your organization has implemented EmpowerID to help you keep your user information secure and manage your access to its IT resources. This topic will help become more familiar with EmpowerID so that you can quickly get about your business, accomplishing what you need to do as efficiently as possible. If you are a new user, this topic is the place to begin as it shows you the basics of using EmpowerID from your first login. Once you understand the basics, you can select any topics that are relevant to you and your organizational situation.
What is EmpowerID?
EmpowerID is an Identity and Access Management platform that makes it easy for organizations to securely manage their IT resources.
How Do I Start?
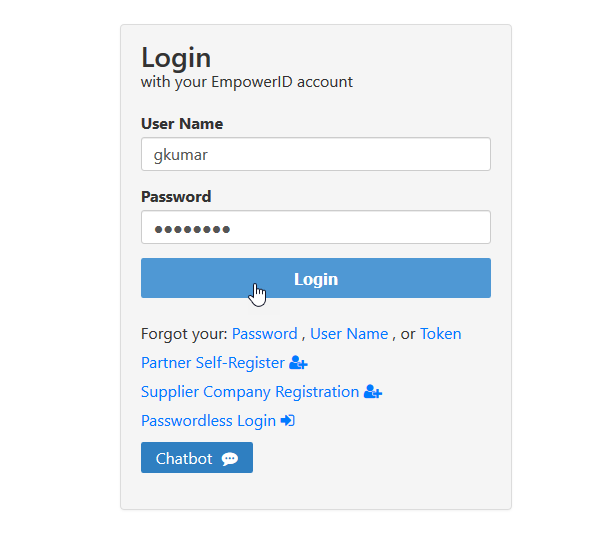
To get started with EmpowerID, you open your browser and go to the login page for your organization. The URL for this page should look something like https://eid.yourorganization.com/ui, where "eid" represents the name of your organization's EmpowerID server. The page you see should look something like the below image. In the image, there is only one login option, the default EmpowerID login. Depending on how your organization has configured the page, you may have more login options and the page may be themed differently.

Once you reach the page, do the following:
-
Enter your credentials and click Login. If you are logging in with your EmpowerID account, you do not need to include your organization's UPN suffix (i.e., @yourorganization.com)
After logging in, you may be directed to a number of different pages before gaining access to your organization's portal. These pages can included the following:
-
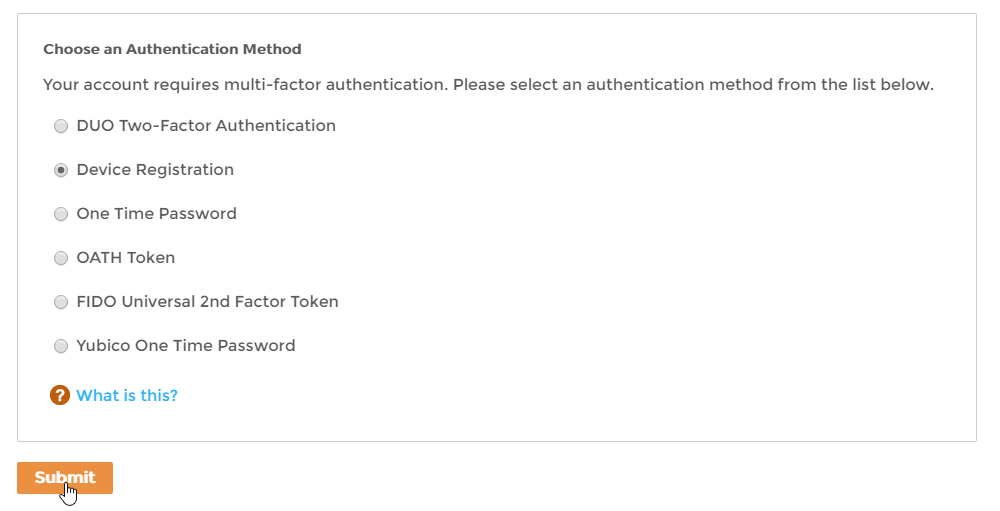
Multi-Factor Authentication page — This page appears if your organization has set up Multi-factor authentication (MFA). Multi-factor authentication enhances the security of your account by using a secondary method to verify your identity. Depending on how your organization has set up MFA, you may be required to pick from one or more secondary methods or have the option to select none.
In the below image, MFA is limited to Device Registration and is optional.
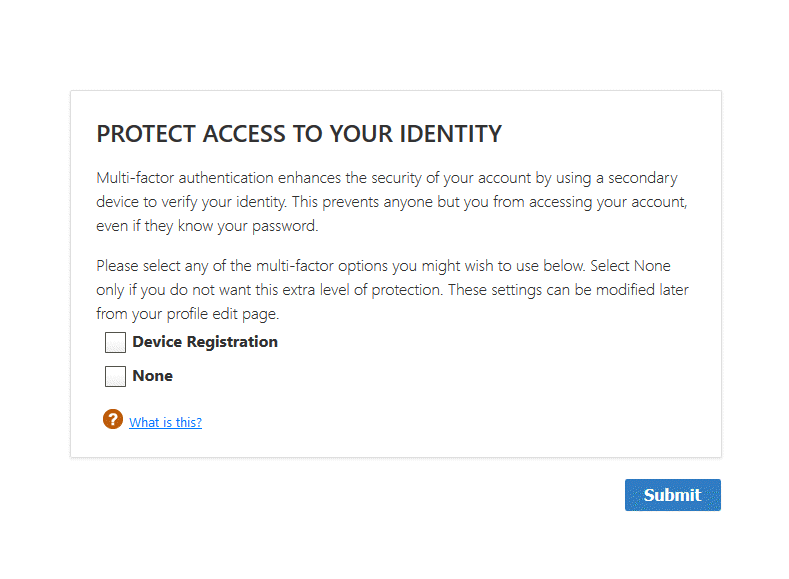
For more information on MFA and EmpowerID, see Multi-Factor Authentication.
-
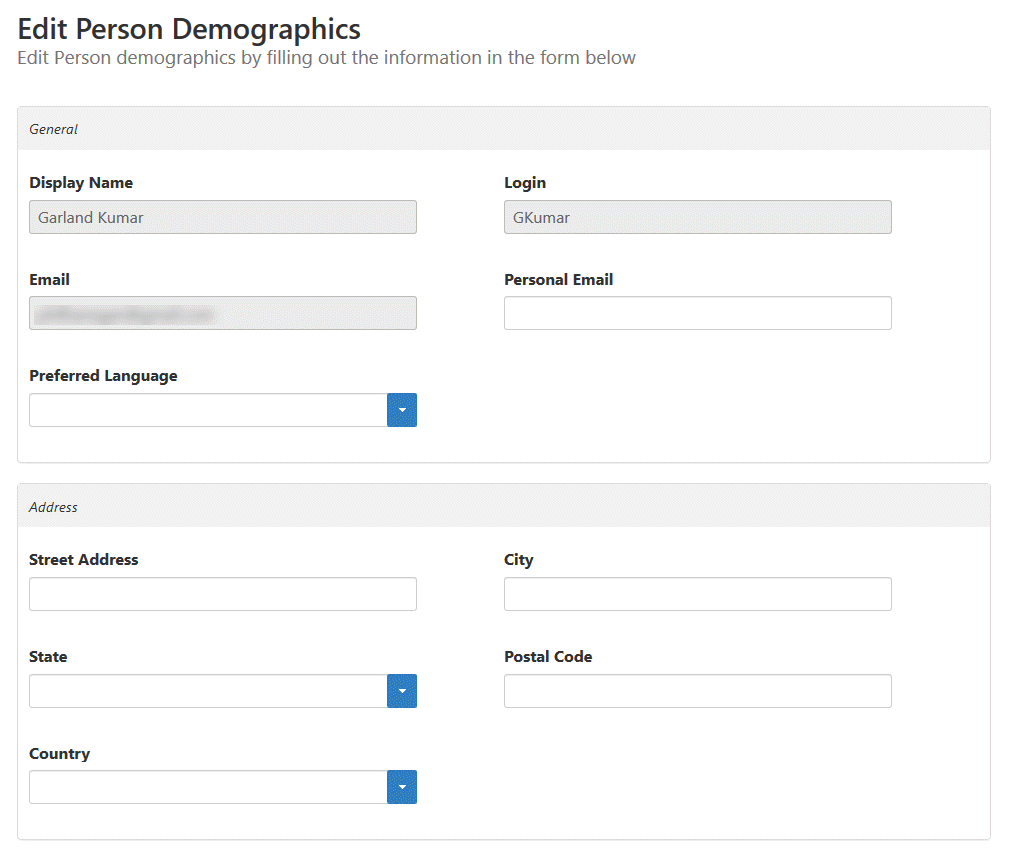
Edit Person Demographics page — This page gives you the opportunity to provide personal information about yourself, such as your personal email or mobile phone number.
If you are not directed to the enrollment page, this means your organization does not allow you to reset
your
password.
If that is the case, the first page you will see is your personal home page.
The below image shows the enrollment page with its default configuration. The page you see may be themed differently and present you with different question and answer options.

Answer the questions presented to you and then click Submit.
You provide your own question and answer for the Custom Question.

After enrolling for password self-service reset (if that is your organization's policy), EmpowerID directs you to the home page that your organization has set for you. In the below image, that page is your personal dashboard. This dashboard allows you to quickly view panes of the most pertinent information about your activity within EmpowerID. An explanation of the dashboard panes follows the image.

- My Open Tasks — In EmpowerID, tasks represent pieces of work that can be performed by an authorized user against an IT resource, and open tasks are those pieces of work that have been initiated, but not yet completed. If you are a user authorized to complete an open task, it appears in this dashboard pane.
- My Tasks by Status — This pane provides a pie chart view of your tasks, with those tasks showing as open, rejected and approved.
- My Requests by Status — IIn EmpowerID, requests represent actions that you have initiated against a resources for which you do not have the necessary access to complete. When this is the case, EmpowerID sends your request to other people with the ability to approve (or reject) your request. This pane provides a pie chart view of your reuests, with those requests showing as open, rejected and approved.
- My Last 10 Login Failures — This pane displays the last 10 attempts to login that failed. This allows you to keep track of any login failures and may help you spot attempts by another user to fraudulently use your account.
- My Recent Activities — This pane displays a list of all tasks you have performed on the site.
- My SSO Apps By # of Logins — In EmpowerID, SSO Apps are Web applications that require you to authenticate, but do not support federated SSO (single sign-on). In these cases, EmpowerID provides the ability for you to still SSO to those applications through its browser extension. If you have accounts that EmpowerID knows about in these types of applications, your login activity to those applications (from EmpowerID) appears in this pane.
What is the purpose of the other elements I see?
Beyond your personal dashboard, you should see a number of elements common to each page. These elements are as follows:
-
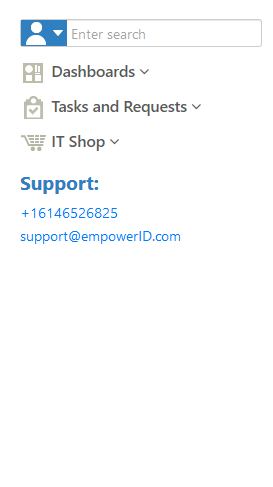
Navigation Sidebar — The Navigation Sidebar is how you
move
through the pages of the EmpowerID Web site and search for
people and other types of resources. The amount of resources for which you can search and the number of
pages available
to you differ according to the amount of access your organization has given you.
-
Language and Profile Menu Items — TThese allow you to
set
your personal language preference, view and edit aspects of your profile, change your password
and log out of EmpowerID.

After logging in, what can I do?
As a default user of EmpowerID, your organization has given you the ability to do a few certain things. These are as follows:
The below capabilities represent the default given to standard users. Depending on your role within your organization, you may be able to see and do more or less.
How do I search for other people?
On every page of the EmpowerID Web application, you will see a Global Search control. This control contains two elements, a filter and a text field. The filter allows you to limit searches to particular resource types, such as people or shared folders. The text field provides a place for you to input the specific resource for which you are looking. For example, if you want to search for a person named "Megan Allen" you select person from the filter and then type "Megan Allen" in the text field. If your organization has a person named "Megan Allen" and you have access to view her then you will see a tile for her. Clicking the tile takes you to a page where you can view information about the person.

By default, the Person search filter is selected. This filter is shown in the above image.
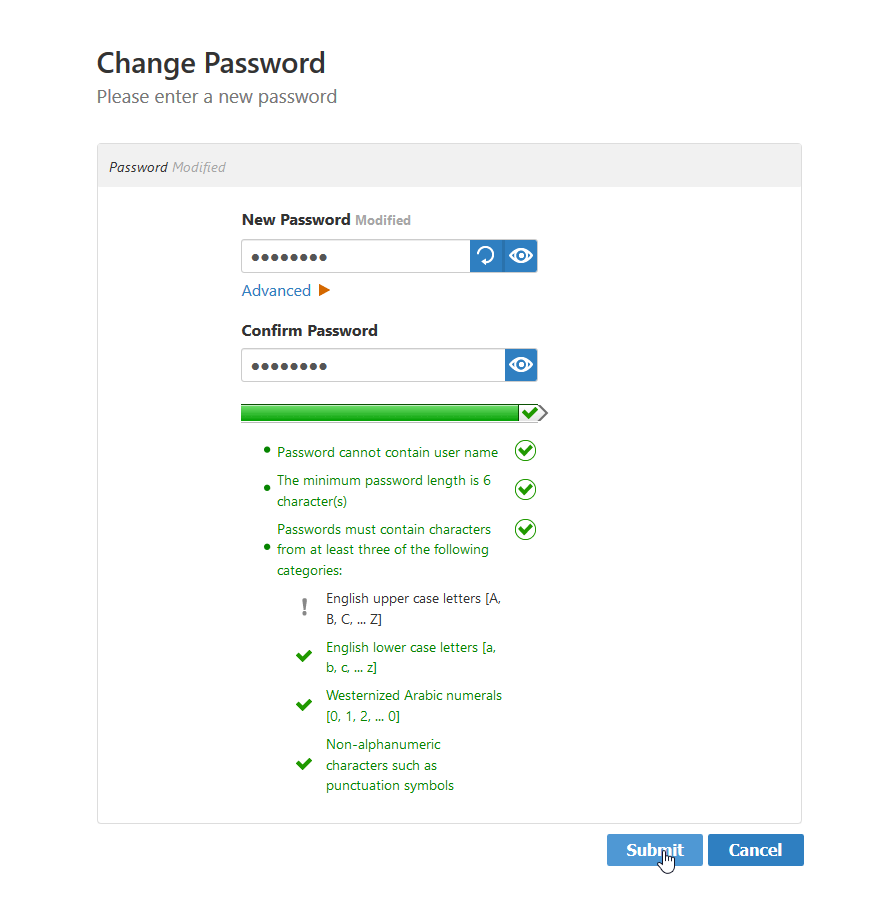
How do I change my password?
If at any time you wish to change your password, you can do so by clicking your display name and selecting the Change Password menu item.

Type your current password in the Change Password field, your new password in the New Password and Confirm Password fields and click Submit.

How do I view and edit my profile?
You can view your profile by clicking your display name and selecting the View Profile menu item.

This directs your browser to your View Self page. This page contains your basic profile information and a number of expandable accordions with information specific to your person.

To edit your profile information, click the Edit link directly underneath the image placeholder. Edit links have the Pencil icon.

As an alternative, you can bypass your View Self page and go directly to your Edit page for your profile from the navigation sidebar by expanding IT Shop, clicking Workflows and then clicking the Edit Your Profile Information button.

This opens the Edit One page for your person. This page contains tabs with fields of information about your person.

To make an edit, select the tab(s) that contains the field(s) you want to edit, add your changes and click Save. For example, if you want to add a photo, you select the Photos tab. The tab provides a Photo Manager that allows you to capture a webcam image or upload a photo.

To upload a photo, do the following:
- Click the Browse button and then search for and select an image file on your machine.
-
Click Upload File.
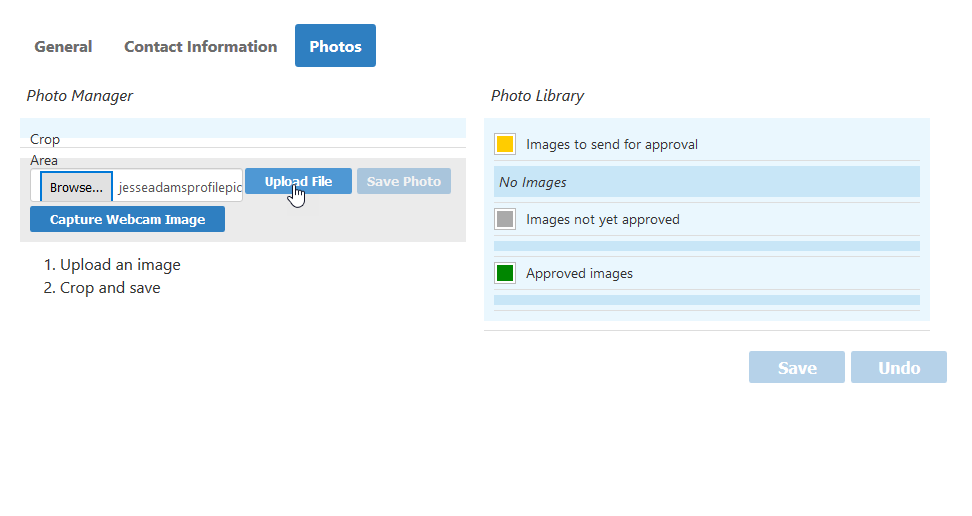
-
Click Save.
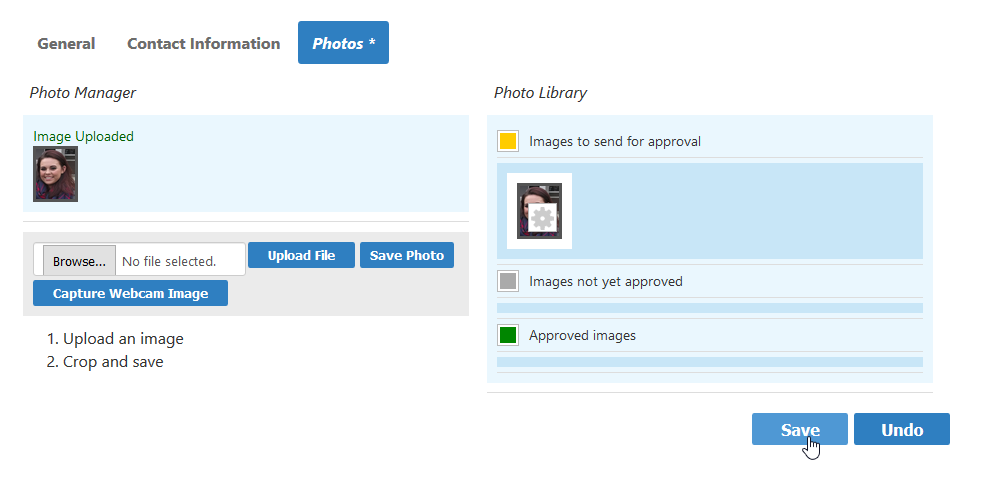
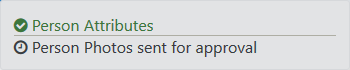
You should see a message stating that the task was sent for approval. Once approved the photo will appear on all pages related to your person. People will be able to see your photo on those pages.
How do I check the status of my requests?
Any time you request access to a resource, make a change to your profile or perform another task for which your manager or an administrator needs to approve, that task is sent to those people. You can view the status of your request, as well as who can approve it on the Requests Pending page. To go to the page, do the following:
-
From the navigation sidebar, expand Task and Requests > Workflow Tasks and click Requests Pending.
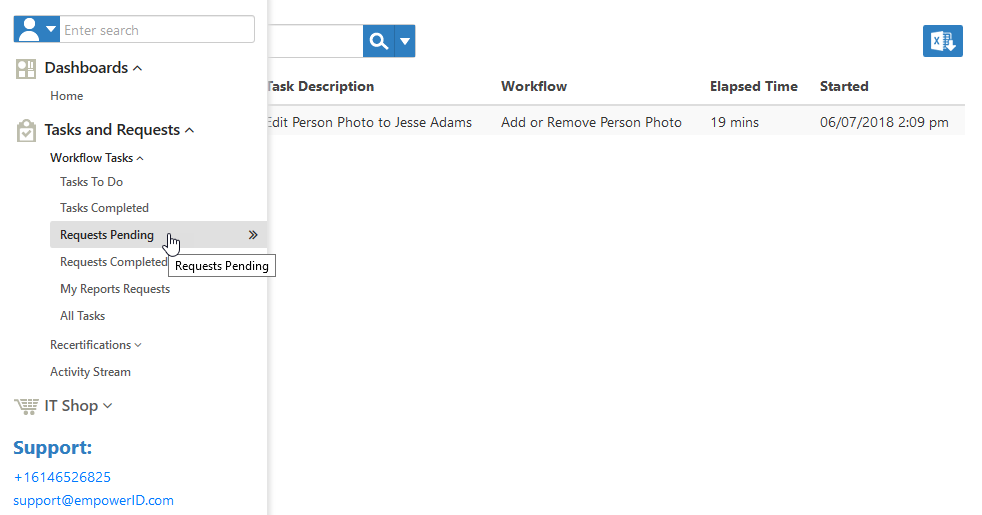
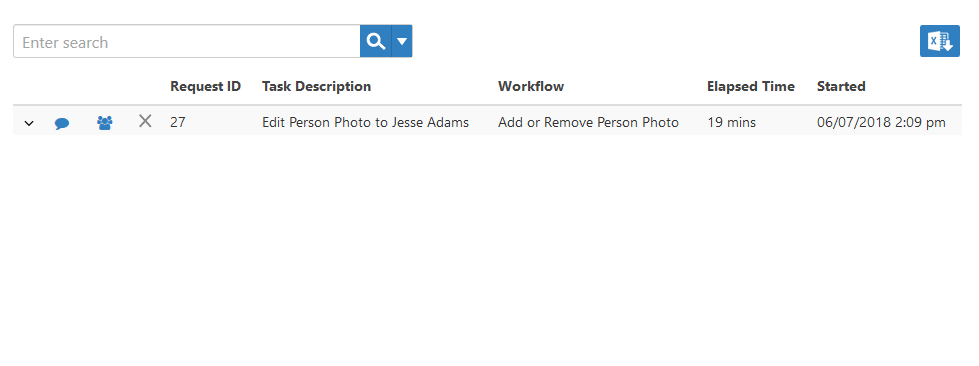
You should see your requests (if any) in the grid below the Search field. The grid allows you to view the task, the workflow you initiated, the elapsed time and when you submitted the request.
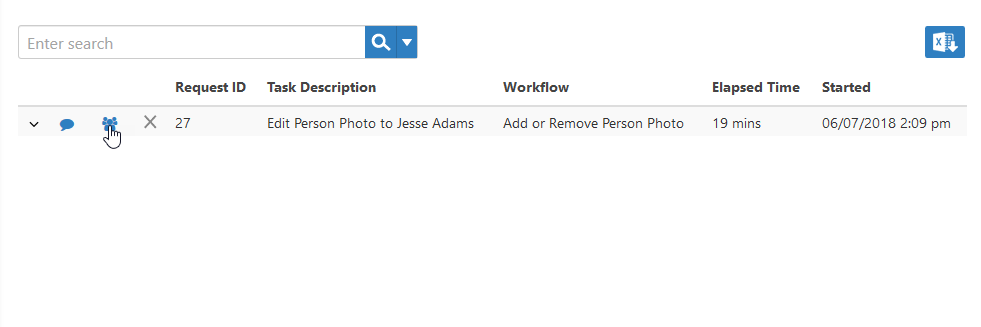
-
To view who can approve a request, click the users icon beside it.
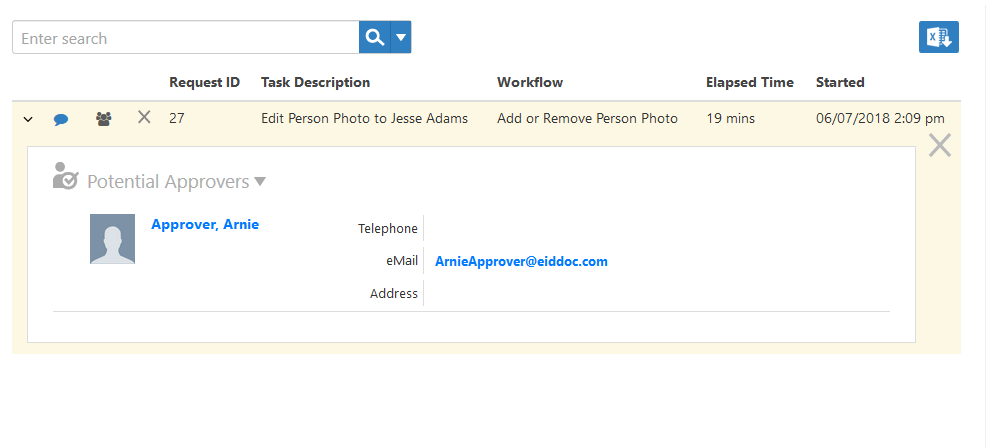
You should see a list of potential approvers.
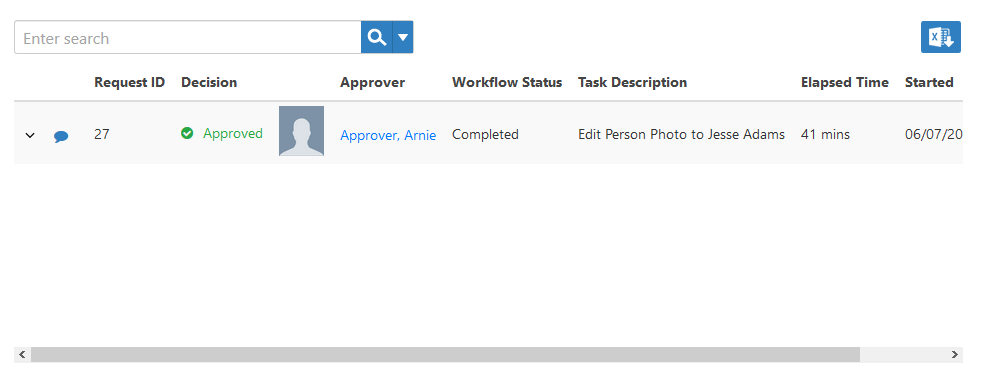
If a request is approved or rejected, you will see it on the Requests Completed page. You can view this page by expanding Tasks and Requests > Workflow Tasks and clicking Request Completed.
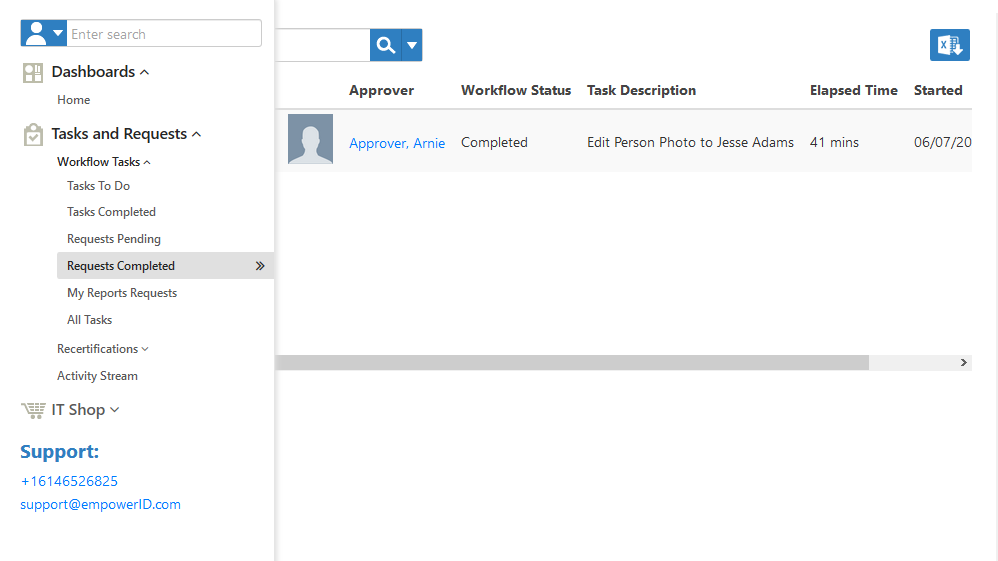
You should see any completed requests in the grid below the search field. You can see the decision that was made about the request, who made it as well as the status of the workflow.
You may need to log out and then log back in to see some approvals take effect. For example, if you uploaded a photo and it was approved, you will see it on your next login.
How do I reset a forgotten password?
If you have enrolled for password self-service reset as described above and have forgotten your password, you can reset it by clicking the Password link on the login page.
Resetting a forgotten password requires that you have either an email address or mobile phone that is registered in EmpowerID. This is necessary as EmpowerID sends you a one-time password as an intermediate step. You enter the one-time password to authenticate and then reset the password.

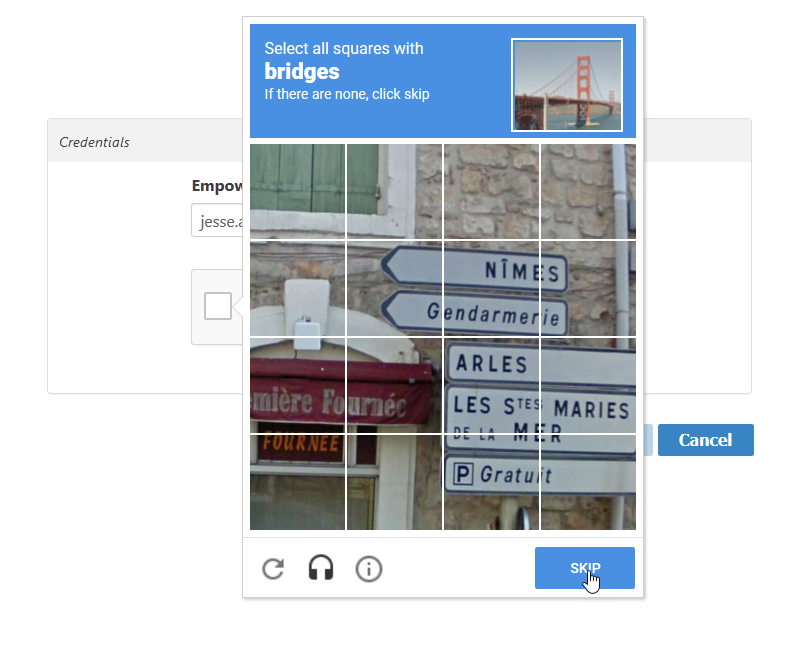
Doing so directs you to the Password Reset Center, where you enter your EmpowerID login or email and validate you're a human by passing the reCAPTCHA.

To reset your password do the following:
- Enter your EmpowerID login or email.
-
Check I'm not a robot and then pass the reCAPTCHA challenge
- Click Submit.
-
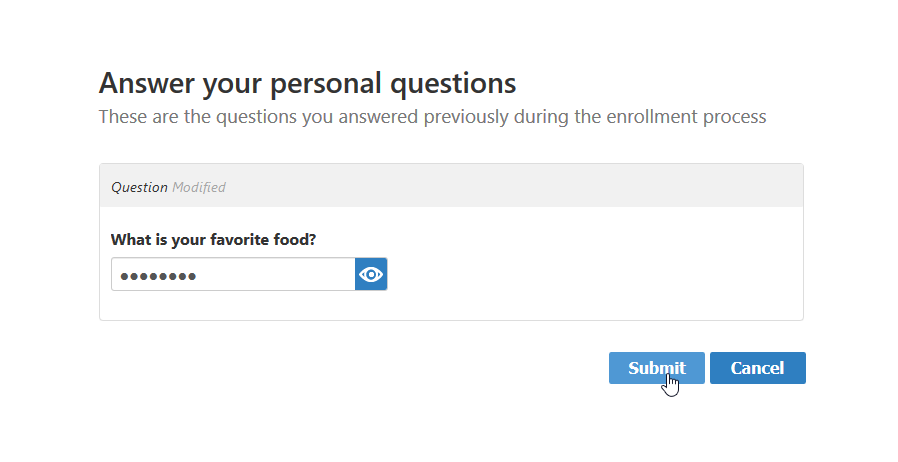
Answer the personal challenge questions you created when enrolling for password self-service reset.
-
After answering your personal challenge questions, select
Unlock and Reset
Password
and specify the one-time password
delivery method.
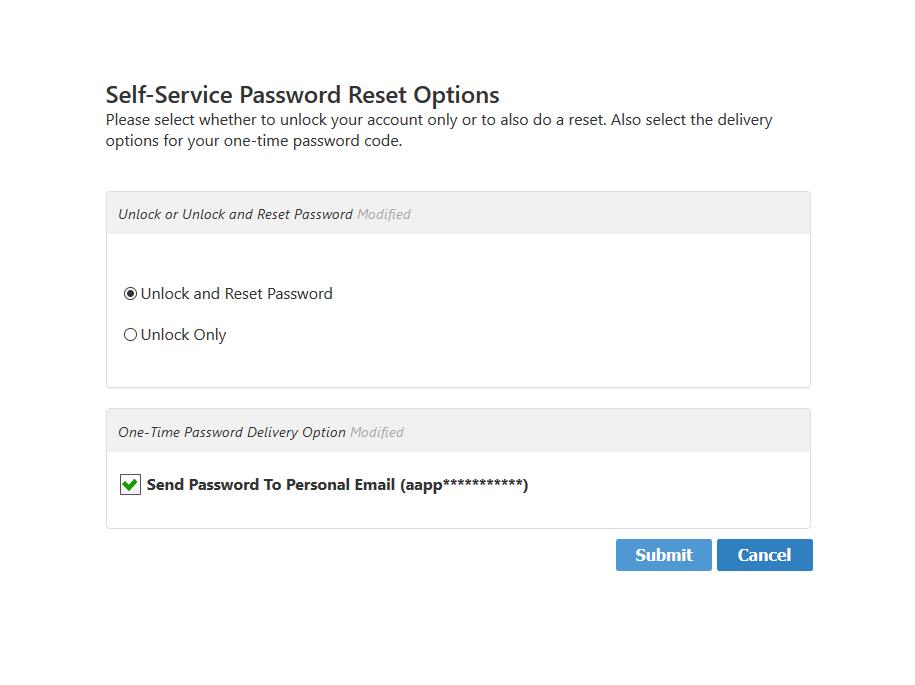
- Click Submit.
- Retrieve the one-time password that EmpowerID sends to your specified delivery method.
-
Enter the one-time password in the One-Time Password field and then
click Submit.
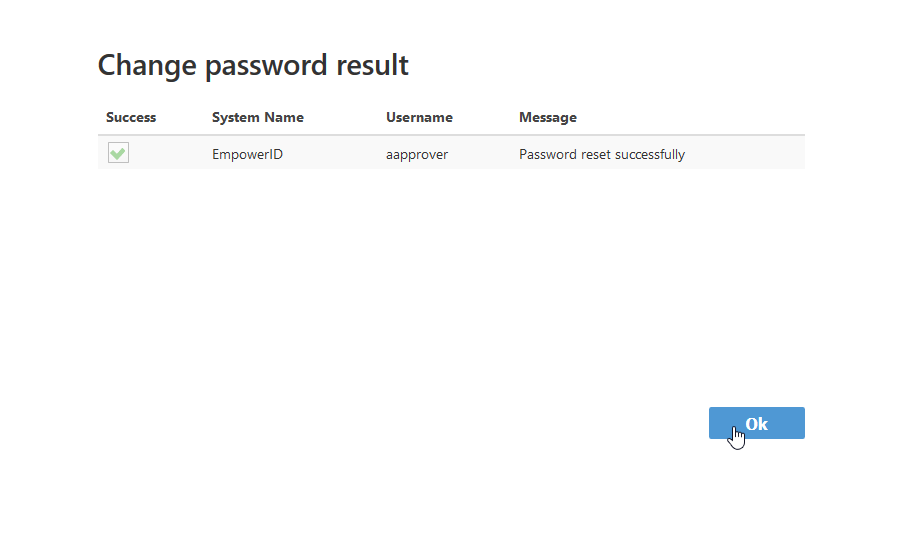
-
Click OK to close the
Change password
result
message.
Using Yubikey OTP
If your organization has enabled Yubikey OTP for multi-factor authentication, when logging in you will have the opportunity to authenticate using a token generated by a Yubikey device as a second factor. If multi-factor authentication is optional for your account, you do not need to use this method. However, if multi-factor authentication using Yubico OTP is required, you must have a Yubikey device issued to you and authenticate using that key before gaining access to your resources.
To use Yubikey OTP
- Log in to your organization's Web portal as you would normally do so.
-
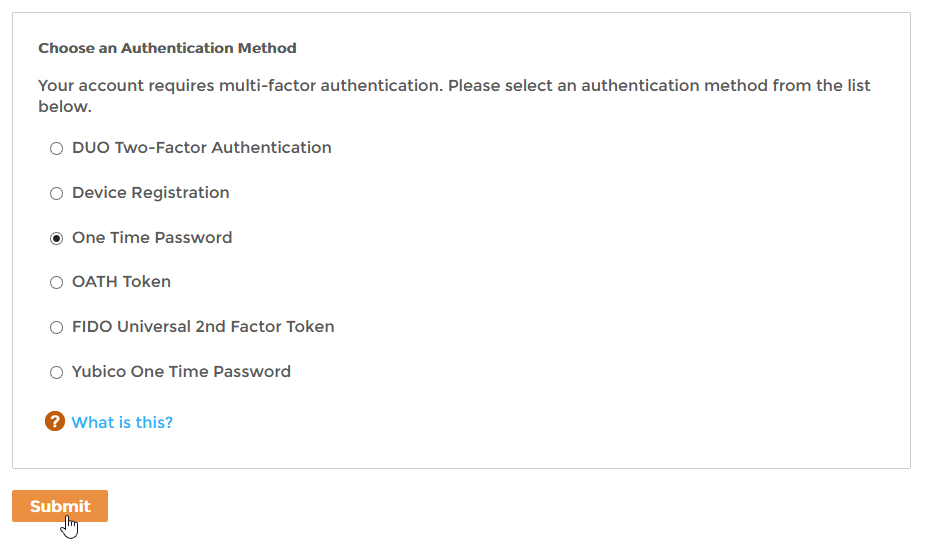
If multi-factor authentication is optional (or required and you have multiple options available to you)
and you want to
enable OATH Tokens as a second factor for your account, select OATH Token and click Submit.
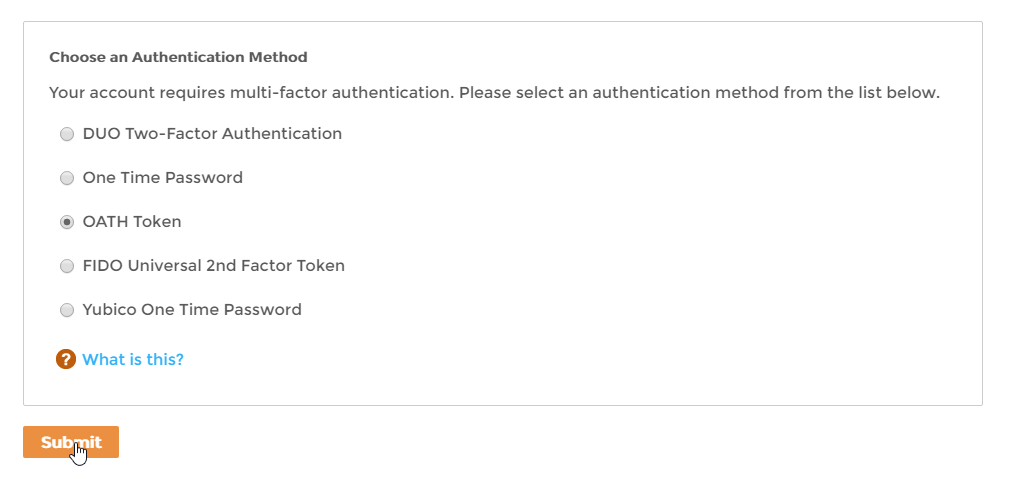
If Yubico is required for your account, you will not see a screen asking you to select a multi-factor option. Instead, you will see the below screen.
-
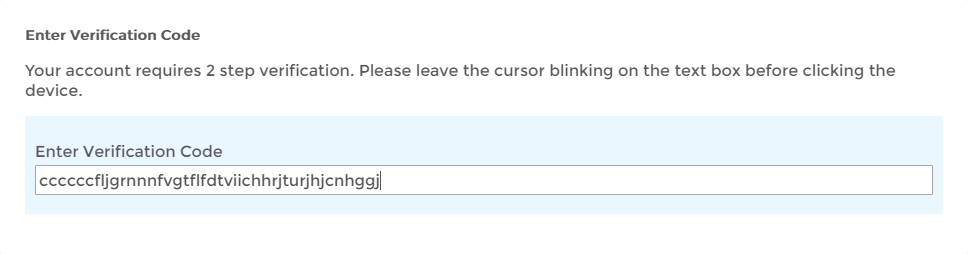
Making sure your Yubikey is plugged into your computer, place your cursor in the Enter Verification Code
field and then
press the button or the gold disk on the key.
You should see a token generated in the Enter Verification Code field.
Unless another level of multi-factor authentication is required on your account, you should now be authenticated. The next time you log in, plug your Yubikey device into the USB port on your computer and follow the instructions on the screen.
If you are asked for another factor, select the desired authentication method and follow the steps shown on the screen.
Using OATH Tokens
If your organization has enabled OATH Tokens for multi-factor authentication, when logging in you will have the opportunity to authenticate using a token generated by a client application such as Google Authenticator or Duo Security. If multi-factor authentication is optional for your account, you do not need to use this method. However, if multi-factor authentication using this method is required, you must have install Google Authenticator or Duo Security on your mobile device and authenticate using the token generated by that application.
To use OATH Tokens
- Log in to your organization's Web portal as you would normally do so.
-
If multi-factor authentication is optional (or required and you have multiple options available to you)
and you want to
enable OATH Tokens as a second factor for your account, select OATH Token and click Submit.
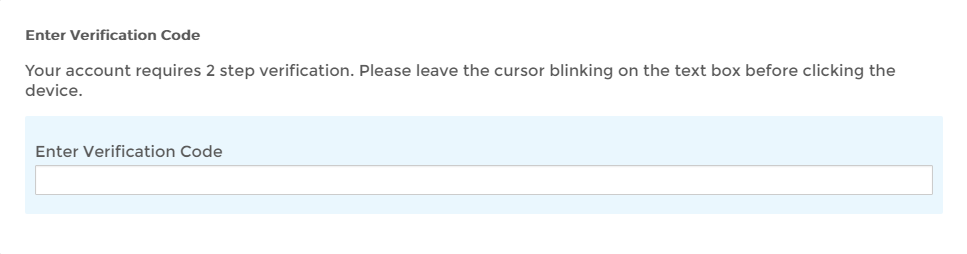
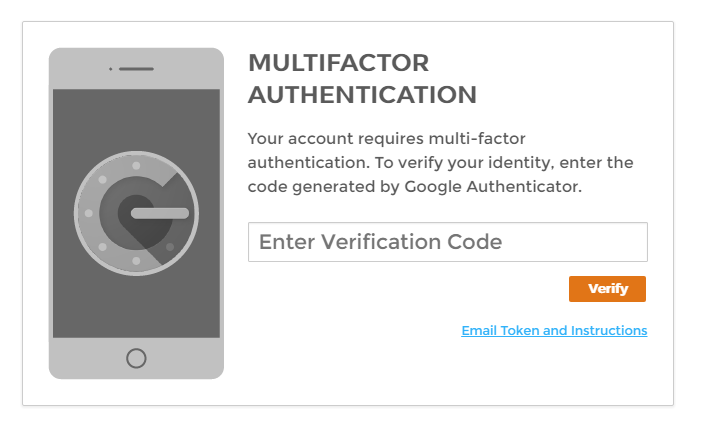
If OATH Tokens are required for your account, you will not see a screen asking you to select a multi-factor option. Instead, you will see the below screen.
You should see a screen stating that you need to verify your identity by entering the code generated by Google Authenticator.
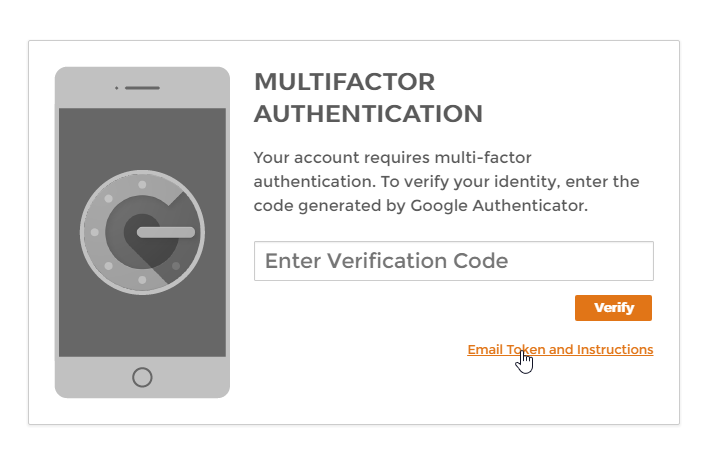
-
To get your token, click Email Token and Instruction.
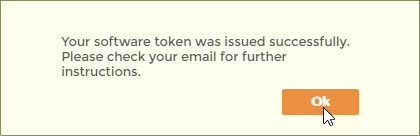
-
Click Ok to close the software token was issued successfully message and then
check your email for further instructions.
-
Follow the instruction for installing Google Authenticator on your phone and then click the appropriate
link to
provision your token.

-
If you read the email from the your computer, clicking the from your PC link generates QR code in the
browser. Scan the
code with a barcode reader from your mobile phone.

-
Next, retrieve the token from Google Authenticator (or Duo if you are using that application), enter it
in the
Verification field and then click Verify.

If you entered the code correctly, and another level of multi-factor authentication is not required on your account, you should be authenticated. The next time you log in to the portal, follow the instructions on the screen.
If you enter the wrong code, you will see a message stating "The passcode entered is incorrect. Please try again." To do so, select your delivery method and request a new code. Once you correctly enter the new code, you will be authenticated. Depending on how your administrator has set things up, if you enter the wrong code repeatedly, you will see a message asking you to restart the login process. To do so, click the Back link.

Using Device Registration
If your organization has enabled device registration for multi-factor authentication, when logging in you will have the opportunity to authenticate using this method as a second factor. If multi-factor authentication is optional for your account, you do not need to use this method.
To use device registration
- Log in to your organization's Web portal as you would normally do so.
-
If multi-factor authentication is optional (or required and you have multiple options available to you),
and you want to
enable device registration for your account, select
Device
Registration
and click Submit.
The MFA options available to you depends on your administrator. You may see more or less options than those shown below.
If device registration is required for your account, you will not see a screen asking you to select a multi-factor option. Instead, you will see the below screen.
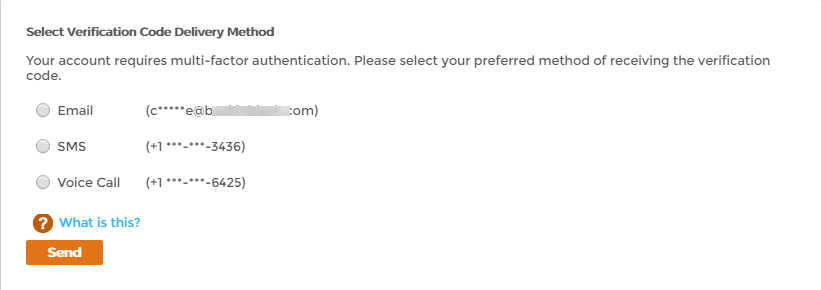
You should see a message asking you to select a verification code delivery method.
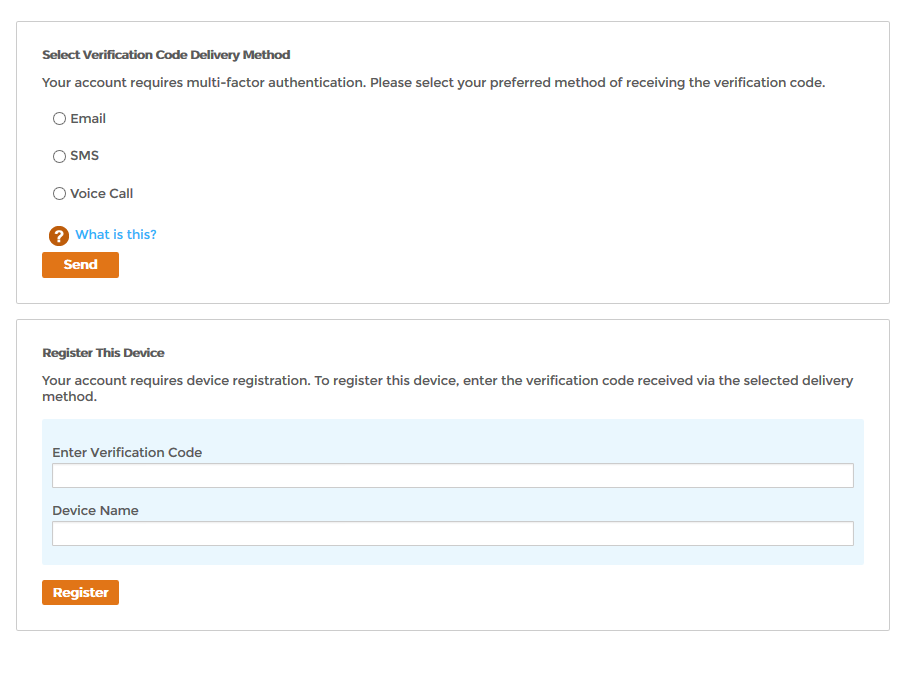
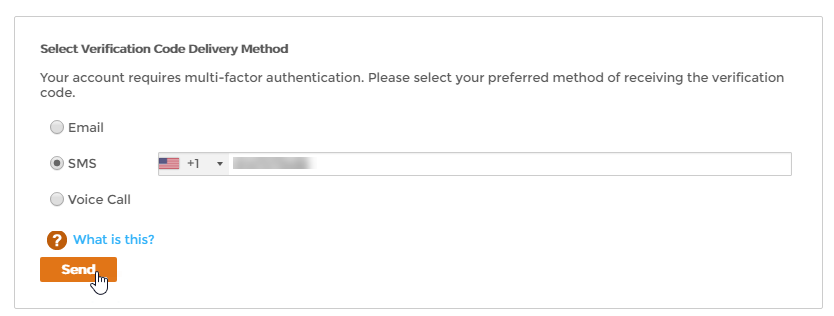
Depending on how your organization is implementing the authentication method, you may not see the SMS and
Voice Call options. -
Select your delivery method, enter the information for that method and then click Send. For example, if you want to have
your verification code sent by SMS enter the appropriate mobile phone number.

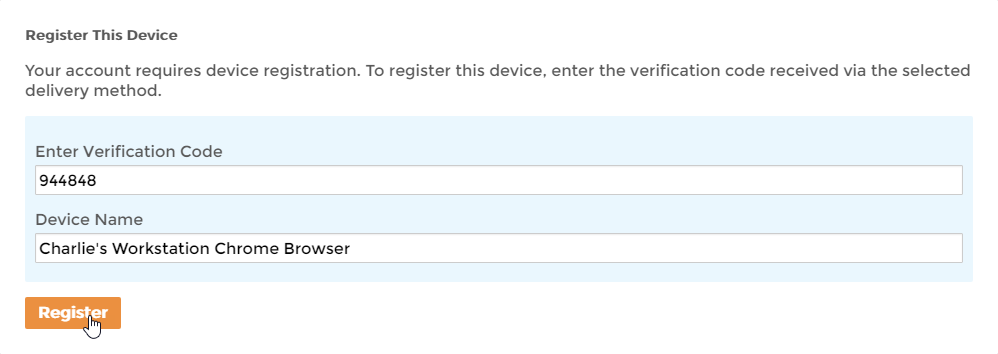
-
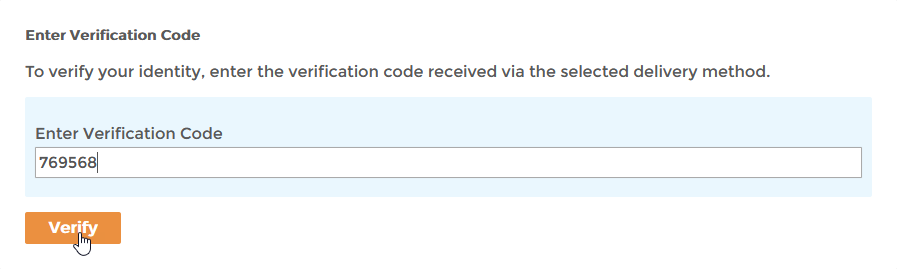
After you receive the code, enter it in the
Enter Verification
Code
field, type a name for your device in the
Device
Name
field and then click Register.
If you entered the code correctly, and another level of multi-factor authentication is not required on your account, you should be authenticated. The next time you access the portal using this device and browser, you can log in simply using your credentials.
If you enter the wrong code, you will see a message stating "The passcode entered is incorrect. Please try again." To do so, select your delivery method and request a new code. Once you correctly enter the new code, you will be authenticated. Depending on how your administrator has set things up, if you enter the wrong code repeatedly, you will see a message asking you to restart the login process. To do so, click the Back link.

If you are asked for another factor, select the desired authentication method and follow the steps shown on the screen.
When using device registration, EmpowerID stores the device registration information in a cookie on the specific browser you used. This means the device registration is only good for that browser and on the specific device you used. If you try to log in using another device—or another browser on the same device—you will need to repeat the device registration process.
Using FIDO 2UF
If your organization has enabled FIDO Universal 2nd Factor for multi-factor authentication, when logging in you will have the opportunity to authenticate using a certificate that is linked to your Yubikey device as a second factor. If multi-factor authentication is optional for your account, you do not need to use this method. However, if multi-factor authentication using FIDO Universal 2nd Factor is required, you must have a Yubikey device issued to you and authenticate using that device before gaining access to your resources.
To use FIDO Universal 2nd Factor as an authentication method, you must use Google Chrome or Opera as your browser. Firefox and Internet Explorer currently do not support the U2F protocol.
To use FIDO Universal 2nd Factor
- Log in to your organization's Web portal as you would normally do so.
-
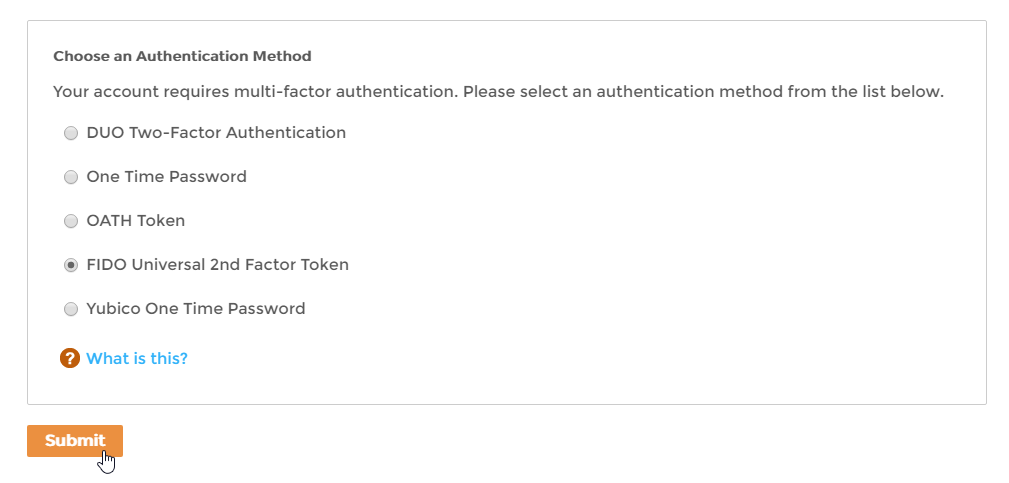
If multi-factor authentication is optional (or required and you have multiple options available to you)
and you want to
enable FIDO Universal 2nd Factor for your account, select
FIDO
Universal 2nd Factor
and click Submit.
The MFA options available to you depends on your administrator. You may see more or less options than shown below.
If FIDO Universal 2nd Factor is required for your account, you will not see a screen asking you to select a multi-factor option. Instead, you will see the below screen.
You should see a message asking you to insert your security key.
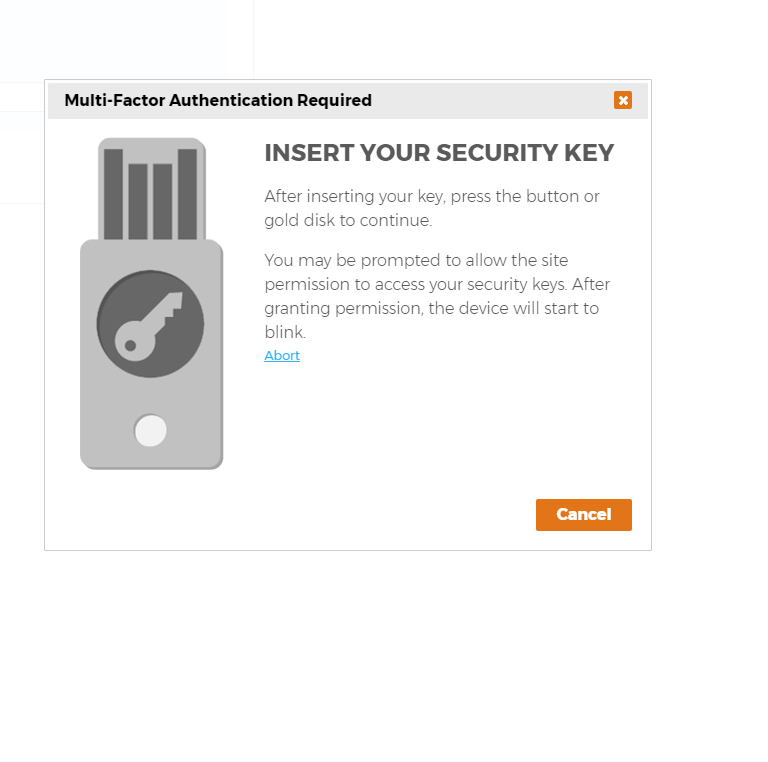
-
Making sure your Yubikey is plugged into your computer, press the button or the gold disk on the key.
Unless another level of multi-factor authentication is required on your account, you should now be authenticated.
If you are asked for another factor, simply select the desired authentication method and follow the steps for that method.
When you use this method of authentication, EmpowerID generates a certificate for the Yubikey that is linked to your EmpowerID Person. No other user can use your Yubikey device to authenticate using FIDO Universal 2nd Factor authentication.
Using EmpowerID One-Time Passwords
If your organization has enabled EmpowerID One Time Passwords for multi-factor authentication, when logging in you will have the opportunity to authenticate using this method as a second factor. If multi-factor authentication is optional for your account, you do not need to use this method.
To use EmpowerID One Time Passwords
- g in to your organization's Web portal as you would normally do so.
-
If multi-factor authentication is optional (or required and you have multiple options available to you)
and you want to
enable One Time Passwords for your account, select
One Time
Password
and click Submit.
The MFA options available to you depends on your administrator. You may see more or less options than shown below.
If EmpowerID One Time Password authentication is required for your account, you will not see a screen asking you to select a multi-factor option. Instead, you will see the below screen. option. Instead, you will see the below screen.
You should see a message asking you to select a verification code delivery method.
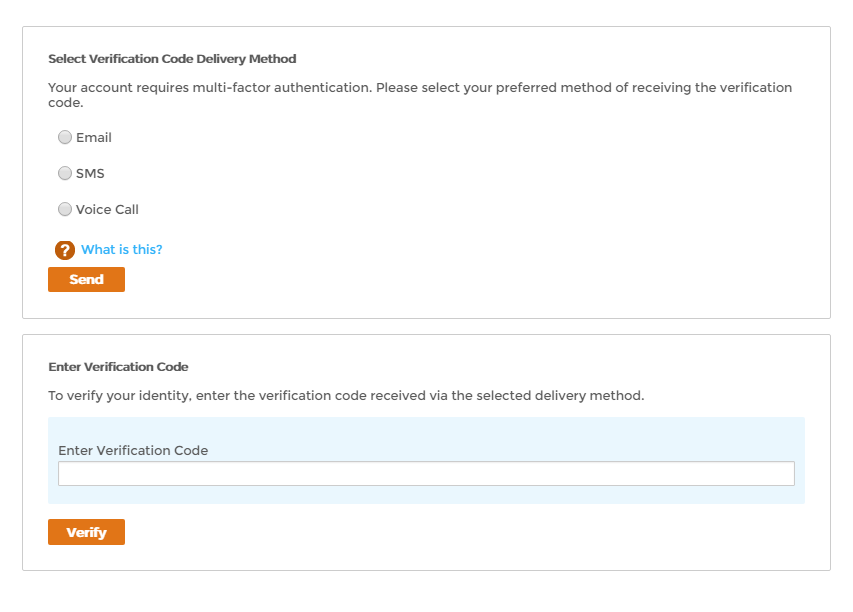
Depending on how your organization is implementing the authentication method, you may not see the SMS and Voice Call options.
-
Select your delivery method, enter the information for that method and then click Send. For example, if you want to have
your verification code sent by SMS enter the appropriate mobile phone number.
-
After you receive the code, enter it in the
Enter Verification
Code
field and then click Verify.
If you entered the code correctly, and another level of multi-factor authentication is not required on your account, you should be authenticated. The next time you log in to the portal, you will be asked to verify your identity with a verification code.
To use FIDO Universal 2nd Factor as an authentication method, you must use Google Chrome or Opera as your browser. Firefox and Internet Explorer currently do not support the U2F protocol.

Using DUO Two-Factor Authentication
If your organization has enabled Duo for multi-factor authentication, when logging in you will have the opportunity to register your Duo Security account in EmpowerID. If multi-factor authentication is optional for your account, you do not need use this method or register your Duo Security account. However, if multi-factor authentication is required, you must register your Duo account before gaining access to your resources.
In order to use Duo, you must have a Duo Security account and have the Duo Mobile app installed on your mobile device. If you do not have a Duo account, you can sign up for one by visiting https://signup.duo.com/. Once signed up, install the Duo Mobile app on your mobile device from the App Store that is applicable to your device.
To use DUO Two-Factor Authentication
- Log in to your organization's Web portal as you would normally do so.
-
If multi-factor authentication is optional and you want to enable Duo for your account, select
Duo
Two-Factor
Authentication and click Submit.
The MFA options available to you depends on your administrator. You may see more or less options than shown below.
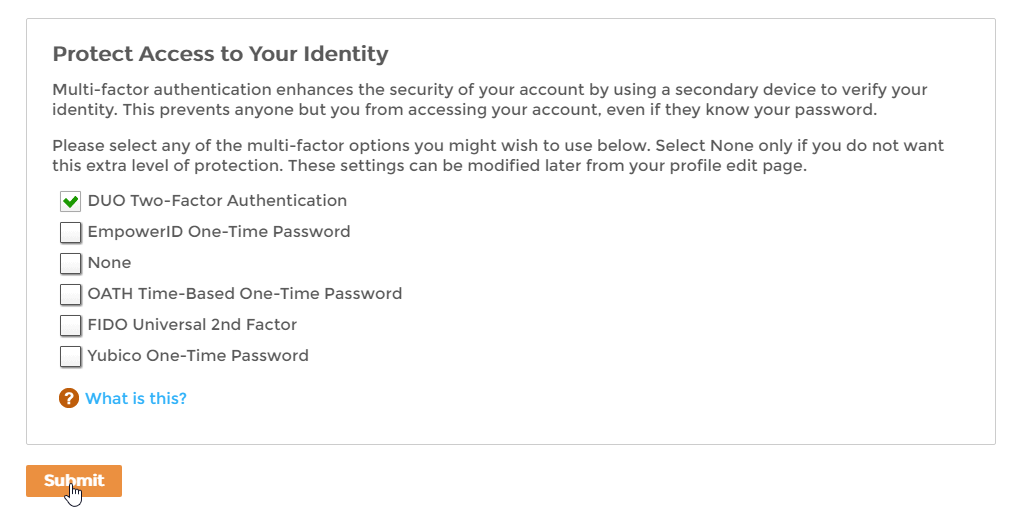
If DUO two-factor authentication is required for your account, you will not see a screen asking you to select a multi-factor option. Instead, you will see the below screen.
You should a message stating that your account requires DUO two-factor authentication.

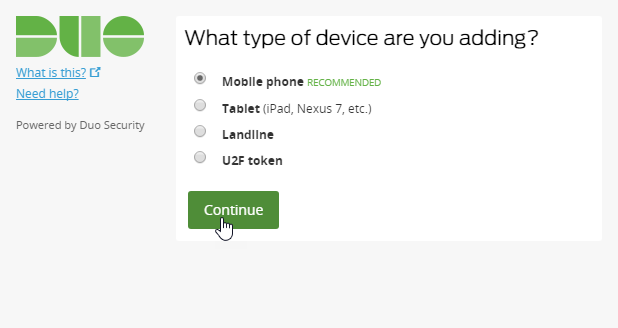
- Click Start setup.
-
Select the type of device you want to add and then click Continue. In this example, we are selecting Mobile phone as
that is the recommended device.
-
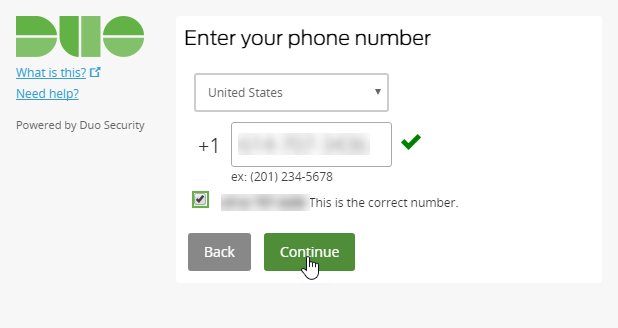
Enter and verify your phone number and then click Continue.
-
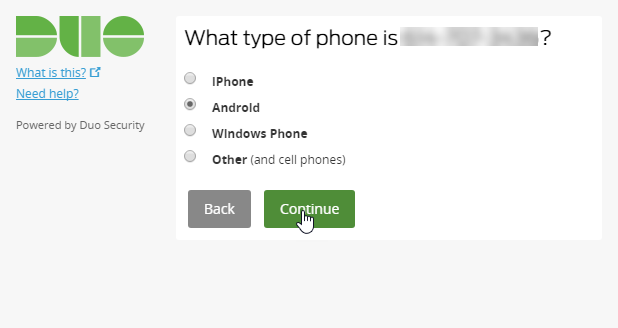
Select the type of phone and then click Continue.
-
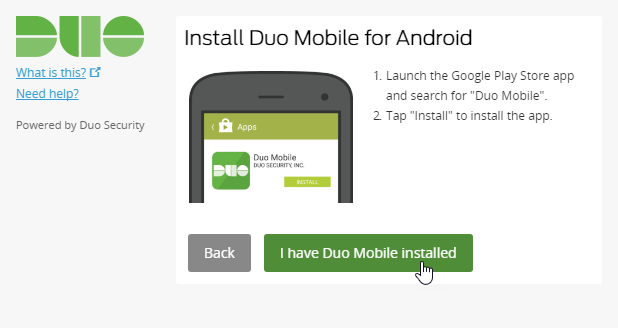
Install Duo Mobile for your phone type and then click
I have
Duo Mobile installed.
.
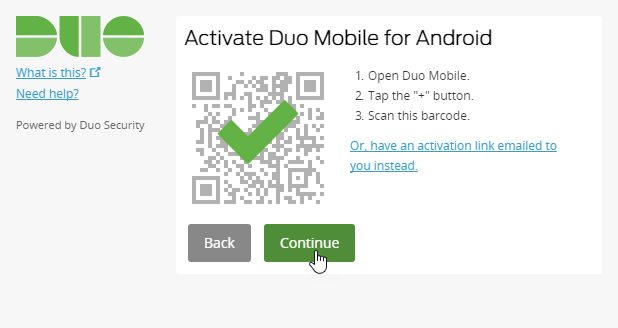
- Activate your Duo Mobile account for your organization by opening the opening the app on your phone, tapping the + button and scanning the barcode displayed on the page.
-
Once you see the green check over the barcode, click Continue.
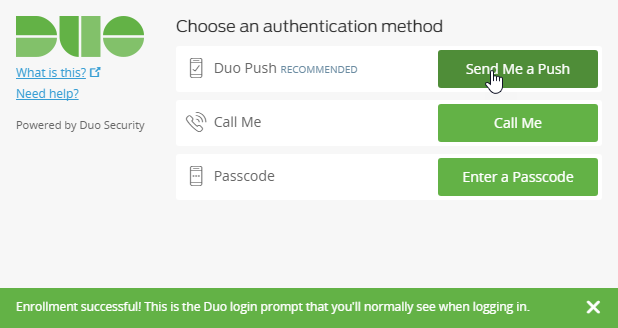
- Select your preferred authentication method from the When I log in drop-down and then click Continue to Login . You can choose to have Duo automatically send a Duo Push to your device, automatically call you or opt to make your choice on a case-by case basis.
-
Proceed to log in and then choose your authentication method. In this example we are selecting Send Me a Push, which is
the recommended method.
- If you selected Send Me a Push, Duo sends a notification to your mobile device. To continue to log in, click Approve and then Confirm.
Editing Your Multi-Factor Communication Options
When you enroll for multi-factor authentication (MFA), depending on the MFA method selected, you may need to provide EmpowerID with a preferred delivery method for receiving verification codes. Depending on how your administrator has configured your environment, delivery methods (also known as MFA communication options) could include email, SMS or voice call. When you select a delivery method, EmpowerID prompts you to enter the details for that method (such as your email address or phone number). You then verify your ownership of the email address or phone number by entering the code EmpowerID sends to it. Once verified, EmpowerID adds that communication option to your person as a trusted phone number or email address. The next time you perform an MFA method that requires a verification code, EmpowerID delivers it using this delivery method. If your phone number or email address changes, or you want to add additional phone numbers, email addresses and delivery methods (such as a voice call) you can do so from your person profile page. This article shows you how.
To edit your multi-factor communication options
-
From any page of the EmpowerID Web interface, click your name and then select View Profile.
This directs you to your personal profile page.

-
From your profile page, click your display name link to go to your profile edit page.OATH Token and click Submit.
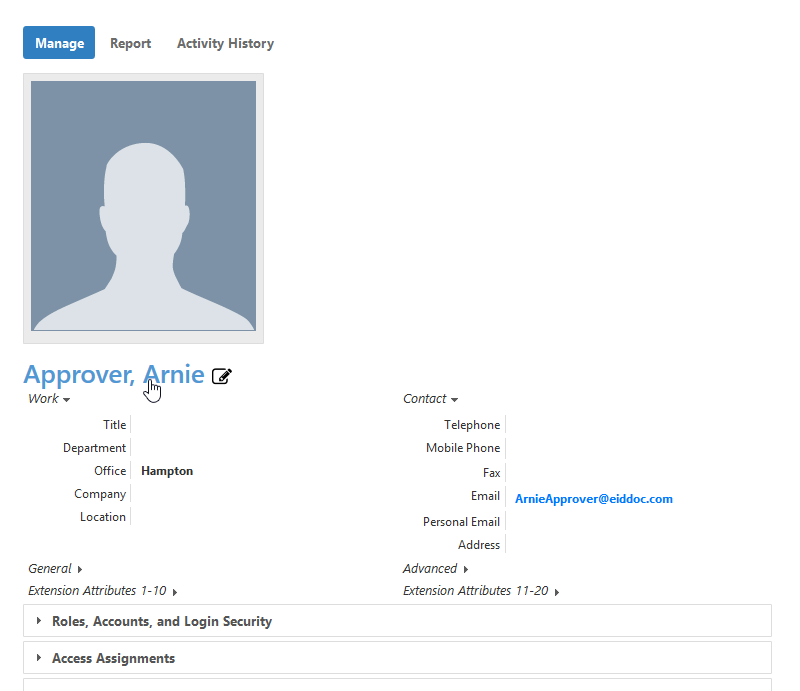
-
From your profile edit page, click the
Contact
Information
tab.
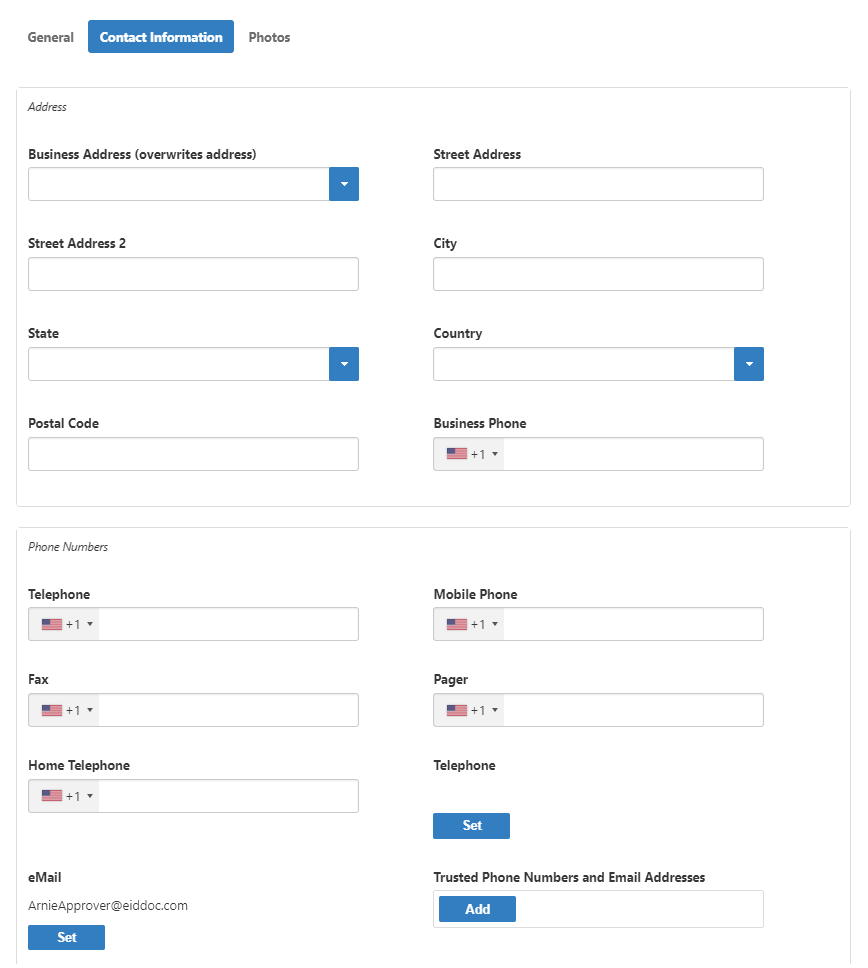
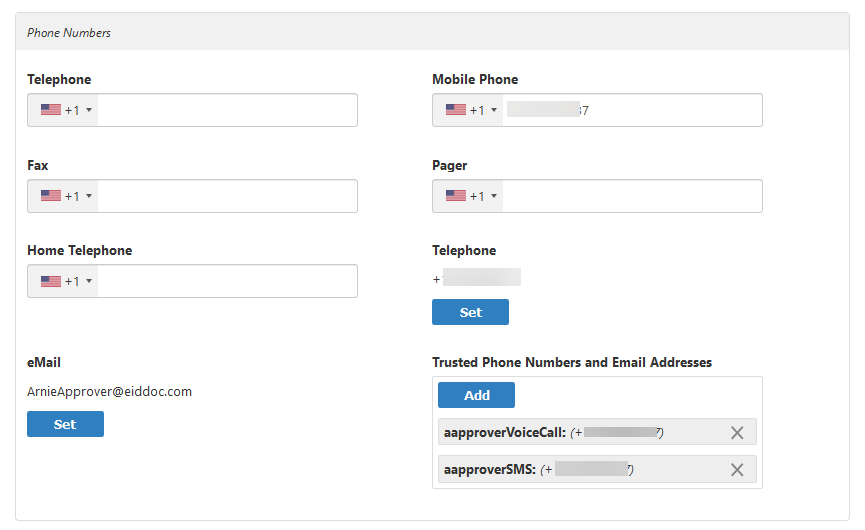
If you enrolled for multi-factor authentication and selected a preferred delivery method, you will see it in the Trusted Phone Numbers and Email Addresses pane of the Phone Numbers section. In the below image, the user selected SMS as their preferred delivery method.
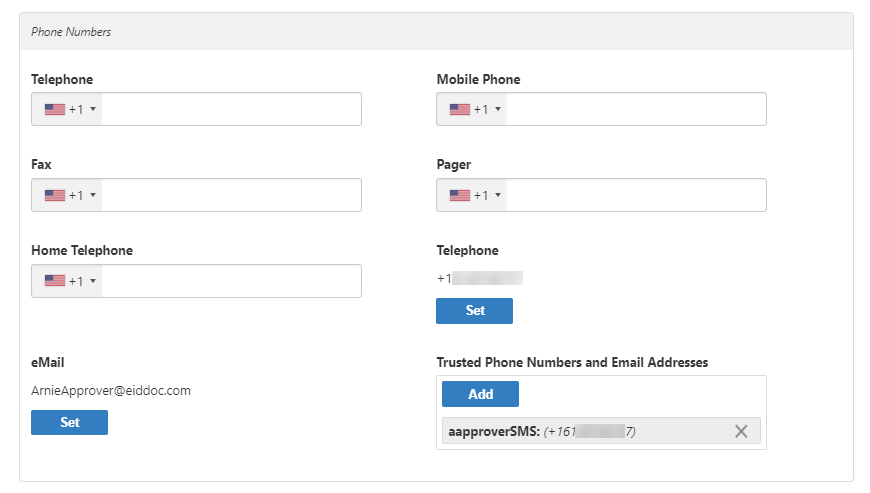
-
To add a new trusted phone number or email address do the following:
-
a. From the Trusted Phone Numbers and Email Addresses pane, click the Add button.
This opens the Add Multi-Factor Communication Option modal.
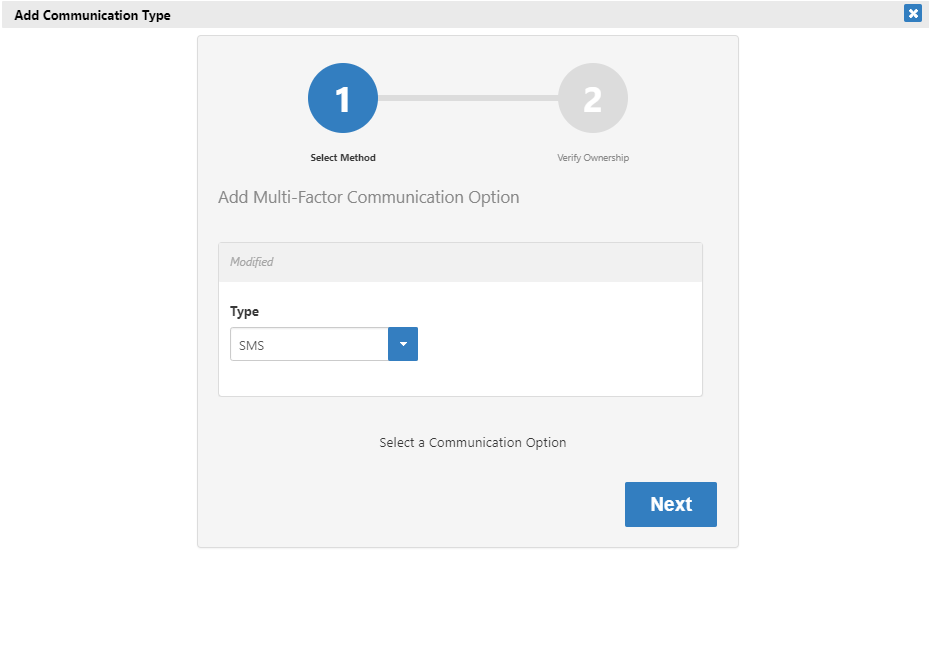
-
b. Click the Type drop-down and select the
communication type you want to add.
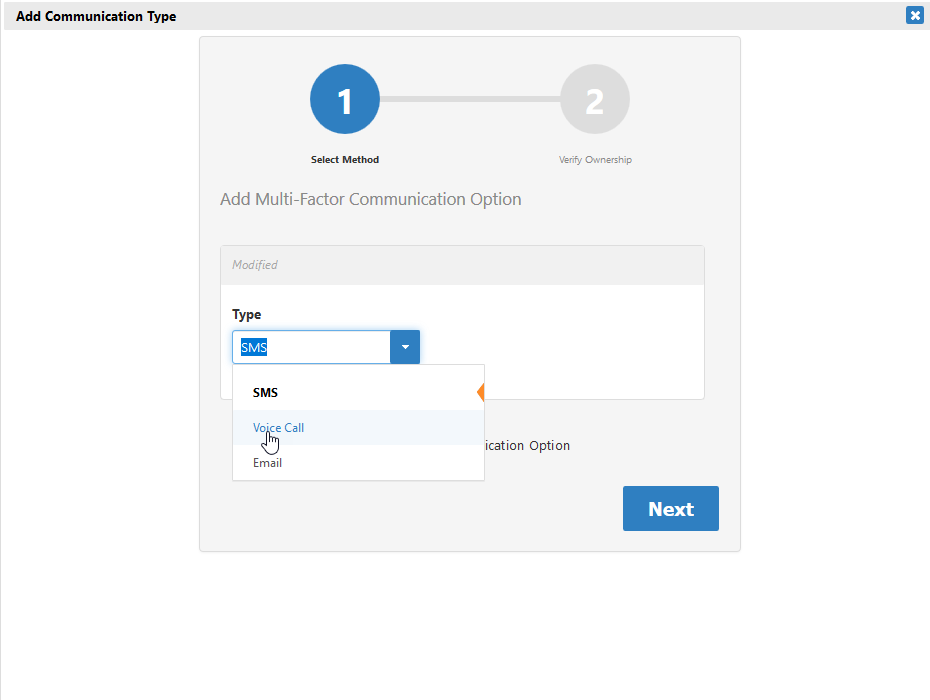
- c. Click Next
-
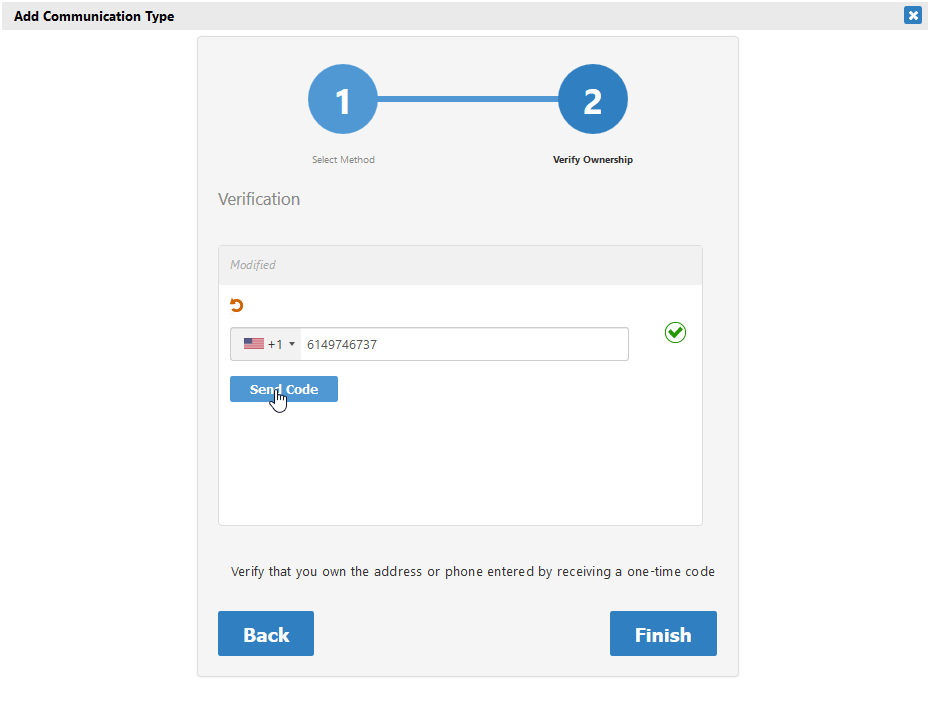
d. Depending on the communication type you selected, enter the appropriate phone number or email
address and click Send Code
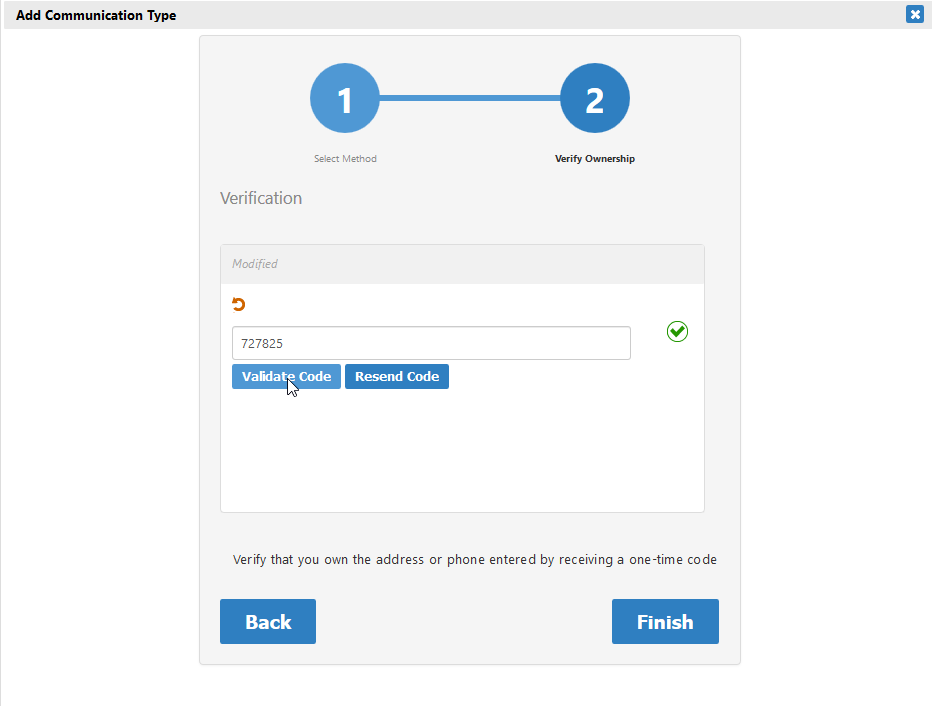
-
e. Enter the code you received and then click
Validate
Code
.
If you entered the code correctly, you should see a Code Is Valid message
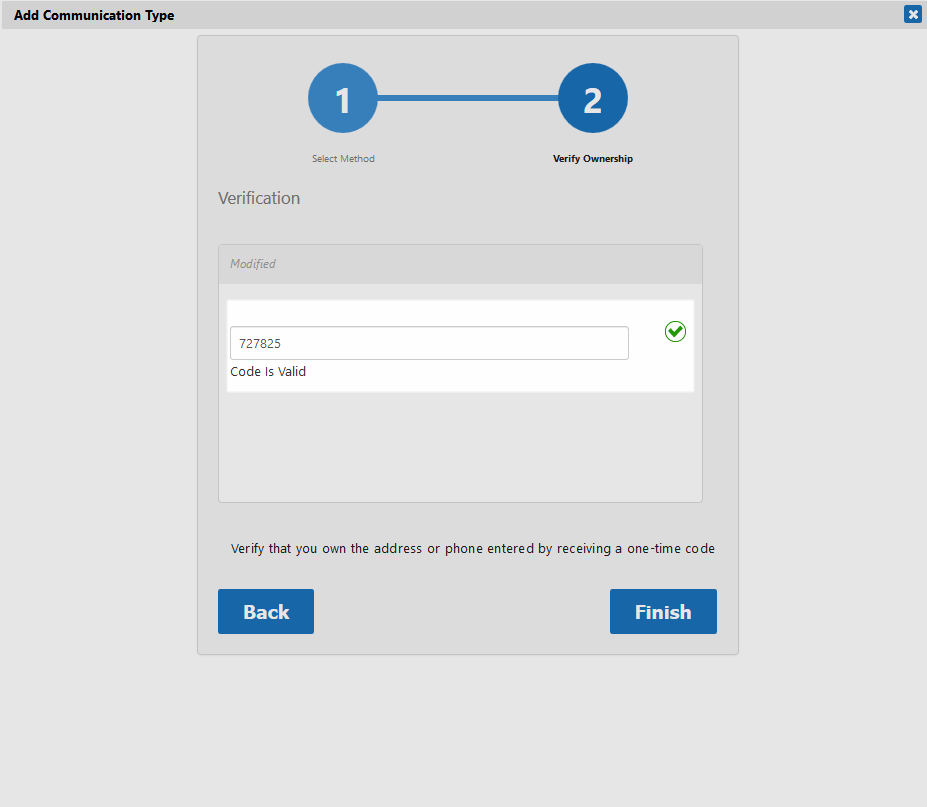
-
f. Click Finish
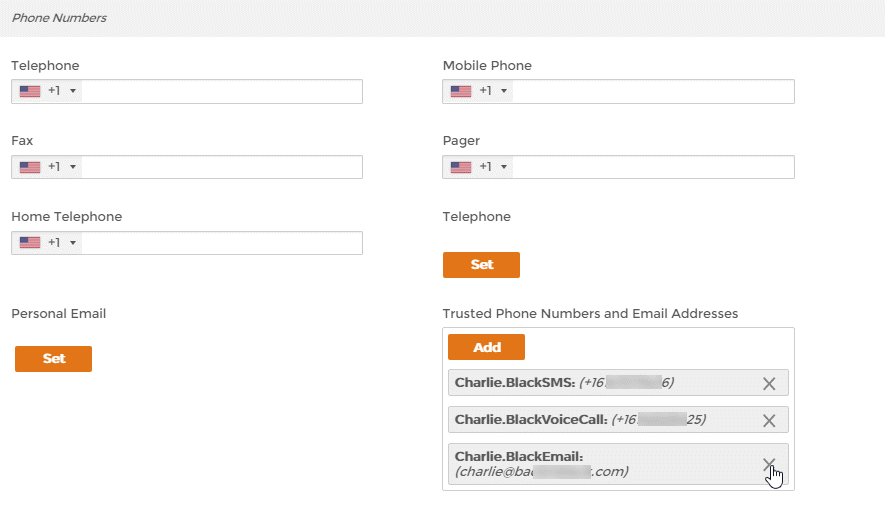
You should see the new communication type added to your trusted phone numbers and email addresses.
The next time you do a MFA method that requires a verification code be sent to your phone or email address, you can select any of your trusted phone numbers and email addresses as the delivery method.
You can delete a trusted phone number or email address by clicking the "X" beside the one you want to delete.
-
a. From the Trusted Phone Numbers and Email Addresses pane, click the Add button.
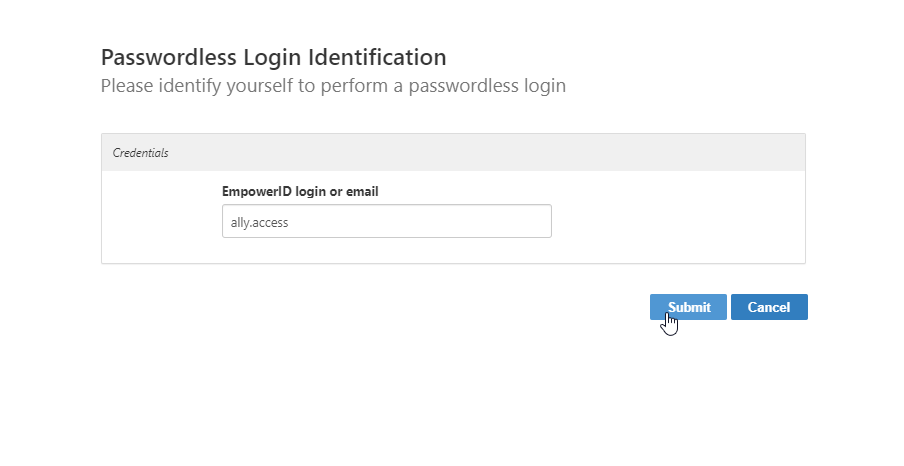
Using Passwordless Login
If your organization has enabled Passwordless login, you can login to your organization's site without needing to use your password. You authenticate using your EmpowerID user name or email address and one or more of the MFA types—such Device Registration and EmpowerID One-Time passwords —associated with your Password Manager policy.
To login using Passwordless login
-
Point your browser to your organization's Web portal and then click the Passwordless Login link.
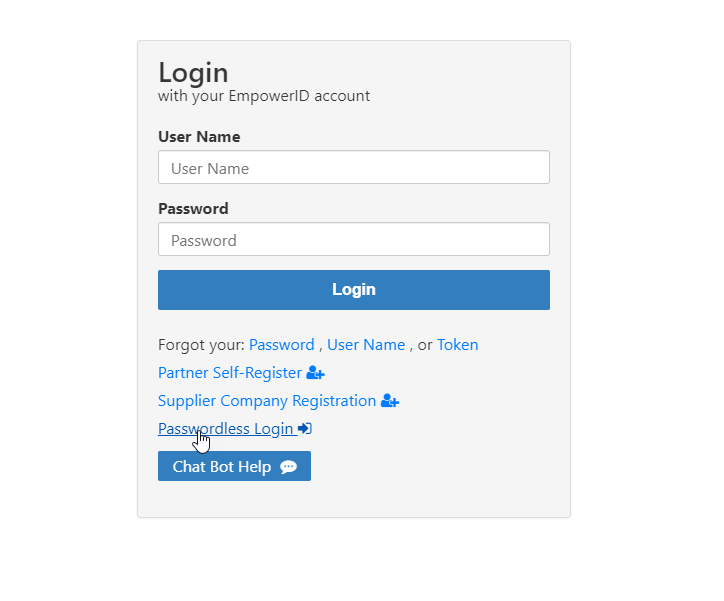
-
Enter your EmpowerID login or email address and then click Submit.
-
If you have not yet chosen an authentication method, you will be prompted to select one as shown below.
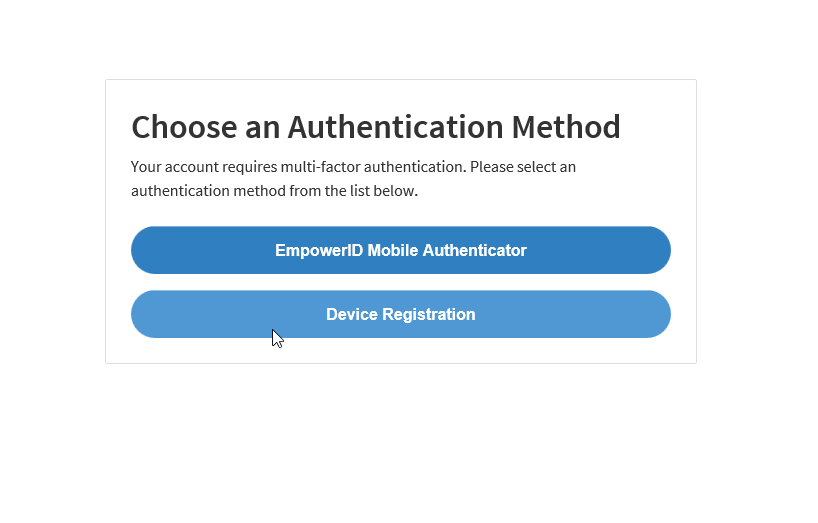
If you have already authenticated with an authentication method, you can simply authenticate using that method.
-
Follow the prompts to finish the selected authentication method.
Unless another level of multi-factor authentication is required on your account, you should now be logged in. The next time you choose Passwordless login, simply authenticate using your selected authentication method(S).
If you are asked for another factor, select the desired authentication method and follow the steps shown on the screen.
Installing the EmpowerID Mobile App
The EmpowerID Mobile App can be installed from the App Store for iOS and the Google Play Store for Android. Follow the instructions below for your device's operating system.
iOS
- Open the App Store on your iOS device.
- Search for EmpowerID.
- Locate the EmpowerID app and touch Get.
Android
- Open the Play Store on your Android device.
- Search for EmpowerID.
- Locate the EmpowerID app and select Install.
Registering a Mobile Device
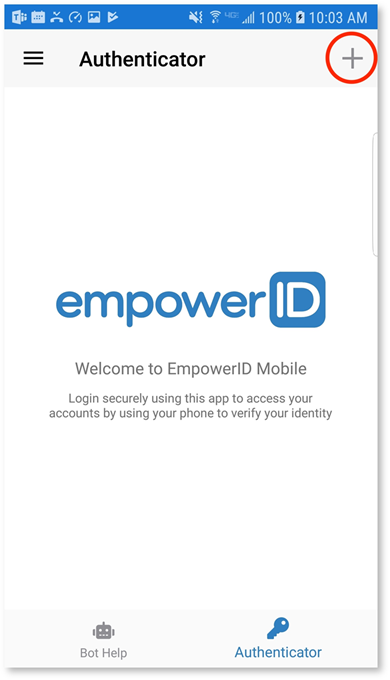
Registering a Mobile Device to an account allows users to use Push and Passcode Multi-factor Authentication for logging into their EmpowerID account. If your administrator has made Mobile App Push an available MFA option in your Password Manager policy and MFA is required for your login, you will see an option to select Mobile App Push along with your other MFA options during login. The first time you select Mobile App Push, EmpowerID knows that you have not yet registered a mobile device and will show a QR code on the screen to allow registration of your phone. When the QR code is showing on the screen perform the following steps.
- Open the EmpowerID App.
-
In the Authenticator View, touch the + icon to open the QR Code Reader.
-
Scan the QR Code on your computer screen.
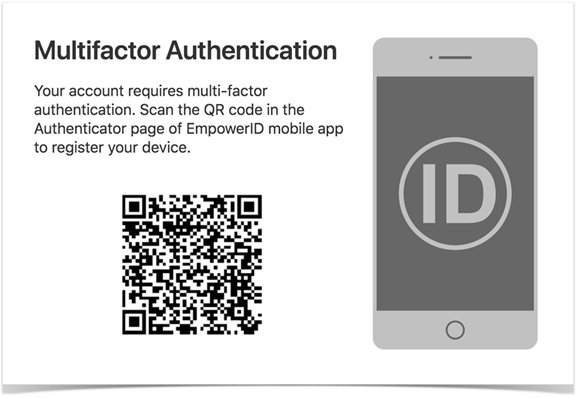
-
You will see the new account in your account list.
An EmpowerID account may not be registered more than once on a single device. Multiple devices may be registered to EmpowerID account and multiple accounts can be registered to the same device.
If your EmpowerID person already has registered a mobile phone, you will not see the QR code during login to add another. You may return to this initial state by having an admin delete your Mobile Phone MFA Asset.
Note: Passwordless login does not allow registration of a Mobile Phone for security purposes.
Sending a Push
Using the EmpowerID Mobile App, use Push Authentication to login to EmpowerID.
NOTE: If you see a QR code when logging in, you need to register at least one device for your account. Refer to Register a Mobile Device.
- Open the EmpowerID App.
-
Click Send Push
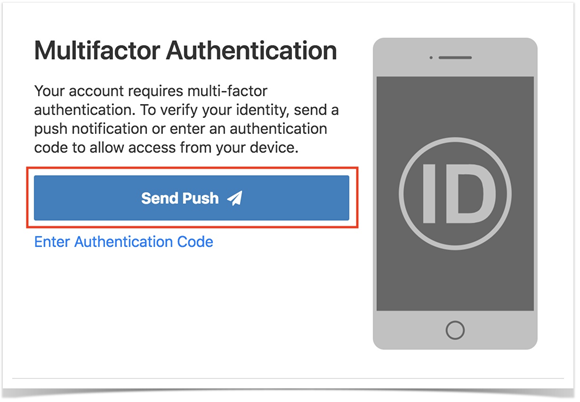
-
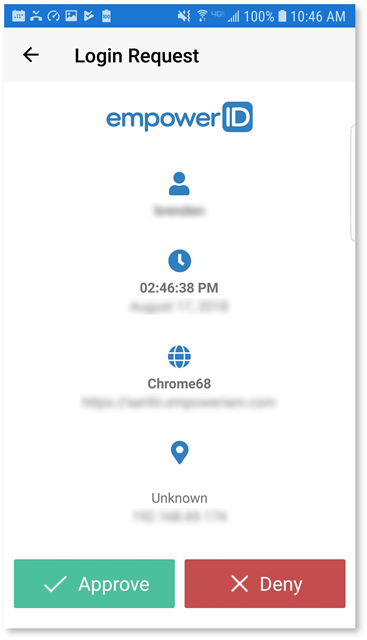
In your mobile device, open the EmpowerID mobile app and touch Approve. The authentication process is completed and you
are logged into EmpowerID.
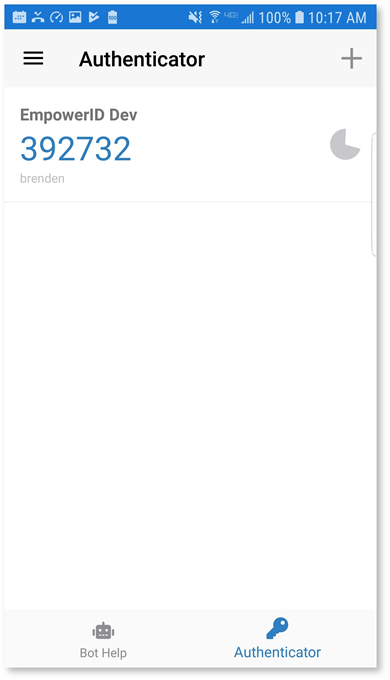
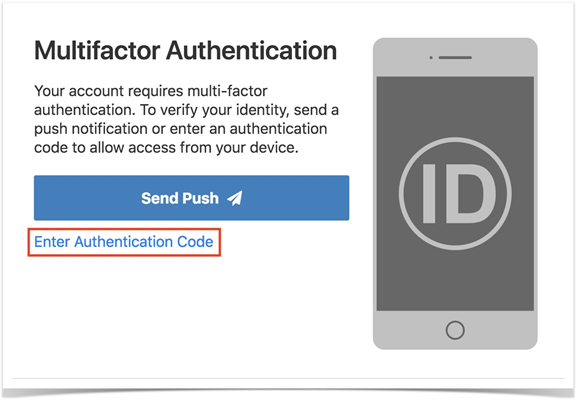
Submitting an Authentication Code
Using the EmpowerID Mobile App, use Passcode Authentication to login to EmpowerID.
NOTE: If you see a QR code when logging in, you need to register at least one device for your account. Refer to Register a Mobile Device.
- Login to EmpowerID.
-
Click the Enter Authentication Code link.
- On your mobile device, open the EmpowerID mobile app and touch Allow when prompted with the push notification. The authentication process is completed and you are logged into EmpowerID.
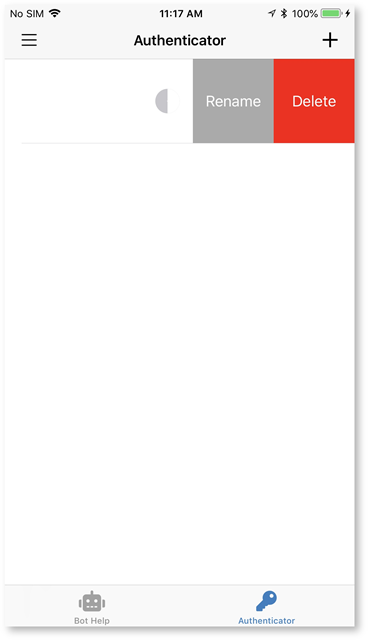
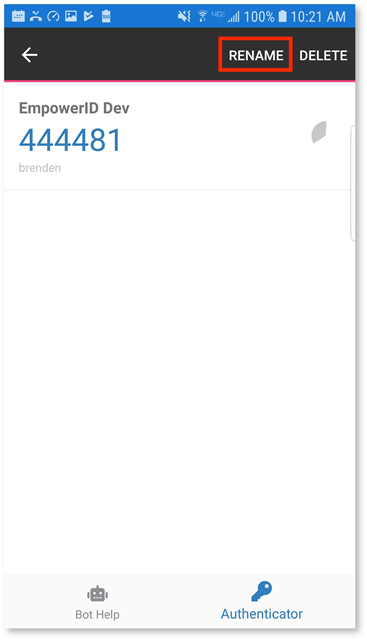
Editing the Name of an Account
To edit the name of an account in the EmpowerID Mobile App.
-
Open the edit name dialog.
-
iOS -- Swipe left on the account list item and
touch the Rename action.
-
Android -- Long press the account list item and
touch the Rename action.
-
iOS -- Swipe left on the account list item and
touch the Rename action.
-
Enter a new account name.
Names are restricted to letters and numbers.
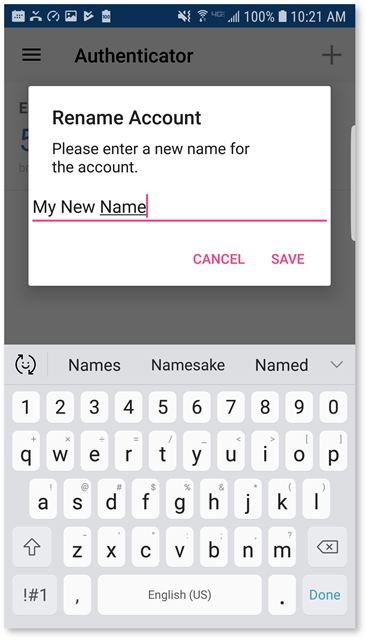
-
Touch Save to save the new account name. You should see the app update to show the new name.

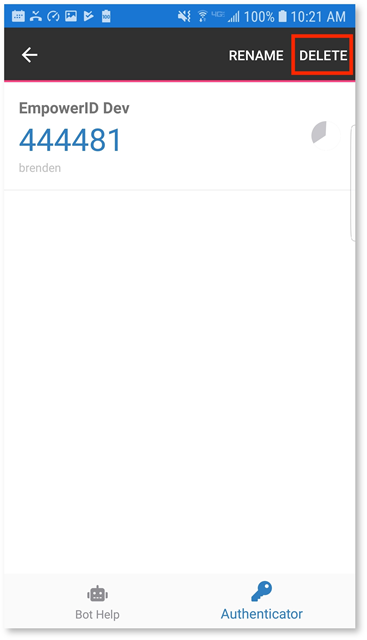
Deleting a Registered Mobile Device
To delete a registered mobile device in the EmpowerID Mobile App
-
Touch the delete action.
-
iOS -- Swipe left on the account list item and
touch the Delete action.

-
Android -- Long press the account list item and
touch the Delete action.
-
iOS -- Swipe left on the account list item and
touch the Delete action.
-
Touch Okay to confirm account deletion.

IT Shop Overview
The IT Shop makes requesting access to resources easy. Instead of navigating throughout the Web site looking for a specific resource—like an application, a role or a group, or a hard asset like a laptop—you can go to the IT Shop.
The IT Shop allows you to quickly see what resources you currently have access to and shop for more—both for yourself and for others. You simply search for what you want and put it in your cart. Once an item is placed in the cart, it stays in the cart until you check out or remove it. In this way, you can go about your business, navigating away from the IT Shop and even logging out of the EmpowerID Web application without losing the contents of your cart. When you are ready to checkout, that is, submit your access request(s), you review the items in your cart, add a reason for requesting those items and click Submit. Your requests then route for approval—first to managers and then to those with the RBAC delegations needed to make the final decision.

IT Shop Pages
The IT Shop contains the following four pages.
Find Resources
The Find Resources page (shown in the image above) contains all resources that have been published to the IT Shop. This page is the page you see when shopping for resources. From this page, you can search for and request access to any resources in the shop. Once your requests are in your cart, you simply submit them and wait for a response. If you have been given the delegations needed to access the resources without needing approval, the EmpowerID system grants you immediate access.
Resources in the IT Shop are divided by resource type (mailboxes, groups, shared folders, etc.) to allow you to filter the items for which you are shopping. You can tell which filter is being applied to the IT Shop by the image associated with the Search field. To change the filter, you select the image that represents the resource type. These filters are as follows:
Filters
Filter Image

Filter
This is the unfiltered or default view of the IT Shop. When you see this filter in the IT Shop Search field, your search returns all published resources having the searched for parameter. Thus, if you pass in "Bike Team" as your search parameter and there is a shared folder named "Bike Team," a mailbox named "Bike Team," and a group named "Bike Team," all three resource items are returned.

Filter Image

Filter
This is the application filter. When you see or apply this filter to the IT Shop Search field, your search returns published applications only.

Filter Image

Filter
This is the asset filter. When you see or apply this filter to the IT Shop Search field, your search returns published assets only.

Filter Image

Filter
This is the mailbox filter. When you see or apply this filter to the IT Shop Search field, your search returns published mailboxes only.

Filter Image

Filter
This is the group filter. When you see or apply this filter to the IT Shop Search field, your search returns published groups only.

Filter Image

Filter
This is the Management Role filter. When you see or apply this filter to the IT Shop Search field, your search returns published Management Roles only.

Filter Image

Filter
This is the Shared Folder filter. When you see or apply this filter to the IT Shop Search field, your search returns published shared folders only.

My Resources
The My Resources page provides a central location for you to see all the resources to which you currently have access, as well as the type of access to those resources you have. Similar to the Find Resources page, the My Resources page can be filtered to show resources by resource type.
The image below shows the My Resources page with the application filter applied.

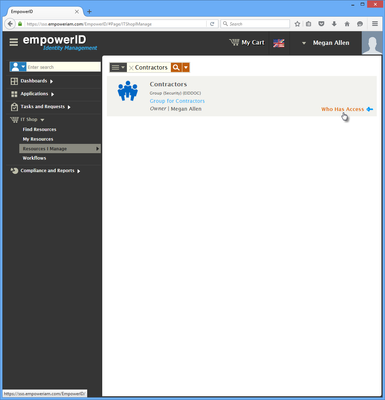
Resources I Manage
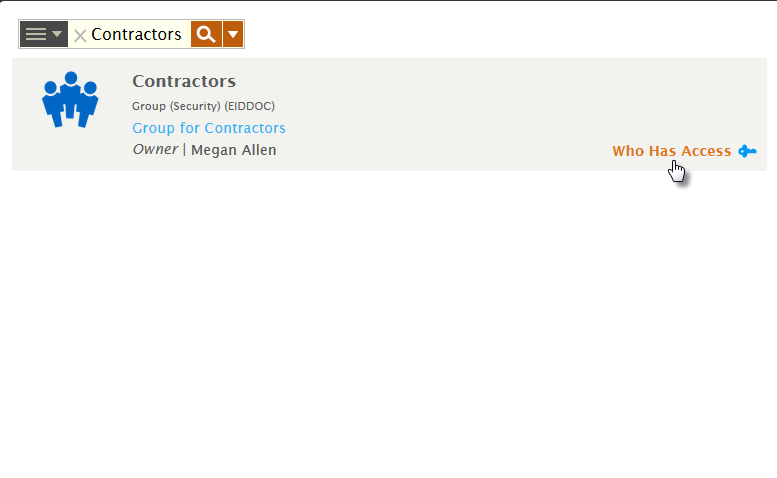
The Resources I Manage page provides a central location for you to see and manage all the resources for which you are a resource owner. In EmpowerID, resource owners are delegated with the ability to grant other users access to those resources. As with the Find Resources and My Resources pages, the Resources I Manage page can be filtered by resource type.
The below image shows the Resources I Manage page with the shared folder filter applied.

As shown in the image above, each resource item record contains an Who Has Access link. When clicked, this link opens an Assignee pane, which allows the resource owner to see who currently has access to the resource and the type of access they have, as well as provides them with the ability to grant new access assignments against the resource.

Workflows
The Workflows page provides a central location for you to access any self-service workflow to which you are entitled, such as the Change Your Password and Edit Your Profile Information workflows.

Requesting Access to Resources
If you need access to resources you currently do not have, you can submit an access request for those resources from the IT Shop. As long as you have the ability to shop in the IT Shop and your organization has made the resource requestable. If you have the ability to shop in the IT Shop, but do not see the specific resource you want, most likely your organization has not made that resource requestable.
Once you find the resource for which you are looking and submit your request, EmpowerID sends the request to the Tasks and Requests Center for the appropriate people to either approve or reject. As the requesting person, EmpowerID places the request in your personal Request Center, where you can view the status of the request and see who has the ability to approve it.
To request access to resources
-
From the Navigation Sidebar, expand t IT Shop and click
Find Resources.
If you do not see a node for the IT Shop in the Navigation Sidebar, this means you have not been given access to the IT Shop and cannot request access to new resources.
-
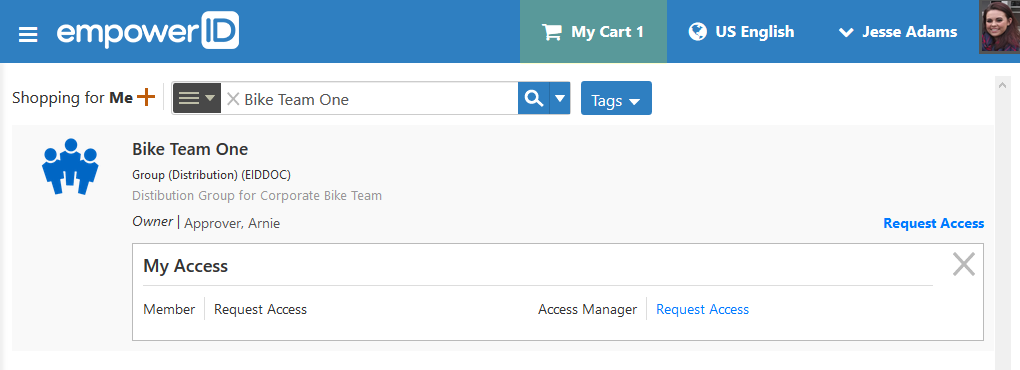
In the IT Shop, search for the resource you are requesting and then click the Request Access link for that resource.
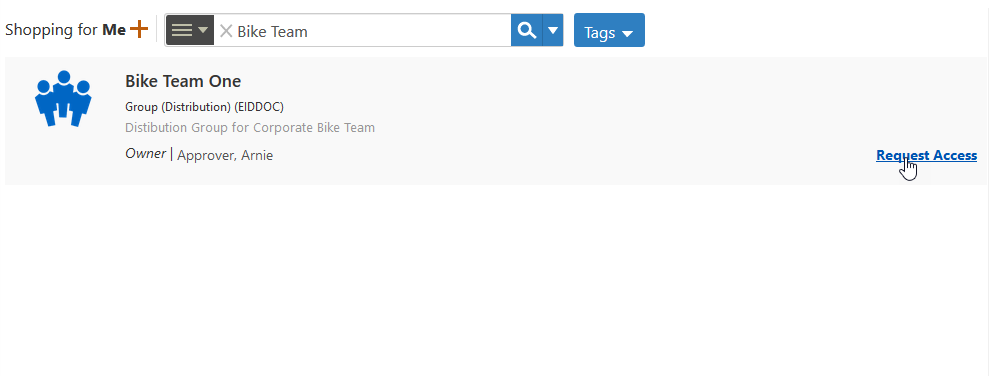
-
Click the link beside the type of access you are requesting.
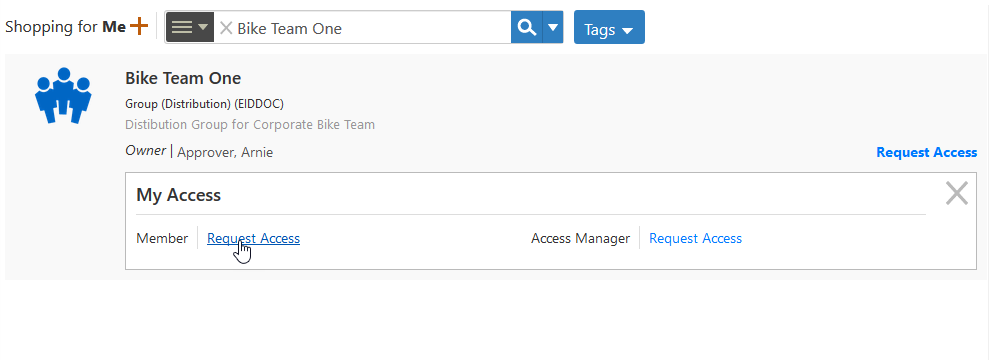
-
Click Save.
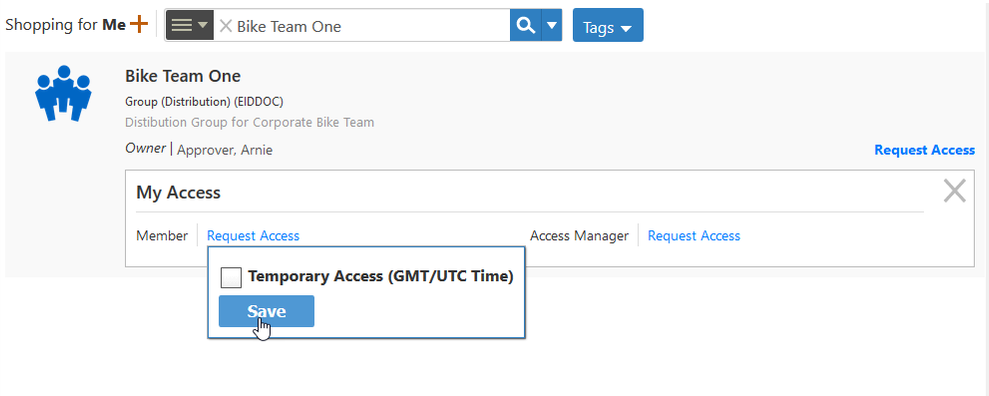
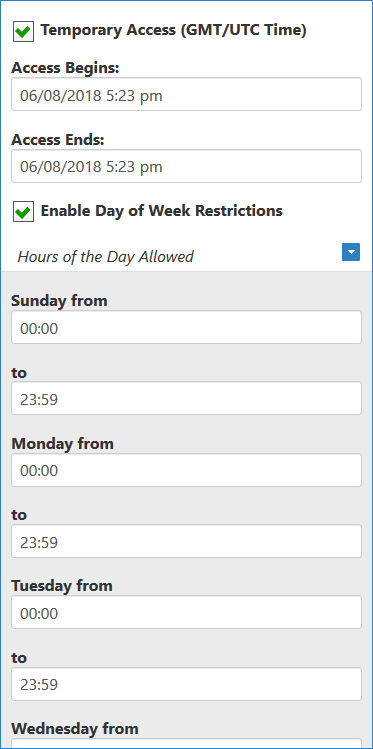
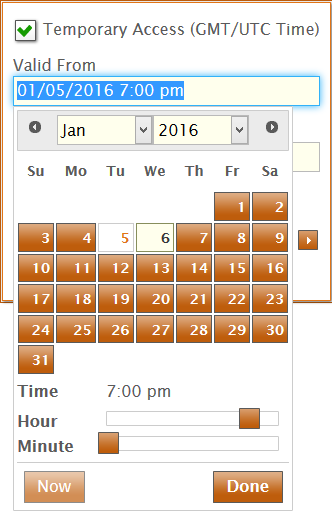
The Temporary Access option allows you to put date and time constraints on the access request. In this way, if you are a manager who is shopping for others, you can choose to limit the access assignment for that person when permanent access is not necessary.
When this option is selected, you set the date and time ranges by clicking in the Access Begins and Access Ends fields and picking the appropriate values from the Calendar.
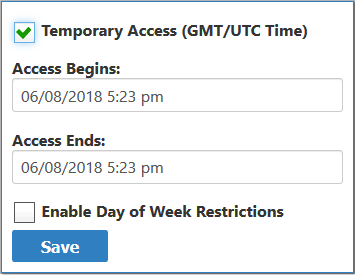
Additionally, you can restrict the access to certain days and hours of the week by clicking Enable Day of Week Restrictions > Hours of the Day Allowed and setting the restrictions in the from and to fields for each day.
This adds the request to the shopping cart.
-
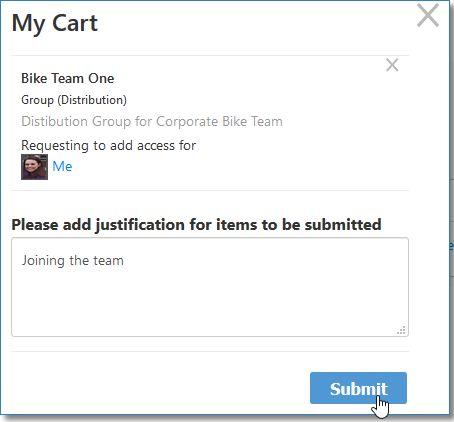
Click the shopping cart, type a reason for the request in the cart dialog and then click Submit.
EmpowerID sends the request for approval. You can view the status of your request in the Request Center. For more information, see Viewing the Status of Your Access Requests.
Viewing Your Request Status
When you submit requests for resources and those requests go for approval, you can view the status of those requests in the Request Center, and interact with them further if needed.
To view the status of your access requests
-
From the Navigation Sidebar, expand Tasks and Requests
Workflow Tasks and click
Requests Pending.
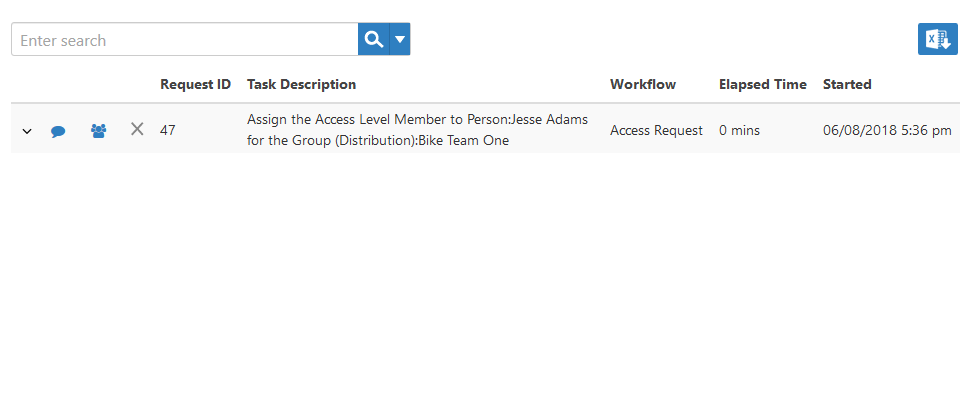
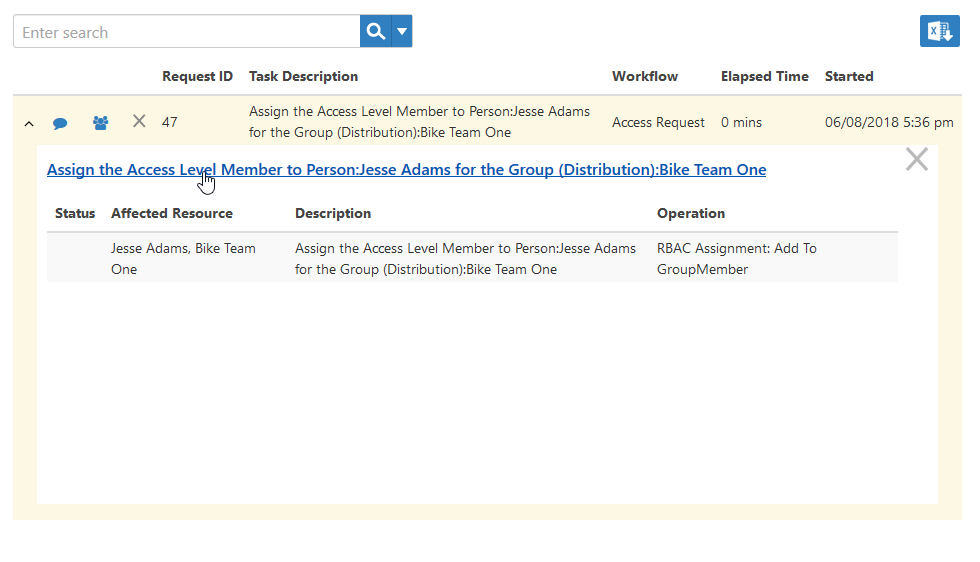
This opens your personal view of the Request Center, which display all requests you have submitted that have yet to be acted on.
-
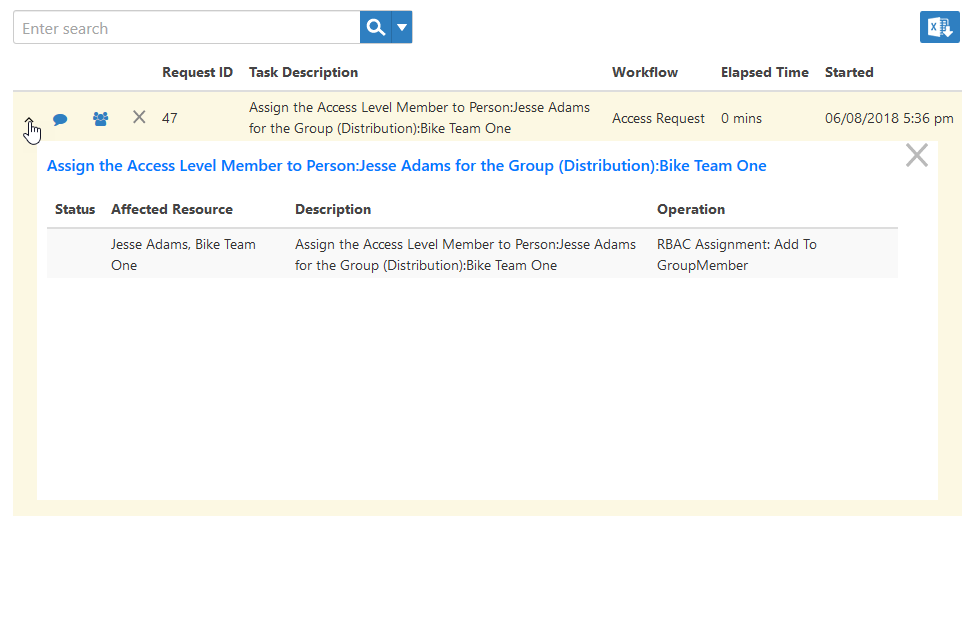
Select an open request and click the drop-down arrow beside the request. This allows you to view more
detailed information about the request as well as provides a link to the Task Details page for the
request.
Clicking the balloon icon to the right of the drop-down arrow opens the Comments pane for your request. This pane allows you to view any comments made by you, as well as any made by potential approvers.
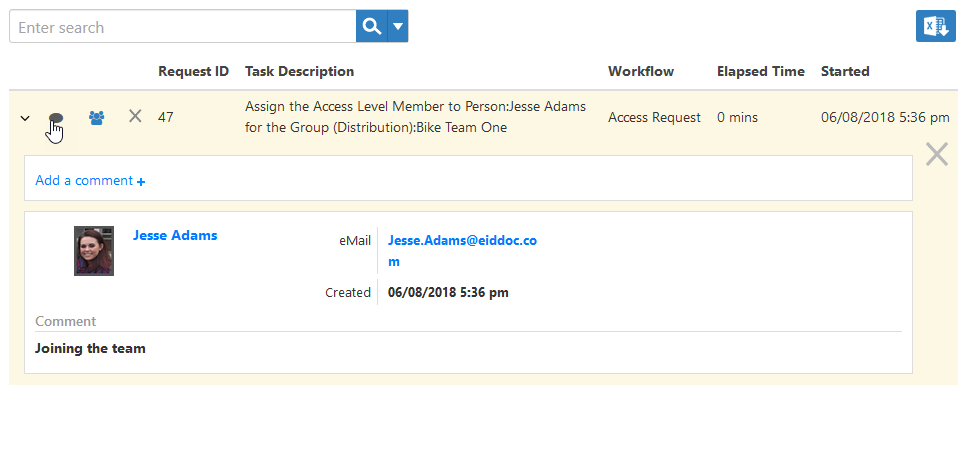
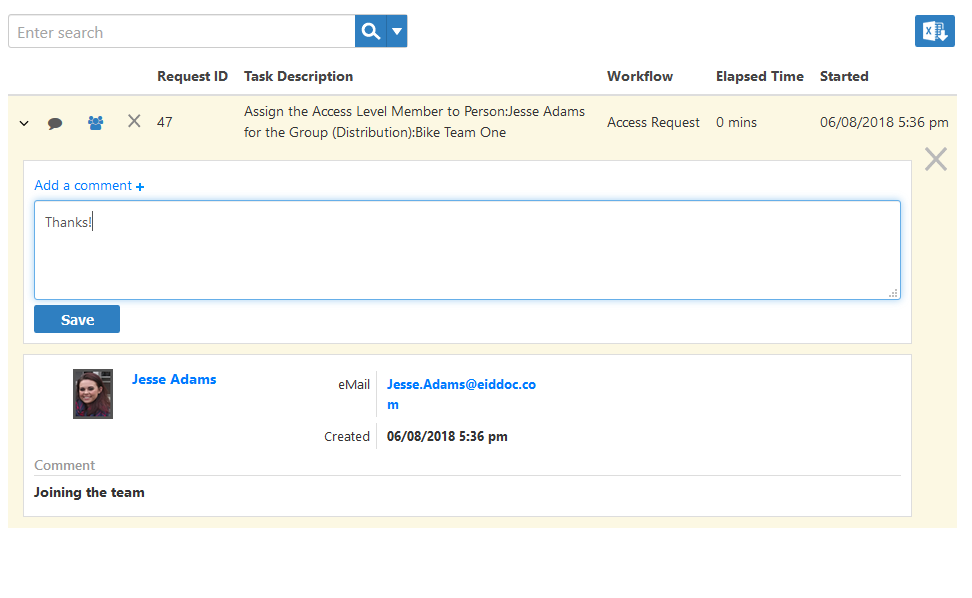
You can add new comments to the request by clicking the Add a comment link and typing your comments in the text field that appears.
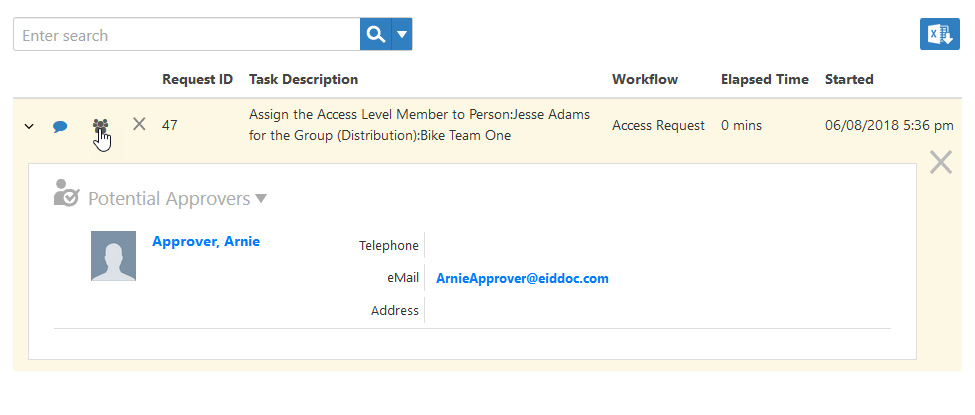
Clicking the person icon to the right of the balloon icon opens the Approvers pane for your request. This pane allows you to view all potential approvers of your request.
-
If you wish to go to the Task Details page for the request, click the link for the access request.
The Task Details page allows you to quickly see the status of the task as well as provides several accordions that when expanded allow you to view specific information about the task. These accordions are as follows:
-
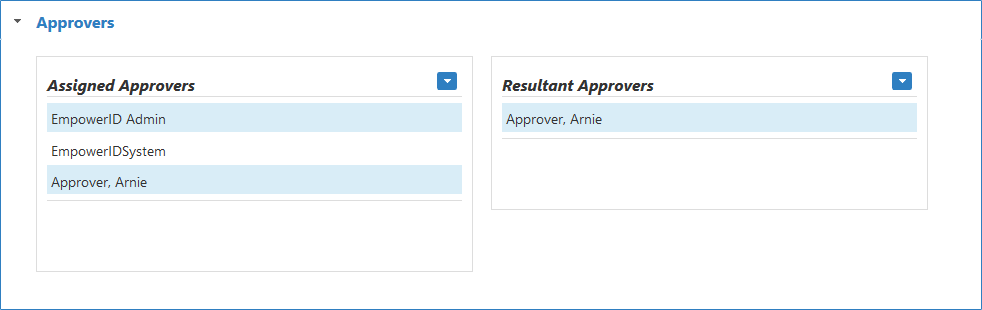
Approvers Accordion — This accordion displays
all possible approvers of the request.
-
Comments Accordion — This accordion displays
the comments you made initially when justifying your request as well as any comments made by a
potential approver. You can also add new comments to the request from the accordion. To do so,
you type the new comment in the Add Comment
field and press ENTER.

-
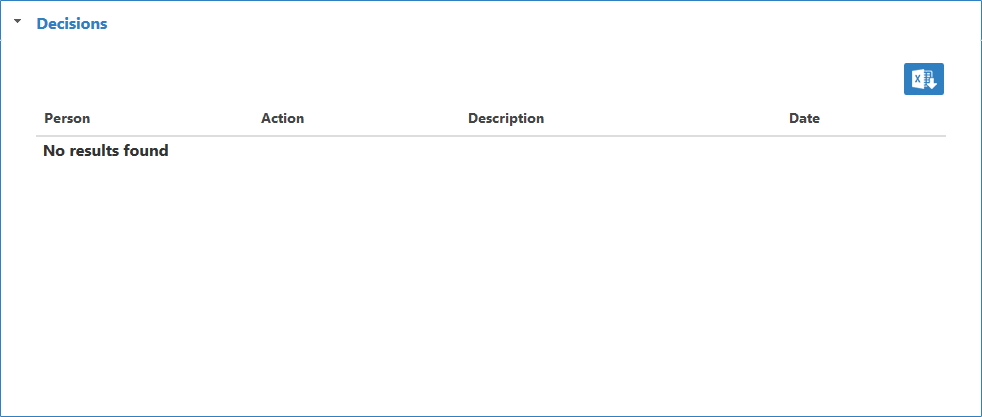
Decisions Accordion -- This accordion allows
you to view any decision made concerning the request.
-
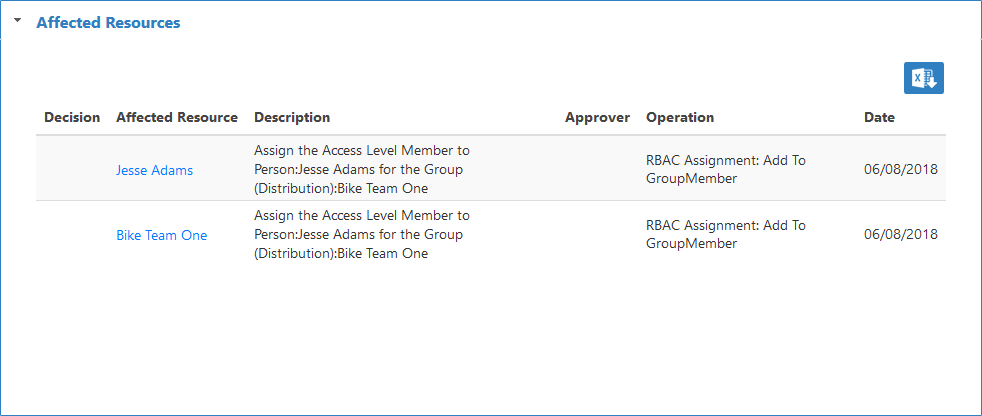
Affected Resources Accordion -- This accordion
allows you to view the resources involved with your request. The affected resources will always
include your person (which is a resource in EmpowerID) and the resource you want to access.
-
Process Flow Accordion -- This accordion allows
you to see where your request is within the processes (workflow) involved with approving or
rejecting it. Completed processes are notated with green lines while incomplete are notated with
black lines.

-
Approvers Accordion — This accordion displays
all possible approvers of the request.
Granting Access to Resources
If you are a resource owner (known as an "Access Manager" in EmpowerID) or another user delegated the ability to manage resources, you can view and manage the access assignments to those resources from the Resources I Manage page of the IT Shop. For example, if you are a group owner, you can add and remove people to and from the group as needed, as well as grant them additional levels of access.
Prerequisites
In order to manage access to the resources you manage from the IT Shop, you need to have access to the following EmpowerID resources:
- IT Shop I Manage page - This page allows you to view any resources for which you are either an owner or a delegated manager.
- UpdateAssignments workflow - This workflow allows you to initiate updating the access assignments of another person.
If you do not have access to these resources, you can request them from the IT Shop if your organization has made them requestable. If they are not in the IT Shop, you will need to speak with your manager.
To grant access to the resources you manage
- From the Navigation Sidebar, expand IT Shop and click Resources I Manage.
-
From the Resources I Manage page, search for the
resource that you want to give another user access to and then click
the Who Has Access link for that resource
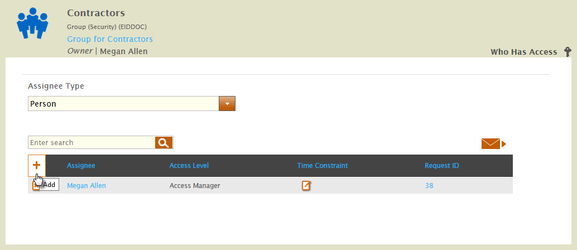
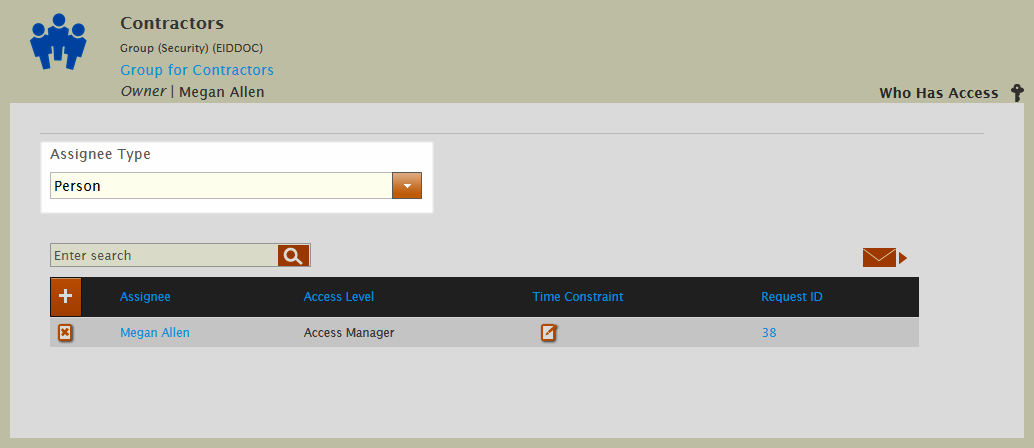
This opens the Access pane. This pane shows you who currently has access to the resource and the type of access they have. At a minimum, you can see your access.

The Access pane is comprised of the following components:
- Assignee Type Drop-down - This allows you to filter the results returned to the pane by EmpowerID actor type. Search Field - Allows you to search for a specific assignee with current access. Assignee Grid - Displays the assignees who currently have access to the resources and provides the functionality for adding and removing assignees.
-
Select the appropriate actor type for the access assignment from the Assignee Type drop-down. In this
example, we are granting access to another person, so we are selecting
Person
.

-
From the Assignee Grid, click the
Add
(+)
button.
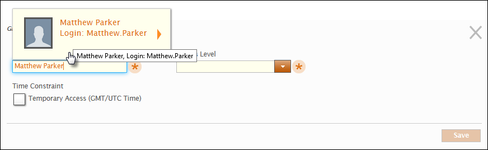
-
In the Grant Access pane that appears, type the name of
the person to whom you want to grant access and then click the tile for that person.
-
In the Grant Access pane, type the Access Level you
want to grant the person and then click the tile for that Access Level.
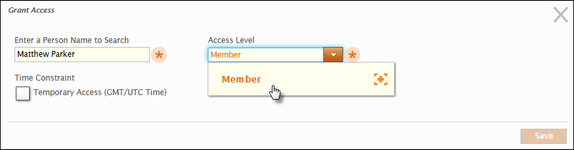
-
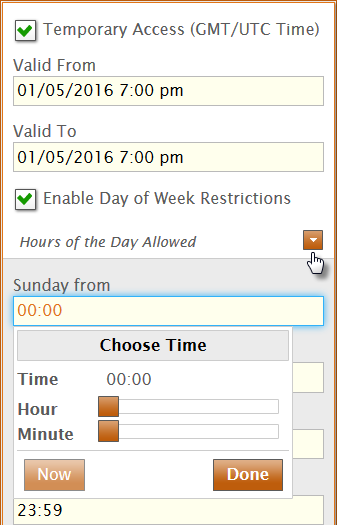
If the access is to be temporary, select
Temporary
Access
. When this option is selected, you set the date and time ranges by clicking the Valid
From and Valid To fields and picking the appropriate values from the Calendar.
-
Additionally, you can restrict the access to certain days and hours of the week by clicking the Hours of the Day Allowed drop-down button and setting the
restrictions in the from and to fields for each day.
-
Click Save.

- Repeat for each additional access assignment you want to make.
-
When you have finished adding access assignments for the resource, click the Shopping Cart located at
the top of the page, type a reason for the request in the cart dialog and then click Submit.
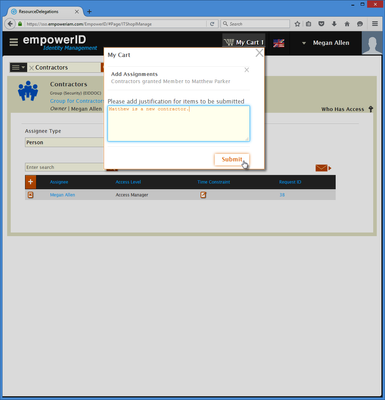
The new access assignment appears in the Assignee Grid.
Responding to Access Requests
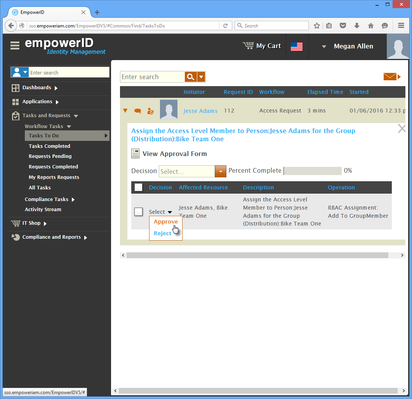
If you are a manager, resource owner or other user delegated the ability to respond to access requests submitted by people within your organization, EmpowerID routes the access request to you, creating a task for you to complete. This topic demonstrates how to interact with those tasks from your Tasks To Do view, approving or rejecting the access requests associated with them.
If your organization has configured EmpowerID for email approvals, you can approve access requests directly from your email client. This is advantageous in situations where you are not logged in to EmpowerID. For more information, see Responding to Email Requests.
To respond to access requests from your Tasks To Do view
- From the Navigation Sidebar, expand Tasks and Requests, then Workflow Tasks, and click Tasks To Do.
-
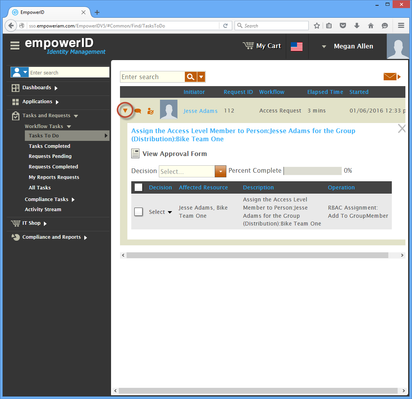
If there is an Access Request awaiting your action, it appears in the grid.

-
Click the drop-down arrow beside the request. This allows you to view more detailed information about
the request as well as make a decision to approve or reject the request.
-
Click the drop-down arrow beside the request. This allows you to view more detailed information about
the request as well as make a decision to approve or reject the request.
-
To approve or reject the request, click the
Decision
Selection
drop-down and then click the appropriate response. In our example, we are approving
the request.
-
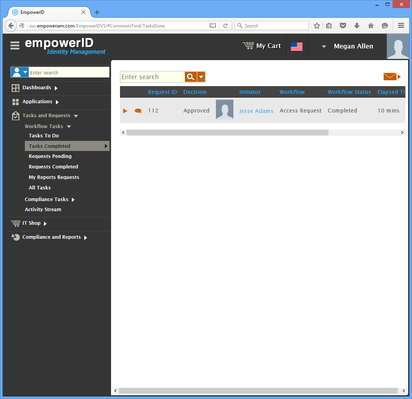
After EmpowerID processes the operation, click the
Tasks
Completed
node in the Navigation Sidebar.
The request you just approved appears.
-
Click the drop-down button for the request and then click the task link.
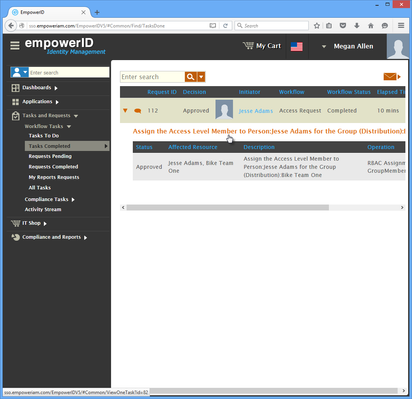
This directs you to the View page for the task. This page allows you to view the details of the task, including who initiated the request, who approved and what resources were affected.

Responding to Email Requests
If you are a manager, resource owner or other user delegated the ability to respond to access requests submitted by people within your organizations—and EmpowerID is configured for email approvals—you can respond to those access requests from your email client, apart from interacting directly with the request in your To Do Tasks or being in an active authenticated state. To do so, you simply reply to the email EmpowerID sends you with "Approved" or "Rejected". EmpowerID reads the response and submits your decision.
To respond to the Access Request from Email
- From your email client, locate and open any email containing an access request. The subject for the email looks something like "RequestID:X Pending Approval-..."
-
Reply to the email with "Approved " or "Rejected"
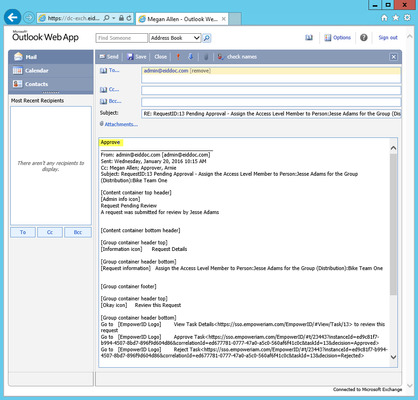
- EmpowerID submits your decision.
Removing Access to Resources You Manage
If you are a resource owner (known as an "Access Manager" in EmpowerID) or another user delegated the ability to manage resources, you can view and manage the access assignments to those resources from the Resources I Manage page of the IT Shop. For example, if you are a group owner, you can add and remove people to and from the group as needed, as well as grant them additional levels of access. This topic demonstrates how to remove access to resources you own.
Prerequisites
In order to manage access to the resources you manage from the IT Shop, you need to have access to the following EmpowerID resources:
- IT Shop I Manage page — This page allows you to view any resources for which you are either an owner or a delegated manager.
- UpdateAssignments workflow — This workflow allows you to initiate updating the access assignments of another person.
If you do not have access to these resources, you can request them from the IT Shop if your organization has made them requestable. If they are not in the IT Shop, you will need to speak with your manager.
To remove access to the resources you manage
- From the Navigation Sidebar, expand IT Shop and click Resources I Manage.
-
From the Resources I Manage page, search for the resource for which you
want to remove access from
another user and then click the Who Has Access link for that resource.
This opens the Access pane. This pane shows you who currently has access to the resource and the type of access they have.

The Access pane is comprised of the following components:
- Assignee Type Drop-down- This allows you to filter the results returned to the pane by EmpowerID actor type.
- Search Field - Allows you to search for a specific assignee with current access.
- Assignee Grid - Displays the assignees who currently have access to the resources and provides the functionality for adding and removing assignees.
-
Select the appropriate actor type for the access assignment from the
Assignee
Type
drop-down. In this example, we are removing access from another person, so we are
selecting Person.
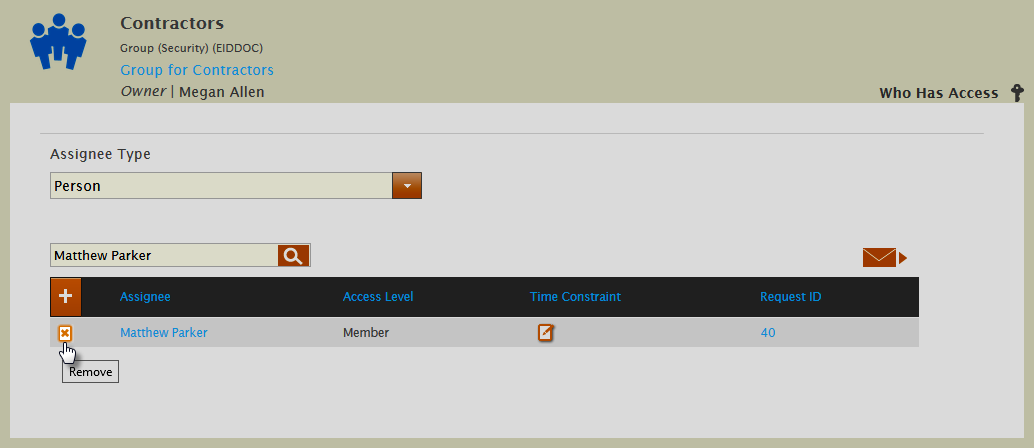
- Search for the actor from whom you want to remove access.
-
From the Assignee Grid, click the
Remove
Access
button for the actor.
-
Select the appropriate actor type for the access assignment from the
Assignee
Type
drop-down. In this example, we are removing access from another person, so we are
selecting Person.
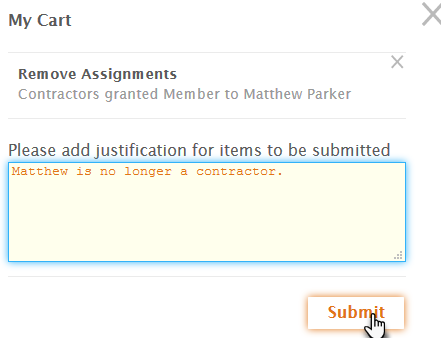
- Repeat for each access assignment you want to remove and when ready click the Shopping Cart located at the top of the page.
-
Type a reason for the removal in the cart dialog and then click Submit.
Creating Audit Recertification Policies
Recertification policies are policies that you add to audits to generate recertification review tasks for the access assignments given to people, roles, groups and Query-Based collections. Once you create an Recertification policy, you then scope the policy by adding targets, such as a specific Business Role and Location or group, to it.
| Policy | Usage |
|---|---|
| Access for Active People (Logged in Last 90 Days) | For certifying the EmpowerID access assignments for all people who logged in during the last 90 days. |
| All Access Assignments for Shared Folders flagged as Audit | For certifying shared folder access. |
| Certify Access Assignments for Resource Mailboxes | For certifying access to resource mailboxes. |
| Direct Reports Recertification - All People Logged in Last 90 Days | For managers to recertify any direct reports who have logged in within the last 90 days. |
| Mailbox Permissions | For certifying mailbox permissions. |
| Management Role Access | For certifying the access granted to Management Roles. |
| Person Access Summary for People Logged in Last 90 Days | For certifying the access of all people who have logged in within the last 90 days. |
| Person Direct Entitlements | For managers to certify or revoke the access of their direct reports. |
| SharePoint Group Access Assignments | All EmpowerID access assignments for SharePoint groups. |
To create a Recertification Policy
- Log in to the EmpowerID Web application as an auditor or other person with the ability to configure audits.
- From the navigation sidebar, expand For Auditors and click Audit Configuration.
-
From the Audit Configuration page, click the Actions tab and then click Create Recertification Policy.
-
In the Policy Details form that appears, select the appropriate policy type from the Policy Type drop-down. When selecting policy types, you have the following options:
- Assignee Granted Security — This Recertification policy type creates a snapshot of the Access Level Assignments and Management Role assignments granted to an assignee as an actor.
- Direct Reports — This Recertification policy type creates a snapshot of who reports to whom.
- Exchange Mailbox Permissions — This Recertification policy type creates a snapshot of who currently has what type of access to a given Exchange mailbox.
- Folder Permissions — This Recertification policy type creates a snapshot of who currently has what type of access to a given Windows folder.
- Group Membership — This Recertification policy type creates a snapshot of who currently has membership in a given group.
-
Person Access Summary — This Recertification policy type creates a snapshot of all of the access assignments currently granted to a Person, and includes the following:
- All RBAC assignments, including direct, relative, and by location assignments
- Business Role and Location assignments
- Any group memberships, including those on their accounts and those granted through RBAC
- Any Management Role memberships
- Account and group ownership
- Any native permissions, such as NTFS permissions for shared folders and Exchange mailbox permissions/acls
- Person Direct Entitlements — This Recertification policy type snapshots the current access granted to people and creates recertification tasks for the managers of each person targeted by the policy.
- Management Role Membership — This Recertification policy type creates a snapshot of current assignees of a Management Role.
- Resource Granted Security — This Recertification policy type creates a snapshot of who currently has access to any given resource object for which the policy is created.
- In our example, we are selecting Person Direct Entitlements.
- Type the appropriate information for the Recertification policy in the Name, Display Name and Description fields.
- Select Enabled to enable the policy.
-
Click Save.


Adding Targets to Policies
Once you have created a Recertification policy you can scope the policy by adding targets to it. Recertification policy targets are the specific IT objects you wish to audit and can include multiple EmpowerID Actor types, including individual resources, people, roles, locations, groups and Query-based Collections (SetGroups).
To add targets to Recertification Policies
- Log in to the EmpowerID Web application as an auditor or other person with the ability to configure audits.
- From the Navigation Sidebar, expand For Auditors and click Audit Configuration.
-
From the Audit Configuration page, click the Recertification Policies tab, search for the Recertification Policy to which you want to add a target, and click the Display Name link for that policy.
-
From the Policy Details page that appears, click the Add button in the Target grid.
This opens the Policy Target dialog, which provides fields for selecting the type of resource—such as Business Role and Location—as well as the specific object from that type, such as Sales Rep in Boston.
By default, the Policy Target dialog opens with Business Role and Location selected as the type. To select another type, like Group, select it from the Type drop-down.
- Select the appropriate target type from the Type drop-down. In our example, we are targeting a Business Role and Location, therefore the following steps demonstrate the procedure for picking the target Business Role and Location.
-
In the Business Role pane, search for and select the Business Role you want to target.
-
In the Location pane, search for and select the location.
With this target selected, the Recertification policy generates Recertification tasks for each person who has the BJB Roles Business Role in any location.
- Click Save.
- Repeat the above steps as needed to add other targets (of any type, such as a group, etc.) to the policy.


Creating and Configuring Audits
In EmpowerID, an audit is a user-defined, logically named object for identifying or grouping recertification tasks and running the Recertification policies that generate those tasks. When you create an audit, you add Recertification policies to it to define what you want to audit. Then when the audit runs, it compiles those Recertification policies, creating the appropriate recertification tasks.
To create and configure an audit
- Log in to the EmpowerID Web application as an auditor or other person with the ability to configure audits.
- From the Navigation Sidebar, navigate to the Audit Configuration page by expanding For Auditors and clicking Audit Configuration.
-
From the Audit Configuration page, click the Actions tab and then click Create Audit.
- In the Audit Details form that appears, type an appropriate name, display name and description for the audit in the Name, Display Name and Description fields, respectively.
- Select the date you want the audit to start from the Started field. The start date must either be the present date or a future date. If you select a past date, the audit will not compile.
- Select the date you want the audit to end from the Due Date field. The due date must either be the present date or a future date. If you select a past date, the audit will not compile.
- In the Audit Owner field, type the name of the person who is to be the audit owner and then click the tile for that person. When creating audits, it is important to assign an owner to those audits. In EmpowerID, the audit owner is the auditor. Auditors are the only people who can compile their audits.
- Select Enabled. This allows the audit to compile any Recertification polices belonging to it.
-
Click Save.


After EmpowerID creates the audit, you will see a Recertification Policy grid appear on the Audit Details page. This grid allows you to add and remove Recertification Policies to and from the audit. In order for the audit to create recertification tasks, it needs to have at least on Recertification policy. This is demonstrated in the below section, as well as treated separately in the Adding Recertification Policies to Audits topic.

Adding Recertification Policies to Audits
In EmpowerID, an audit is a user-defined, logically named object for identifying or grouping recertification tasks and running the Recertification policies that generate those tasks. After creating an audit, you add Recertification policies to it to define what you want to audit. Then when the audit runs, it compiles those Recertification policies, creating the appropriate recertification tasks.
To add recertification policies to audits
- Log in to the EmpowerID Web application as an auditor or other person with the ability to configure audits.
- In the Navigation Sidebar, expand Compliance Management and click Audit Configuration.
- Click the Audits tab and search for the audit to which you want to add a Recertification policy.
-
Click the Audit link.
This opens the View One page for the Audit. View One pages allow you to view information about an object in EmpowerID and manage it as needed.
-
From the audit's View One page, expand the Recertification Policies accordion and click the Add New Recertification Policy (+) button in the Policy grid.
-
In the Recertification Policy dialog that appears, type the name of the policy you want to add to the audit, and then click the tile for that policy.
-
Optionally, type a number in the Ignore Any Certified Within Last X Days field.
This is useful in situations where a previous audit closed before all recertification tasks it generated were completed. This way, managers only receive recertification tasks for any direct reports who were not certified in the last audit. This setting does not completely exclude previously audited direct reports; it only excludes those access assignments that were re-certified within the specified day range. Thus, if a direct report gains access to a new resource, such as becoming the member of a new group, the audit generates a recertification task for that new membership.
- Click Save to add the Recertification policy to the audit. The policy is added to the Recertification Policies grid.


To add exclusions to the Policy
Optionally, you can keep the audit from creating recertification tasks for certain access assignments that would normally be generated by the recertification policy.
-
On the Recertification Policy grid, click the Exclusions button for the policy.
This opens a view with two grids: Exclude These Entitlements and Exclude These Entitlement Types. These grids allow you to exclude entitlements granted to specific actors, such as individual people or groups, as well as entitlement types, such as roles or groups that have no bearing for the audit.
-
To exclude a specific entitlement, in the Exclude These Entitlements grid, click the Add button.
This opens the Attestation Policy Target dialog, where you can select the type of resource, such as Business Role and Location, and a specific object of that type, such as Sales Rep in Boston.
-
Select a target type from the Type drop-down, for example, Management Role.
A box (or if you choose Business Role and Location, a pair of tree selectors) appears to the right.
-
Click in the box and press Enter for a list of available options, or type the name of the specific actor to exclude, in this case "customer," select the tile for the actor, and click Save.
The Customer actor type is added to the grid of entitlements to exclude from this audit.
-
To exclude a type of entitlement, in the Exclude These Entitlement Types grid, click the Add button.
-
Select a Type from the drop-down list. The following types are available:
- Business Role excludes business roles from the type of entitlements audited.
- Group Membership excludes group membership from the type of entitlements audited.
- Inherited Direct by Business Role excludes any access inherited directly from the person's business role from the type of entitlements audited.
- Inherited Direct by Management Role excludes any access inherited directly from the person's management role from the type of entitlements audited.
- Inherited Direct by Primary Business Role excludes any access inherited directly from the person's primary business role from the type of entitlements audited.
- Inherited Location based by Business Role excludes any location inherited from the person's business role from the type of entitlements audited.
- Inherited Location by Primary Business Role excludes any location inherited from the person's primary business role from the type of entitlements audited.
- Inherited Management Role by Primary Business Role excludes any management role inherited directly from the person's primary business role from the type of entitlements audited.
- Inherited Role Group Membership excludes any group membership inherited from the person's role from the type of entitlements audited.
- Management Role excludes management roles from the type of entitlements audited.
- Primary Business Role excludes primary business roles from the type of entitlements audited.
- Resource Role excludes resource roles from the type of entitlements audited.
- Role Group Membership excludes role group membership from the type of entitlements audited.
-
Click Save.
The type is added to the grid of excluded entitlement types.
Once you have finished adding your Recertification policies to the audit, the next step is to generate the recertification tasks associated with the policies. You do this by compiling the audit. This is demonstrated in the Compiling Audits topic.


Compiling an Audit
In order to create recertification tasks for audit participants to review and certify to, the audit needs to be compiled. When an audit is compiled, EmpowerID creates a certification task for each of the resources included in the Recertification policies associated with the audit. For example, if you an audit with a Recertification policy that targets the access assignments of each manager's direct reports, compiling the audit will generate recertification tasks for those managers.
Before compiling an audit be sure that the audit has at least one Recertification policy that targets the resources you want to audit. Otherwise, the audit will not generate any recertification tasks. If this is not the case, please see the following topics:
To compile audits
- Log in to the EmpowerID Web application as an audit owner.
- From the Navigation Sidebar, expand For Auditors and click Audit Configuration.
- From the Audit Configuration page, click the Audits tab and search for the audit you want to compile.
-
From the Audit grid, click the View Dashboard link for the audit.
This takes you to the Audit Compliance Audit Details page for the audit. This page provides you with a dashboard for quick analysis of the audit's status as well as a Policies tab for viewing the Recertification policies belonging to the audit and a Communication tab that can be used to send email messages to audit participants.
-
From the Dashboard tab, click the Compile button to start generating Recertification tasks.
If you do not see the Compile button, check the Start and Due dates set for the audit. If the Start date is later than the present date or the Due date has passed, EmpowerID disables the Compile button as the parameters for the audit are not valid. To enable the button, update the dates accordingly. Additionally, ensure that you are the audit owner (auditor).
-
While the audit is compiling, you can click the Policies tab to see how many tasks and review items are being generated.
With the audit compiling, each audit participant receives a Recertification task. We discuss how to respond to those tasks in the Responding to Recertification Tasks topic.


Fulfilling Revokes
Once recertification tasks have been completed by line managers and approved by auditors performing revoke quality checks, EmpowerID creates Fulfillment tasks for each team responsible for removing user access to each revoked resource within any external application for which their team is an owner. Any member of the team can fulfill the revoke. As a Fulfillment team member, once you revoke access in the application, you certify in EmpowerID that you have done so. Your certification completes your task.
To fulfill revokes
- Log in to the EmpowerID Web application as a Fulfillment team member.
-
From the Navigation Sidebar, expand Tasks and Requests and click Tasks To Do.
Any Fulfillment tasks you have are listed.
-
Click the drop-down arrow beside the Fulfillment task and click View Approval Form.
 This directs you to the Process Entitlement Fulfillment page. This page allows you to view information about the task and includes a grid of each user removal that you must execute in the external application for which you are an owner.

-
After you have finished processing the revokes in the application, click Submit.
EmpowerID processes your submission and marks the task as completed. You can view this from your Tasks Completed view.
-
To view more details about the Fulfillment, click the drop-down arrow beside the task and then click task link.
 This directs you to the View One page for the task. This page allows you to view information about the task, including other Fulfillment tasks related to it.

-
As you can see from the above image, there are still two Fulfillments that need to be performed. After the appropriate teams complete their Fulfillment tasks, EmpowerID processes the removals and marks the Fulfillments completed.

Performing Revokes Quality Checks
Once recertification tasks have been completed by line managers, as the auditor you need to review and approve or reject any revokes executed by those line managers. In EmpowerID, this action is known as Revokes Quality Checks. Once you approve the revokes, if the resources represented by those revokes live in a system to which EmpowerID is connected, EmpowerID completes the revocation by removing those resources. If the resources live in a system to which EmpowerID is not connected, EmpowerID routes the revokes to the Fulfillment teams responsible for maintaining access to the resources in those disconnected systems.
To perform a Revokes Quality Check
- Log in to the EmpowerID Web application as the auditor responsible for performing Revoke Quality Checks.
-
From the Navigation Sidebar, expand For Auditors and click Revokes Quality Check.
All revokes executed by each line manager involved with the recertification are listed.
-
Optionally, if you want to view more information about a revoke, click the Task ID link for for it.
 This directs you to the Recertification Details page, where you can view all the recertification decisions made by the line manager for the person. When you have finished viewing the details, click the back button on your browser to return to the Revokes Quality Checks page

-
From the Revokes Quality Check page, choose whether to process the revokes or ignore them. When doing so, you have two options:
-
You can select all revokes on the current page by checking the box in the grid header.
EmpowerID adds each revoke to the Selected basket.
-
You can select individual revokes by checking the box beside the revoke. This is most useful in scenarios where you either want to further review the revokes before processing them or ignore them altogether.
-
You can select all revokes on the current page by checking the box in the grid header.
-
Once you have finished your selections, either click Process Selected to send the revokes to your Fulfillment teams or click Ignore Selected to close the revokes.


Getting Started with EmpowerID
Getting an API Key
EmpowerID is an extendable Identity and Access Management (IAM), Single Sign-On and workflow development platform that uses thousands of workflow operations with real-time access checks to give organizations the security tools needed to control who can do what, where and when with their resources. Through its Web API, you the developer, can access and extend these features in your own applications. The API is built on the principles of REST and is organized around the components (resource objects, like user accounts, EmpowerID people, Exchange mailboxes, workflows, etc.,) of the EmpowerID platform. This topic is an introductory topic to using the EmpowerID API, showing the basic steps needed to successfully call it. To get started, have your organization assign you the SSO Application Developer Management Role. Among other things, this role gives you the ability to create OAuth applications in EmpowerID. Once you have the role, follow the rest of the topic to begin working with the EmpowerID API.
Prerequisites
Your organization’s resources—like its user accounts, groups and mailboxes, etc.,as well as the resources internal to EmpowerID—such as its workflows and the pages of the EmpowerID Web application—are protected application resources secured by various EmpowerID operations. These operations are protected code objects that when executed allow resources to be accessed in a way that is consistent with the operation and the type of resource being accessed. Some examples include adding users to groups, creating mailboxes, updating user attributes or even viewing the pages of the Web application. Before users can access a resource in a given way, their EmpowerID Person must have an access assignment for the operation or operations that allows them to do so. As API calls are essentially executions of EmpowerID operations via HTTP, the applications you create to call the API need to have an EmpowerID Person linked to them with the appropriate access. Otherwise, you will receive a 401: Unauthorized error. To facilitate API calls, your organization should create the requisite number of Person objects with the appropriate amount of access for the application’s intended purpose.
Getting an API Key
- From the Navigation Sidebar of the EmpowerID Web interface, expand Admin > SSO Connections and click OAuth.
-
From the EmpowerID OAuth Client Apps tab of the OAuth page, click the Add button.

- In the OAuth Provider Application Details page that appears, type a name, display name and description for the application in the Name, Display Name and Description fields, respectively.
- Select Active from Application Status.
-
Scroll to the Callback URLs section of the form and click the Add New button.

-
In the Redirect URI field, enter https://yourserver/webidpforms/oauth/v2, replacing "yourserver" with the FQDN of your EmpowerID Web server.

- Click Save to close the Callback URLs dialog.
- Back on the main page, click Save.
-
Once the application is created, return to the EmpowerID OAuth Client Apps page and click the link for the application you just created.

-
Copy the API Key, the Client ID and the Client Secret. You will need these to get an access token.

Getting an Access Token
After registering an application in EmpowerID, the next step for working with the API is to use the credentials generated for that application—which consists of the API Key, the Client ID and the Client Secret—to get an access token. The access token is what authorizes resource API calls. The resources that can be manipulated vary, depending on the Access Levels associated with the application user. Access tokens can be issued as OAuth 2.0 tokens or JWT tokens. In this topic, we demonstrate getting an OAuth 2.0 token.
The default expiration time for JWT and access tokens is 3600 seconds. You can change this value in the Token Expiration (in seconds) field on the application. To do so:
- In the Navigation Sidebar, expand Admin, then SSO Connections, and click OAuth.
- Open the Application Details for the application and click the Edit button.
-
On the General tab, you can find the setting in the OAuth Application Details section.

To get an access token
To get an access token, you need to make a POST request to https://{FQDN_Of_Your_EmpowerID_Web_Server}/oauth/v2/token with the following header and data value pairs:
Headers
| Key | Value |
|---|---|
| Authorization | This is the Basic authentication scheme for the EmpowerID Person requesting the access token. To use this scheme, you set the value to the base-64 encoded value of the person's username and password. To get this value, you can visit one of many websites that provide this service, write your own code, or use a REST client like Postman. |
| Content-Type | application/json |
| X-EmpowerID-API-Key | The API key for the OAuth application you created. |
Request Data
Request data is sent to the API in JSON format.
            >
                {
                    "client_id": "{The Client ID of the OAuth app you created above}",
                    "client_secret": "{The Client Secret of the OAuth app you created above}",
                    "redirect_uri": "{The Redirect URI of the OAuth app you created above}",
                    "grant_type": "password"
                }
Response
If the request is successful, you should receive a JSON response that looks similar to the following:
            >
                {
                    "access_token": "WER1RFdjUVF1OE52ekdWZjJIQjMzSHVqcERQT0p5c...aZW",
                    "token_type": "Bearer",
                    "expires_in": 3600,
                    "refresh_token": "YnQrRHhuyYmNidzY3MTFSVnE1Q1BLN1RuZ1liOH...WQ==",
                    "id_token": "null",
                    "error": "",
                    "error_description": "null"
                    }
Code Examples
cURL
            >
                curl "https://{FQDN_Of_Your_EmpowerID_Web_Server}/oauth/v2/token" \
                -H "X-EmpowerID-API-Key: {Your_API_Key} \
                -H "Authorization: Basic {base64_encoded_value_of_the_EmpowerID_Person_username_and_password}" \
                -H "Content-Type: application/x-www-form-urlencoded" \
                -d "grant_type=password&client_id={Your_Client_ID}&client_secret={Your_Client_Secret}&redirect_uri=
                https://{FQDN_Of_Your_EmpowerID_Web_Server}/webidpforms/oauth/v2"
Ajax
            >
                var auth = btoa("EmpowerID_Person_Username:EmpowerID_Person_Password")
                $.ajax({
                    url: "https://{FQDN_Of_Your_EmpowerID_Web_Server}/oauth/v2/token",
                    type: "POST",

                    headers: {
                    "X-EmpowerID-API-Key": "1a9e18d5-7ec8-4214-b4e7-23b550c9c6ba",
                    "Content-Type": "application/json",
                    "Authorization": "Basic " + auth
                    },

                    data: JSON.stringify({
                    "client_id": "Your_Client_ID",
                    "client_secret": "Your_Client_Secret",
                    "redirect_uri": "https://{FQDN_Of_Your_EmpowerID_Web_Server}/webidpforms/oauth/v2",
                    "grant_type": "password"
                    })
                });
Postman Example
If you'd rather manage your API calls with a more graphically oriented tool, there are a number of browser extension applications that you can use, such as Postman for Chrome and RESTClient for Firefox. In this topic, we use Postman.
- Open the Postman app on your machine.
-
In Postman, open a new tab, select POST as the HTTP method and enter https://{FQDN_Of_Your_EmpowerID_Web_Server}/oauth/v2/token.
-
Click the Headers tab add the above mentioned key/value pairs.
-
Click the Body tab, select raw and then add the below JSON:
> { "client_id": "{Your_Client_ID}", "client_secret": "{Your_Client_Secret}", "redirect_uri": "https://{FQDN_Of_Your_EmpowerID_Web_Server}/webidpforms/oauth/v2", "grant_type": "password" } -
Click Send.
If the request is successful, you should receive a JSON response that looks similar to the following:


Now that you have the access token for your application, you can start working with the API as demonstrated in the Creating a Person topic.
Creating a Person
To call the API so that it performs the operations or returns the data requested by your application, you need to make a POST request to the appropriate endpoint. When creating new resources like an EmpowerID Person, you need to POST a request to the endpoint that starts the EmpowerID Workflow service, passing to the API the necessary header and request data. For creating an EmpowerID Person, this data is as follows.
Endpoint
Headers
| Key | Value |
|---|---|
| X-EmpowerID-API-Key | The API key for the OAuth application you created above. |
| Authorization | The OAuth token you received from EmpowerID. |
| Content-Type | application/json |
Request Data
Request data is sent to the API in JSON format. The data in the below request represents the minimum key/value pairs required for creating an EmpowerID Person. The API Reference includes all possible key/value pairs that can be submitted when creating people.
OutputParameters are optional, but are useful for viewing the results of the operation.
{
"Name" class="text-white">:
"CreatePerson" class="text-white">,
"InputParameters" class="text-white">:
{
"TargetPerson" class="text-white">:
{
"LastName" class="text-white">:
"Adams" class="text-white">,
"FirstName" class="text-white">:
"Samuel" class="text-white">,
"PrimaryOrgRoleOrgZoneID" class="text-white">:
"2"
}
},
"OutputParameters"
: [{
"TargetPerson"
: [
"PersonID" class="text-white">,
"FirstName" class="text-white">,
"LastName" class="text-white">]}]
}
| Element | Description | Type | Required |
|---|---|---|---|
| Name | Name of the workflow | String | Required |
| InputParameters | Workflow input | Data Object | Required |
| TargetPerson | Attributes of the person | Data Object | Required |
| FirstName | First name of the person | String | Required |
| LastName | Last name of the person | String | Required |
| PrimaryOrgRoleOrgZoneID | Primary Business and Location of the person | Integer | Required |
| OutputParameters | Workflow output | Data Object | Optional |
Code Examples
In the examples, we are passing in the minimum number of parameters and requesting an output showing the PersonID, LastName and FirstName attributes of the person that is created by the operation.
cURL
Be sure to use double quotes unless you are making the request from a non-Windows OS.
Request
-X POST \
-H "X-EmpowerID-API-Key: {Your_API_Key} \
-H
"Authorization: Bearer {OAuth_token_you_received_from_EmpowerID}"
\
-H
"Content-Type: application/x-www-form-urlencoded"
\
"{ \"Name\": \"CreatePerson\", \"InputParameters\": {\"TargetPerson\":{\"LastName\""
\"Adams\",
\"FirstName\": \"Samuel\", \"PrimaryOrgRoleOrgZoneID\" \"2\" }}, \"OutputParameters\": [{\"TargetPerson\":
[\
"PersonID\", \"FirstName\", \"LastName\"]}]}"
Ajax
$.ajax({
type:
"POST"
,
headers: {
"X-EmpowerID-API-Key"
:
"{Your_API_Key}"
,
"Content-Type"
:
"application/json"
,
"Authorization"
: "Bearer {OAuth_token_you_received_from_EmpowerID
}
},
data: JSON.stringify({
"Name"
:
"CreatePerson"
,
"InputParameters"
:
{
"TargetPerson"
: {
"FirstName"
: "Adams"
,
"LastName" class="text-white">:
"Samuel"
,
"PrimaryOrgRoleOrgZoneID"
: "4980"
}
},
"OutputParameters"
: [{ "TargetPerson"
: [ "PersonID"
, "FirstName"
, "LastName"
]}]
})
})
Response
If the request is successful, you should receive a JSON response that looks similar to the following:
{
"Id"
: 0,
"Name"
:
"CreatePerson"
,
"InstanceId"
:
"db14de5f-b8e4-4e61-a6a5-d17030e4a44f"
,
"CorrelationId"
:
"00000000-0000-0000-0000-000000000000"
,
"UIType"
:
"None"
,
"UIName"
:
""
,
"UIData"
: null
,
"OutputParameters"
: {
"TargetPerson"
: {
"PersonID"
: 402,
"FirstName"
:
"Samuel"
,
"LastName"
:
"Adams"
}
},
"OutputTaskParameters"
: null
,
"WorkflowState"
:
"Completed"
,
"DeferredUntil"
:
"0001-01-01T00:00:00"
,
"Error"
: null
}
Postman Example
- Open the Postman app on your machine.
- In Postman, open a new tab, select POST as the HTTP method and enter https://{FQDN_Of_Your_EmpowerID_Web_Server}/api/services/workflow/start.
-
Click the Headers tab and add the above mentioned key/value pairs.
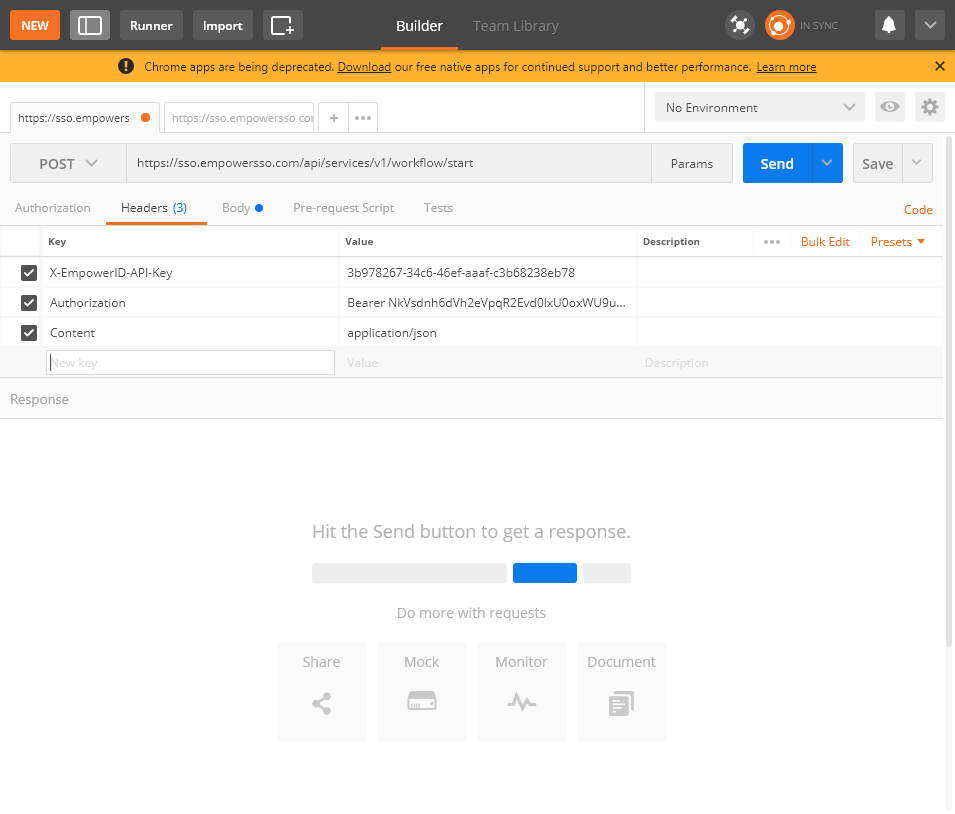
-
Click the Body tab, select raw and then
add the below JSON:
{"Name":class="text-success">"CreatePerson","InputParameters":{"TargetPerson"class="text-white">:{"LastName":class="text-success">"Adams","FirstName":class="text-success">"Samuel","PrimaryOrgRoleOrgZoneID":"2"}},"OutputParameters": [{class="text-success">"TargetPerson": [class="text-success">"PersonID",class="text-success">"FirstName",class="text-success">"LastName"]}]} -
Click Send.
If the request is successful, you should receive a JSON response that looks similar to that shown below.
{"Id": 0,"Name":"CreatePerson","InstanceId":"db14de5f-b8e4-4e61-a6a5-d17030e4a44f","CorrelationId":"00000000-0000-0000-0000-000000000000","UIType":"None","UIName":"","UIData":null,"OutputParameters": {"TargetPerson": {"PersonID": 381,"FirstName":"Samuel","LastName":"Adams"}},"OutputTaskParameters":null,"WorkflowState":"Completed","DeferredUntil":"0001-01-01T00:00:00","Error":null}
Editing People
To call the API so that it performs the operations or returns the data requested by your application, you need to make a POST request to the appropriate endpoint. When creating new resources like an EmpowerID Person, you need to POST a request to the endpoint that starts the EmpowerID Workflow service, passing to the API the necessary header and request data. For creating an EmpowerID Person, this data is as follows.
The below example demonstrates editing an EmpowerID Person by editing the Title attribute of the person created in the above example.
Endpoint
api/services/v1/workflow/start
Headers
| Key | Value |
|---|---|
| X-EmpowerID-API-Key | The API key for the OAuth application you created above. |
| Authorization | The OAuth token you received from EmpowerID. |
| Content-Type | application/json |
Request Data
Request data is sent to the API in JSON format. The data in the below request represents the minimum key/value pairs required for editing an EmpowerID Person.
OutputParameters are optional, but are useful for viewing the results of the operation.
{
"Name" :
"EditPerson" ,
"InputParameters" :
{
"TargetPerson" :
{
"PersonID" :
"381" ,
"Title" :
"Pre-sales Engineer"
}
},
"OutputParameters" : [{
"TargetPerson" : [
"PersonID" ,
"FirstName" ,
"LastName" ,
"Title" ]}]
}
| Element | Description | Type | Required | Note |
|---|---|---|---|---|
| Name | Name of the workflow | String | Required | |
| InputParameters | Workflow input | Data Object | Required | |
| TargetPerson | Specifies the object of the operation | Data Object | Required | |
| PersonID | ID of the person | Integer | Required | |
| Title | Attribute being edited | String | Required | At least one attribute needs to be edited. In this example, Title is the attribute. You add each attribute being edited to the request. |
Code Examples
cURL
The following shows an example of editing a Person using cURL.
Be sure to use double quotes unless you are making the request from a non-Windows OS.
Request
-X POST \
-H "X-EmpowerID-API-Key: {Your_API_Key} \
-H
"Authorization: Bearer {OAuth_token_you_received_from_EmpowerID}"
\
-H
"Content-Type: application/x-www-form-urlencoded"
\
-d
"{ \"Name\": \"EditPerson\", \"InputParameters\": {\"TargetPerson\":{\"PersonID\""
\"402\",
\"Title\": \"Book Manager\" }}, \"OutputParameters\": [{\"TargetPerson\":
[\
"PersonID\", \"FirstName\", \"LastName\", \"Title\"]}]}"
Response
If the request is successful, you should receive a JSON response that looks similar to the following:
{
"Id"
: 0,
"Name"
:
"EditPerson"
,
"PersonId"
: 351,
"InstanceId"
:
"dcc1e525-5d01-48cf-aa7e-d7da1697237f"
,
"CorrelationId"
:
"fef9ba33-4768-4910-a4cd-b79ebcf91ff0"
,
"UIType"
:
"None"
,
"UIName"
:
class="csharp keyword">null
,
"UIData"
:
class="csharp keyword">null
,
"OutputParameters"
: {},
"OutputTaskParameters"
: {
"Title"
:
"Operation Execution Summary"
,
"Description"
:
class="csharp keyword">null
,
"Message"
:
""
,
"MessageType"
:
"Info"
,
"DisplayLength"
: 5000,
"BubbleType"
:
"None"
,
"MessagesList"
: {
"NodeValue"
:
"Operation Execution Summary"
,
"ChildNodes"
: [
{
"NodeValue"
:
"Edit Person: Adams, Samuel Name Attributes was executed successfully."
,
"ChildNodes"
: []
},
{
"NodeValue"
:
"Unlock Person Adams, Samuel was executed successfully."
,
"ChildNodes"
: []
},
{
"NodeValue"
:
"Edit Person Adams, Samuel Job Title was executed successfully."
,
"ChildNodes"
: []
}
]
},
"ShowInBubble"
:
class="csharp keyword">false
,
"FormDecision"
:
"Requested"
,
"SelectedOperations"
:
class="csharp keyword">null
,
"DecisionList"
: [
{
"BusinessProcessTaskSlotResponseTypeID"
: 11,
"Name"
:
"Submit"
,
"FriendlyName"
:
"Submit"
,
"LocaleKeyEntryName"
:
"EmpowerIDApplicationCommonWords_Submit"
,
"Description"
:
"The form was submitted"
,
"ConfigurationXml"
:
class="csharp keyword">null
,
"CreatedDate"
:
"2008-02-04T15:21:00"
,
"ModifiedDate"
:
"2008-02-04T15:21:00"
,
"IsGridSelected"
:
class="csharp keyword">false
}
],
"WaitForResponse"
:
class="csharp keyword">true
,
"HideWaitForResultsCheckbox"
:
class="csharp keyword">true
,
"EnableBulkApproval"
:
class="csharp keyword">true
,
"CurrentBusinessProcessID"
: 23,
"ShowAgreements"
:
class="csharp keyword">false
,
"ShowCommentsHistory"
:
class="csharp keyword">true
,
"CommentsHistory"
: [],
"ShowComments"
:
class="csharp keyword">false
,
"AgreementsText"
:
class="csharp keyword">null
,
"Comments"
:
class="csharp keyword">null
},
"WorkflowState"
:
"Completed"
,
"DeferredUntil"
:
"0001-01-01T00:00:00"
,
"Error"
:
class="csharp keyword">null
}
Postman Example
- Open the Postman app on your machine.
- In Postman, open a new tab, select POST as the HTTP method and enter https://{FQDN_Of_Your_EmpowerID_Web_Server}/api/services/workflow/start.
-
Click the Headers tab and add the above mentioned key/value pairs.
-
Click the Body tab, select raw and then
add the below JSON:
{"Name":"EditPerson","InputParameters":{"TargetPerson":{"PersonID":"381","Title":"Pre-sales Engineer"}},"OutputParameters": [{"TargetPerson": ["PersonID","FirstName","LastName","Title"]}]}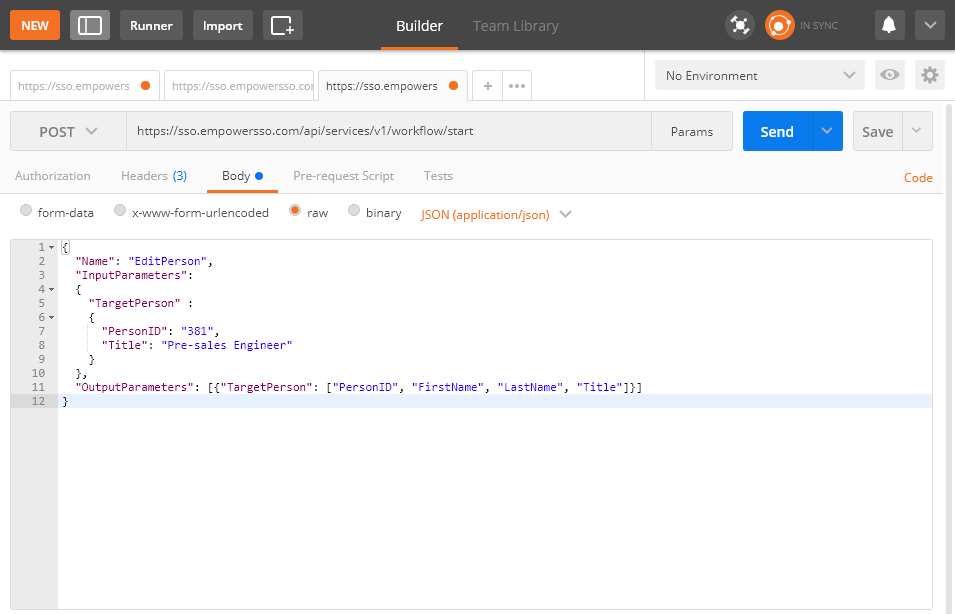
-
Click Send.
If the request is successful, you should receive a JSON response that looks similar to that shown below.
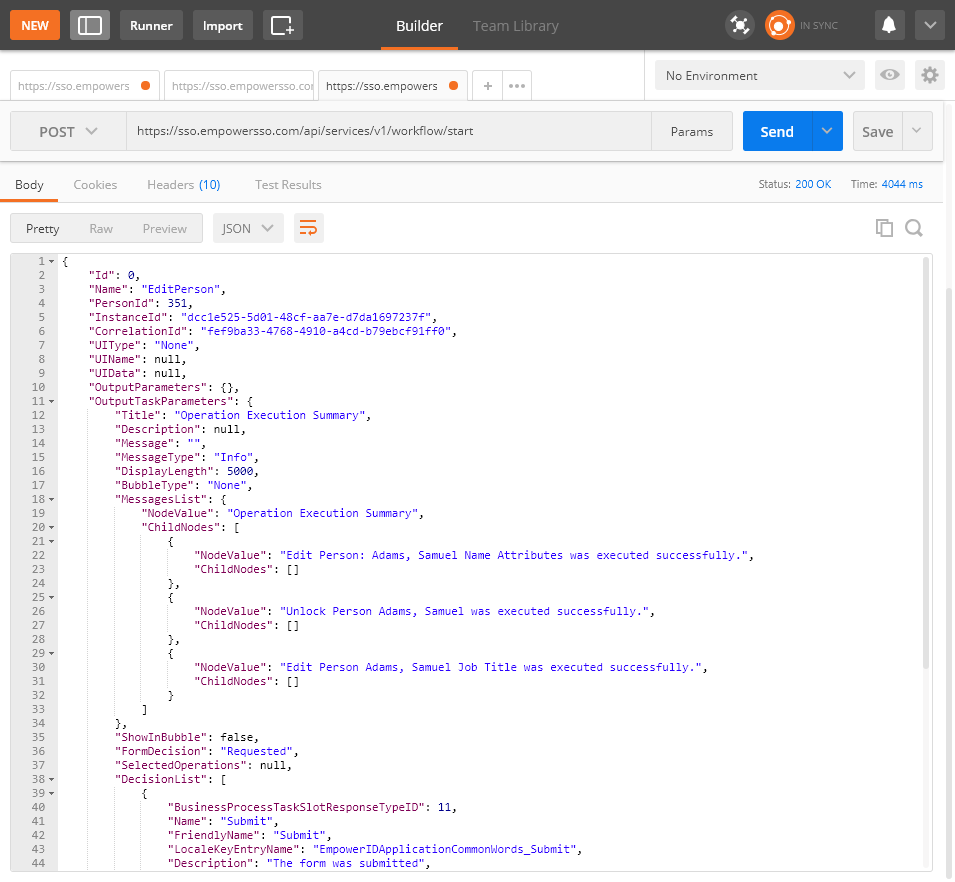
Authorization API
The Authorization API provides endpoints that allow you to call specific HasAccess() checks against a selected resource. This allows you to view what the people in your environment can do with specific resources, as well as view their current roles and other assignments.
In the examples, be sure to replace {Your_Access_Token} with your token and {Your_API_Key} with the API key for your application.
HasAccessToResource
This endpoint allows you to check whether a person can perform operations against two resources, such as approving a request to add a person to a group.
HTTP Request
Header Key/Value Pairs
| Key | Value |
|---|---|
| X-EmpowerID-API-Key | X-EmpowerID-API-Key |
| Authorization | Bearer {Your_Access_Token} |
| Content-Type | application/json |
Payload Name/Value Pairs
| Name | Value |
|---|---|
| person | EmpowerID login of the person you are checking |
| resource1 | GUID of the resource targeted by the operation |
| operation | Display Name of the operation |
Code Examples
Ajax
$.ajax({
type:
"POST"
,
headers: {
"X-EmpowerID-API-Key"
:
"{Your_API_Key}"
,
"Content-Type"
:
"application/json"
,
"Authorization"
:
"Bearer {Your_Access_Token}"
},
data: JSON.stringify({
"person"
:
"jappleseed"
,
"resource"
:
"a5a1ce79-69a3-41e0-a434-5670f654123a"
,
"operation"
:
"resetpassword"
})
})
HasAccessToDualResource
This endpoint allows you to check whether a person can perform operations against two resources, such as approving a request to add a person to a group.
HTTP Request
Header Key/Value Pairs
| Key | Value |
|---|---|
| X-EmpowerID-API-Key | The API key for your OAuth application |
| Authorization | Bearer {Your_Access_Token} |
| Content-Type | application/json |
Payload Name/Value Pairs
| Name | Value |
|---|---|
| person | EmpowerID login of the person you are checking |
| resource1 | GUID of the first resource targeted by the operation |
| operation | Display Name of the operation |
| resource2 | GUID of the second resource targeted by the operation |
Code Examples
Ajax
$.ajax({
url:
                                                                        "
                                                                            https://{FQDN_Of_Your_EmpowerID_Web_Server}/api/services/v1/hasaccess/hasaccesstodualresource"
,
type:
"POST"
,
headers: {
"X-EmpowerID-API-Key"
:
"{Your_API_Key}"
,
"Content-Type"
:
"application/json"
,
"Authorization"
:
"Bearer {Your_Access_Token}"
},
data: JSON.stringify({
"person"
:
"jappleseed"
,
"resource1"
:
"a5a1ce79-69a3-41e0-a434-5670f654123a"
,
"operation"
:
"Approve Group Membership"
,
"resource2"
:
"0c80065b-48a1-40d9-abd9-3f7907fe3d28"
})
})
HasRoleForResource
This endpoint allows you to check whether a person has a specific Access Level for a set of given resources.
HTTP Request
Header Key/Value Pairs
| Key | Value |
|---|---|
| X-EmpowerID-API-Key | The API key for your OAuth application |
| Authorization | Bearer {Your_Access_Token} |
| Content-Type | application/json |
Payload Name/Value Pairs
| Name | Value |
|---|---|
| person | EmpowerID login of the person you are checking |
| resource1 | GUID of the first resource targeted by the operation |
| operation | Display Name of the operation |
| resource2 | GUID of the second resource targeted by the operation |
Code Examples
Ajax
$.ajax({
type:
"POST"
,
headers: {
"X-EmpowerID-API-Key"
:
"{Your_API_Key}"
,
"Content-Type"
:
"application/json"
,
"Authorization"
:
"Bearer {Your_Access_Token}"
},
data: JSON.stringify({
"person"
:
"jappleseed"
,
"role"
:
"Access Manager"
,
"resource"
:
"fb5d20a8-334f-4575-8b36-2058943dd195"
})
})
HasAccessToWorkflow
This endpoint allows you to check whether a person can initiate a specific workflow.
HTTP Request
Header Key/Value Pairs
| Key | Value |
|---|---|
| X-EmpowerID-API-Key | The API key for your OAuth application |
| Authorization | Bearer {Your_Access_Token} |
| Content-Type | application/json |
Payload Name/Value Pairs
| Name | Value |
|---|---|
| person | EEmpowerID login of the person you are checking |
| resource | Display Name of the workflow |
Code Examples
Ajax
$.ajax({
type:
"POST"
,
headers: {
"X-EmpowerID-API-Key"
:
"{Your_API_Key}"
,
"Content-Type"
:
"application/json"
,
"Authorization"
:
"Bearer {Your_Access_Token}"
},
data: JSON.stringify({
"person"
:
"jappleseed"
,
"workflow"
:
"Laptop Asset Provision"
})
})
HasAccessToWorkflows
This endpoint allows you to check whether a person can initiate both of the specified workflows.
HTTP Request
Header Key/Value Pairs
| Key | Value |
|---|---|
| X-EmpowerID-API-Key | The API key for your OAuth application |
| Authorization | Bearer {Your_Access_Token} |
| Content-Type | application/json |
Payload Name/Value Pairs
| Name | Value |
|---|---|
| person | EmpowerID login of the person you are checking |
| workflows | Comma separated Display Name of each workflow |
Code Examples
Ajax
$.ajax({
url:
                                                                        "
                                                                            https://{FQDN_Of_Your_EmpowerID_Web_Server}/api/services/v1/hasaccess/hasaccesstoworkflows"
,
type:
"POST"
,
headers: {
"X-EmpowerID-API-Key"
:
"{Your_API_Key}"
,
"Content-Type"
:
"application/json"
,
"Authorization"
:
"Bearer {Your_Access_Token}"
},
data: JSON.stringify({
"person"
:
"jappleseed"
,
"resource"
:
"Laptop Asset Provision"
})
})
HasAccessToPage
This endpoint allows you to check whether a person can view the specified page in the EmpowerID Web interface.
HTTP Request
Header Key/Value Pairs
| Key | Value |
|---|---|
| X-EmpowerID-API-Key | The API key for your OAuth application |
| Authorization | Bearer {Your_Access_Token} |
| Content-Type | application/json |
Payload Name/Value Pairs
| Name | Value |
|---|---|
| person | EmpowerID login of the person you are checking |
| page | GUID of the page |
Code Examples
Ajax
$.ajax({
type:
"POST"
,
headers: {
"X-EmpowerID-API-Key"
:
"{Your_API_Key}"
,
"Content-Type"
:
"application/json"
,
"Authorization"
:
"Bearer {Your_Access_Token}"
},
data: JSON.stringify({
"person"
:
"jappleseed"
,
"page"
:
"e780eb21-7908-4741-9e9a-61747732147c"
})
})
HasAccessToPages
This endpoint allows you to check whether a person can view the specified pages in the EmpowerID Web interface.
HTTP Request
Header Key/Value Pairs
| Key | Value |
|---|---|
| X-EmpowerID-API-Key | The API key for your OAuth application |
| Authorization | Bearer {Your_Access_Token} |
| Content-Type | application/json |
Payload Name/Value Pairs
| Name | Value |
|---|---|
| person | EmpowerID login of the person you are checking |
| pages | Protected Application Resource GUID of the pages; Comma separated |
Code Examples
Ajax
$.ajax({
type:
"POST"
,
headers: {
"X-EmpowerID-API-Key"
:
"{Your_API_Key}"
,
"Content-Type"
:
"application/json"
,
"Authorization"
:
"Bearer {Your_Access_Token}"
},
data: JSON.stringify({
"person"
:
"jappleseed"
,
"pages"
:
"63f64ec8-b3a2-4085-8337-77385284b8a6, 10ad7ef4-7207-46f0-ae70-103bf3cf0110"
})
})
GetAllowedResources
This endpoint returns a list of resources the specified user can see.
HTTP Request
Header Key/Value Pairs
| Key | Value |
|---|---|
| X-EmpowerID-API-Key | The API key for your OAuth application |
| Authorization | Bearer {Your_Access_Token} |
| Content-Type | application/json |
Payload Name/Value Pairs
| Name | Value |
|---|---|
| person | EmpowerID login of the person you are checking |
| pages | GUID of the parent application |
Code Examples
Ajax
$.ajax({
type:
"POST"
,
headers: {
"X-EmpowerID-API-Key"
:
"{Your_API_Key}"
,
"Content-Type"
:
"application/json"
,
"Authorization"
:
"Bearer {Your_Access_Token}"
},
data: JSON.stringify({
"person"
:
"jappleseed"
,
"application"
:
"e4e51851-5450-4b6e-ae31-bf1f9eeef5c6"
})
})
Results
Returns a JSON object containing the GUID of all controls for a specified parent application that the person can see.
{
"Results"
: [
"dcb1e15f-ee06-4265-9924-4d53b2a648b8"
,
"7187b855-cd13-402e-91cf-d4c3905fd688"
,
"95cb3b83-3ad2-46dc-878a-0edc75543888"
,
"66964466-6fb0-474d-92ad-86a203f6634a"
,
"84a699e8-f91e-48d2-8e50-733d079d2c6c"
,
"282273f3-e702-4487-905c-383b3552fa9e"
,
"5a815ac6-49aa-4442-8a04-d841449ba395"
,
"b61a685f-4afd-4db9-a778-5ede9e6c98ff"
,
"f82358ae-714f-4539-ab09-39803ffce4bf"
,
"6cb51176-582b-49a5-93bf-a7f303b4121c"
,
"6e7f678f-d0a9-41a4-8e0c-79a25c7ba3b1"
,
"e594e7b7-d7ca-423f-8b3b-163d3081392e"
]
}
HasManagementRoles
This endpoint allows you to check whether a person has all of the specified Management Roles.
HTTP Request
Header Key/Value Pairs
| Key | Value |
|---|---|
| X-EmpowerID-API-Key | The API key for your OAuth application |
| Authorization | Bearer {Your_Access_Token} |
| Content-Type | application/json |
Payload Name/Value Pairs
| Name | Value |
|---|---|
| person | EmpowerID login of the person you are checking |
| managementRoles | GUID of each Management Role; Comma separated |
Code Examples
Ajax
$.ajax({
type:
"POST"
,
headers: {
"X-EmpowerID-API-Key"
:
"{Your_API_Key}"
,
"Content-Type"
:
"application/json"
,
"Authorization"
:
"Bearer {Your_Access_Token}"
},
data: JSON.stringify({
"person"
:
"24754"
,
"managementRoles"
:
"fff8153f-982e-4504-b687-2bbd1f8b7c42,fb5d20a8-334f-4575-8b36-2058943dd195"
})
})
Results
Returns a Boolean. If
IsInManagementRole
This endpoint allows you to check whether a person has the specified Management Role.
HTTP Request
Header Key/Value Pairs
| Key | Value |
|---|---|
| X-EmpowerID-API-Key | The API key for your OAuth application |
| Authorization | Bearer {Your_Access_Token} |
| Content-Type | application/json |
Payload Name/Value Pairs
| Name | Value |
|---|---|
| person | EmpowerID login of the person you are checking |
| managementRole | GUID of the Management Role |
Code Examples
Ajax
$.ajax({
type:
"POST"
,
headers: {
"X-EmpowerID-API-Key"
:
"{Your_API_Key}"
,
"Content-Type"
:
"application/json"
,
"Authorization"
:
"Bearer {Your_Access_Token}"
},
data: JSON.stringify({
"person"
:
"24754"
,
"managementRole"
:
"fff8153f-982e-4504-b687-2bbd1f8b7c42"
})
})
Results
Returns a Boolean. If
IsInGroup
This endpoint allows you to check whether a person belongs to a specific group.
HTTP Request
Header Key/Value Pairs
| Key | Value |
|---|---|
| X-EmpowerID-API-Key | The API key for your OAuth application |
| Authorization | Bearer {Your_Access_Token} |
| Content-Type | application/json |
Payload Name/Value Pairs
| Name | Value |
|---|---|
| person | PersonID of the person you are checking |
| group | GUID of the Group |
Code Examples
Ajax
$.ajax({
type:
"POST"
,
headers: {
"X-EmpowerID-API-Key"
:
"{Your_API_Key}"
,
"Content-Type"
:
"application/json"
,
"Authorization"
:
"Bearer {Your_Access_Token}"
},
data: JSON.stringify({
"person"
:
"24754"
,
"group"
:
"6c19c0f1-0a0a-4f1a-a526-2b8408aaf5be"
})
})
Results
Returns a Boolean. If true, the person is in the group; if false, the person is not.
HasGroups
This endpoint allows you to check whether a person belongs to a specific group.
HTTP Request
Header Key/Value Pairs
| Key | Value |
|---|---|
| X-EmpowerID-API-Key | The API key for your OAuth application |
| Authorization | Bearer {Your_Access_Token} |
| Content-Type | application/json |
Payload Name/Value Pairs
| Name | Value |
|---|---|
| person | PersonID of the person you are checking |
| groups | GUID of each Group; Comma separated |
Code Examples
Ajax
$.ajax({
type:
"POST"
,
headers: {
"X-EmpowerID-API-Key"
:
"{Your_API_Key}"
,
"Content-Type"
:
"application/json"
,
"Authorization"
:
"Bearer {Your_Access_Token}"
},
data: JSON.stringify({
"person"
:
"24754"
,
"groups"
:
"6c19c0f1-0a0a-4f1a-a526-2b8408aaf5be, 1089e2ef-67dc-484d-9b4b-c702822ffc0a"
})
})
Results
Returns a Boolean. If true, the person belongs to all of the specified groups; if false, the person is not a member of one or more of the groups.
IsInBusinessRole
This endpoint allows you to check whether a person has a specific Business Role.
HTTP Request
Header Key/Value Pairs
| Key | Value |
|---|---|
| X-EmpowerID-API-Key | The API key for your OAuth application |
| Authorization | Bearer {Your_Access_Token} |
| Content-Type | application/json |
Payload Name/Value Pairs
| Name | Value |
|---|---|
| person | PersonID of the person you are checking |
| businessRole | ResourceID of the Business Role |
Code Examples
Ajax
$.ajax({
type:
"POST"
,
headers: {
"X-EmpowerID-API-Key"
:
"{Your_API_Key}"
,
"Content-Type"
:
"application/json"
,
"Authorization"
:
"Bearer {Your_Access_Token}"
},
data: JSON.stringify({
"person"
:
"24754"
,
"businessRole"
:
"2994477"
})
})
Results
Returns a Boolean. If true, the person has the specified Business Role; if false, the person does not.
HasBusinessRoles
This endpoint allows you to check whether a person belongs to each of the specified Business Roles.
HTTP Request
Header Key/Value Pairs
| Key | Value |
|---|---|
| X-EmpowerID-API-Key | The API key for your OAuth application |
| Authorization | Bearer {Your_Access_Token} |
| Content-Type | application/json |
Payload Name/Value Pairs
| Name | Value |
|---|---|
| person | PersonID of the person you are checking |
| businessRoles | ResourceID of each Business Role; Comma separated |
Code Examples
Ajax
$.ajax({
type:
"POST"
,
headers: {
"X-EmpowerID-API-Key"
:
"{Your_API_Key}"
,
"Content-Type"
:
"application/json"
,
"Authorization"
:
"Bearer {Your_Access_Token}"
},
data: JSON.stringify({
"person"
:
"24754"
,
"businessRoles"
:
"2994477, 2994478, 3146825"
})
})
Results
Returns a Boolean. If true, the person all of the specified Business Role; if false, the person does not belong to one or more of the roles.
IsInBusinessRoleAndLocation
This endpoint allows you to check whether a person belongs to a specified Business Role and Location combination.
HTTP Request
                                                                POST

https://{FQDN_Of_Your_EmpowerID_Web_Server}/api/services/v1/hasaccess/isinbusinessroleandlocation
Header Key/Value Pairs
| Key | Value |
|---|---|
| X-EmpowerID-API-Key | The API key for your OAuth application |
| Authorization | Bearer {Your_Access_Token} |
| Content-Type | application/json |
Payload Name/Value Pairs
| Name | Value |
|---|---|
| person | PersonID of the person you are checking |
| businessRoleAndLocation | ResourceID of each Business Role; Comma separated |
Code Examples
Ajax
$.ajax({
url:
"https://{FQDN_Of_Your_EmpowerID_Web_Server}/api/services/v1/hasaccess/isinbusinessroleandlocation"
,
type:
"POST"
,
headers: {
"X-EmpowerID-API-Key"
:
"{Your_API_Key}"
,
"Content-Type"
:
"application/json"
,
"Authorization"
:
"Bearer {Your_Access_Token}"
},
data: JSON.stringify({
"person"
:
"24754"
,
"businessRoleAndLocation"
:
"3348"
})
})
Results
Returns a Boolean. If true, the person to the specified Business Role; if false, the person does not.
OAuth 2.0 Flows
This topic describes how to consume the EmpowerID REST API with the different OAuth 2.0 flows. Please note that before you can use the framework with your application, you must register that application in EmpowerID. This generates an API Key, Client Secret and Client ID for your application.
OAuth Discovery Endpoint
https://
Authorization Code Grant
-
Initiate a login request to the EmpowerID Authorization URL.
class="text-gray"> https://<EID Server>/oauth/v2/ui/authorizeclass="text-gray">?client_id=xxxxxxxxxxxxxxxxxxclass="text-gray"> class="text-gray">&redirect_uri=https%3A%2F%2Ftestoauthapp.com%2FcallbackUrlclass="text-gray"> class="text-gray">&response_type=code id_tokenclass="text-gray"> class="text-gray">&state=xxxxxxxxxxxxxxxxxxclass="text-gray"> class="text-gray">&nonce=xxxxxxxxxxxxxxxxxxclass="text-gray"> class="text-gray">&scope=openid
- response_type=code -- Must be "code" to initiate authorization code flow. For OpenID connect use "code id_token" as a response type.
- client_id -- This specifies the EmpowerID OAuth application client identifier
- redirect_uri -- This specifies the client endpoint to which the authorization server should redirect after request approval
- state -- This is a random string value sent by the client to maintain session and precent CSR attacks
- nonce -- This is a random string value sent by the client to identify each request
- scope=openind -- Include scope as id_token for OpenID connect flow
- Authenticate using username and password or any of the allowed external identity providers to authorize the request.
-
Authorization server redirects to the redirect_uri with the response
parameters in the query string.
>?state=xxxxxxxxxxxxxxxxxxclass="text-gray"> >&code= xxxxxxxxxxxxxxxxxxclass="text-gray"> >&id_token= xxxxxxxxxxxxxxxxxx
- state -- The value sent by the client to maintain the session
- code -- The authorization code generated by the authorization server
- id_token -- The identity token issued by the authorization server for OpenID connect flow
-
Exchange the code for an access token
class="text-gray"> https://<EID Server>/oauth/v2/tokenclass="text-gray"> ?client_id={The Client ID of the OAuth app you registered in EmpowerID}> class="text-gray"> &client_secret={The Client Secret of the OAuth app you registered in EmpowerID}> class="text-gray">&grant_type=authorization_code> class="text-gray">&code=xxxxxxxxxxxxxxxxxx
- grant_type=authorization_code -- Must be "authorization_code" to continue authorization code flow
- client_id -- EmpowerID OAuth application client identifier
- client_secret -- EmpowerID OAuth application client Secret
- code -- The authorization code received from the authorization server
-
Returns access token and refresh token in the response
class="text-gray">{> class="text-gray">"access_token": "xxxxxxxxxxxxxxxxxxxxxx",> class="text-gray">"token_type": "Bearer",> class="text-gray">"expires_in": 3600,> class="text-gray">"refresh_token": "xxxxxxxxxxxxxxxxxxxxxx",> class="text-gray">"id_token": "xxxxxxxxxxxxxxxxxxxxxx",> class="text-gray">"id": "xxxxxxxxxxxxxxxxxxxxxx"class="text-gray">}
Authorization Code Grant using .NET Client Library
-
Create a ClientSettings model, which contains
consumerKey (client_id), consumerSecret
(client_secret), callbackUrl
(redirect_uri), accessUrl, authorizeUrl,
tokenInfoUrl, and userInfoUrl, and then
initialize a new AuthorizationCodeGrant object passing to it the
ClientSettings model.
class="text-gray">var clientSettings = new ClientSettings(> class="text-gray">“client_id”,> class="text-gray">“client_secret”,> class="text-gray">“redirect_uri”,> class="text-gray">“https://<EID Server>/oauth/v2/token”,> class="text-gray">“https://<EID Server>/oauth/v2/ui/authorize”,> class="text-gray">“https://<EID Server>/oauth/v2/tokeninfo”,> class="text-gray">“https://<EID Server>/oauth/v2/userinfo”);>> class="text-gray">var handler = new AuthorizationCodeGrant(clientSettings);
-
Call the BuildAuthorizationRequestPacket() method to build the fully
qualified URL to redirect to the authentication endpoint.
class="text-success">//Generate random nonce and stateclass="text-gray">var nonce = Guid.NewGuid().ToString( class="text-gray">"N" class="text-gray">);class="text-gray">var state = Guid.NewGuid().ToString( class="text-gray">"N" class="text-gray">);class="text-success">//Use the below commented code for "code" flow to build parametersclass="text-gray">var parameters = handler.BuildAuthorizationRequestPacketclass="text-gray">(ParameterFormat.FormUrlEncoded, state, class="text-secondary">null class="text-gray">, nonce, class="text-secondary">null class="text-gray">);>class="text-success">//Use the below commented code for "code id_token" flow to build parametersclass=" text-success"> //var responseTypes = new List<ResponseType> { ResponseType.id_token };class="text-success">//var parameters = handler.BuildAuthorizationRequestPacketclass="text-success">//(ParameterFormat.FormUrlEncoded, state, "openid", nonce, responseTypes);class="text-success">//Generate redirect URLclass="text-gray">var redirectUrl = class="text-secondary">string class="text-gray">.Format( class="text-gray">"{0}?{1}" class="text-gray">, clientSettings.AuthorizeUrl, parameters);
-
In the application Callback URL method, extract the “code” and “state,” build an
AuthorizationResponseModel object and send it to the
GetAccessToken() method.
class="text-gray">AuthorizationResponseModel authorizationResponseModel = >new class="text-gray">AuthorizationResponseModel() {Code = class="text-gray">"xxxxxxx" class="text-gray">, State = state};class="text-gray">AccessTokenResponseModel tokenResponseModel = >null class="text-gray">;>tryclass="text-gray">{> class="text-gray">tokenResponseModel = handler.GetAccessToken<AccessTokenResponseModel>(> class="text-gray">RequestMethod.POST,> class="text-gray">ParameterFormat.FormUrlEncoded,> class="text-gray">authorizationResponseModel,> >false class="text-gray">);class="text-gray">}class="text-gray">Catch { class="text-success">//Handle error }
Authorization Code Grant using .NET Client Library
-
Initiate a login request to the EmpowerID Authorization URL
class="text-gray"> https://<EID Server>/oauth/v2/ui/authorizeclass="text-gray">?client_id=xxxxxxxxxxxxxxxxxx> class="text-gray">&redirect_uri=https%3A%2F%2Ftestoauthapp.com%2FcallbackUrl> class="text-gray">&response_type=token id_token> class="text-gray">&state=xxxxxxxxxxxxxxxxxx> class="text-gray">&nonce=xxxxxxxxxxxxxxxxxx
- response_type=code -- Must be “token” to initiate authorization code flow. For OpenID connect use “token id_token” as response type
- client_id -- EmpowerID OAuth application client identifier
- redirect_uri -- Client endpoint to which the authorization server should redirect after request approval
- state -- Random string value sent by the client to maintain session and prevent CSR attacks server
- nonce -- Random string value sent by client to uniquely identify each request
- scope=openid -- Include scope as id_token for OpenID connect flow
- Authenticate using Username, Password or any of the allowed external identity providers to authorize the request
-
Authorization server redirects to the redirect_uri with the response
parameters in the fragment part of
URL.
class="text-gray"> https://testoauthapp.com/callbackUrlclass="text-gray">#access_token=xxxxxxxxxxxxxxxxxx> class="text-gray">&state=xxxxxxxxxxxxxxxxxx> class="text-gray">&token_type=Bearer> class="text-gray">&expires_in=3600> class="text-gray">&id_token= xxxxxxxxxxxxxxxxxx
Resource Owner Password Grant
-
Initiate a request to the EmpowerID Token endpoint, https://
/oauth/v2/token class="text-gray">POST /oauth/v2/token HTTP/1.1class="text-gray">Host: <EID Server>class="text-gray">Content-Type: application/x-www-form-urlencodedclass="text-gray">Authorization: Basic base64Encode(<username>:<password>)class="text-gray">Cache-Control: no-cacheclass="text-gray">client_id={The Client ID of the OAuth app you registered in EmpowerID}class="text-gray">&client_secret={The Client Secret of the OAuth app you registered in EmpowerID}class="text-gray">&grant_type=passwordclass="text-gray">&scope=openidHeaders
- Authorization -- Base64 encoded value of the username and password of the EmpowerID Person requesting the token
- Content-Type -- application/x-www-from-form-urlencoded
Post Body
- client_id -- EmpowerID OAuth application client identitfier
- client_secret -- EmpowerID OAuth application client secret
- grant_type=password -- Must be "password for resource owner password grant type
- scope=openid -- Include scope as "id_token" for OpenID connect flow
-
Returns access token and refresh token (optionally id_token) in the response
class="text-gray">{> class="text-gray">"access_token": "xxxxxxxxxxxxxxxxxxxxxx",> class="text-gray">"token_type": "Bearer",> class="text-gray">"expires_in": 3600,> class="text-gray">"refresh_token": "xxxxxxxxxxxxxxxxxxxxxx",> class="text-gray">"id_token": "xxxxxxxxxxxxxxxxxxxxxx",> class="text-gray">"id": "xxxxxxxxxxxxxxxxxxxxxx"class="text-gray">}
Resource Owner Password Grant using .NET Client Library
-
Create a ClientSettings model, which contains consumerKey (client_id),
consumerSecret (client_secret), callbackUrl (redirect_uri), accessUrl,
authorizeUrl, tokenInfoUrl, and
userInfoUrl, and then initialize a new ResourceOwnerPasswordGrant object passing to it the
ClientSettings model.
class="text-gray">var clientSettings = new ClientSettings(> class="text-gray">“client_id”,> class="text-gray">“client_secret”,> class="text-gray">“redirect_uri”,> class="text-gray">“https://<EID Server>/oauth/v2/token”,> class="text-gray">“https://<EID Server>/oauth/v2/ui/authorize”,> class="text-gray">“https:///<EID Server>/oauth/v2/tokeninfo”,> class="text-gray">“https:///<EID Server>/oauth/v2/userinfo”);>> class="text-gray">var handler = new ResourceOwnerPasswordGrant(clientSettings);
-
Call the GetAccessToken() method to retrieve the
access_token, refresh_token, and other
token related information.
class="text-gray">AccessTokenResponseModel responseModel = class="">null class="text-gray">;class="">tryclass="text-gray">{> class="text-gray">responseModel = handler.GetAccessToken<AccessTokenResponseModel>> class="text-gray">(RequestMethod.POST,> class="text-gray">ParameterFormat.FormUrlEncoded,> class="text-gray">“username”,> class="text-gray">“password”,> class="text-gray">“openid”);class="text-gray">}class="">catch class="text-gray">(Exception e)class="text-gray">{> class="text-success">//Handle errorclass="text-gray">}
JWT Bearer Grant
-
Initiate a request to the EmpowerID Token endpoint, https://
/oauth/v2/token class="text-gray">POST /oauth/v2/token HTTP/1.1class="text-gray">Host: < >EID class="text-gray">Server>class="text-gray">Content-Type: application/x-www-form-urlencodedclass="text-gray">Cache-Control: no-cacheclass="text-gray">client_id={The Client ID of the OAuth app you registered in EmpowerID}class="text-gray">&client_secret={The Client Secret of the OAuth app you registered in EmpowerID}class="text-gray">&grant_type=urn:ietf:params:oauth:grant-type:jwt-bearerclass="text-gray">&assertion=xxxxxxxxxxxxxxxxxxclass="text-gray">&scope=openid -
Call the GetAccessToken() method to retrieve the
access_token, refresh_token, and other
token related information.
class="text-gray">AccessTokenResponseModel responseModel = class="">null class="text-gray">;class="">tryclass="text-gray">{> class="text-gray">responseModel = handler.GetAccessToken<AccessTokenResponseModel>> class="text-gray">(RequestMethod.POST,> class="text-gray">ParameterFormat.FormUrlEncoded,> class="text-gray">“username”,> class="text-gray">“password”,> class="text-gray">“openid”);class="text-gray">}class="">catch class="text-gray">(Exception e)class="text-gray">{> class="text-success">//Handle errorclass="text-gray">}
Headers
- Content-Type -- application/x-www-form-form-urlencoded
Post Body
- client_id -- EmpowerID OAuth application client identitfier
- client_secret -- EmpowerID OAuth application client secret
- assertion -- Please refer to the Generate JWT Assertion section below
- grant_type= urn:ietf:params:oauth:grant-type:jwt-bearer -- Must be “urn:ietf:params:oauth:grant-type:jwt-bearer” for JWT Bearer grant type
- scope=openid -- Include scope as "id_token" for OpenID connect flow
-
Returns access token and refresh token (optionally id_token) in the response
class="text-gray">{> class="text-gray">"access_token": "xxxxxxxxxxxxxxxxxxxxxx",> class="text-gray">"token_type": "Bearer",> class="text-gray">"expires_in": 3600,> class="text-gray">"refresh_token": "xxxxxxxxxxxxxxxxxxxxxx",> class="text-gray">"id_token": "xxxxxxxxxxxxxxxxxxxxxx",> class="text-gray">"id": "xxxxxxxxxxxxxxxxxxxxxx"class="text-gray">}
Generate JWT Assertion
-
Create the ClientSettings model which contains consumerKey (client_id),
consumerSecret (client_secret), callbackUrl (redirect_uri), accessUrl, authorizeUrl, tokenInfoUrl, and
userInfoUrl.
Initialize JWTBearerGrant object by passing the ClientSettings configuration object.
class="text-gray">var clientSettings = >new class="text-gray">ClientSettings(> class="text-gray">“client_id”,> class="text-gray">“client_secret”,> class="text-gray">“redirect_uri”,> class="text-gray">“https: class="text-success">//<EID Server>/oauth/v2/token”,> class="text-gray">“https: class="text-success">//<EID Server>/oauth/v2/ui/authorize”,> class="text-gray">“https: class="text-success">//<EID Server>/oauth/v2/tokeninfo”,> class="text-gray">“https: class="text-success">//<EID Server>/oauth/v2/userinfo”);>class="text-gray">var handler = >new class="text-gray">JWTBearerGrant (clientSettings); -
Call the GetAccessToken method to retrieve the “access_token”,
“refresh_token”, and other token related
information.
class="text-gray">AccessTokenResponseModel responseModel = null;class="text-gray">String certificateThumbprint= “xxxxxxxxxxxxxxxxxxxxx”;class="text-gray">tryclass="text-gray">{> class="text-gray">var signingCert = handler.GetSigningCertificate(certificateThumbprint);> class="text-gray">responseModel = handler.GetAccessToken< >AccessTokenResponseModel class="text-gray">>> class="text-gray">(RequestMethod.POST,> class="text-gray">ParameterFormat.Json,> class="text-gray">signingCert);class="text-gray">}class="text-gray">catch (Exception e)class="text-gray">{> class="text-gray">//Handle errorclass="text-gray">}
Generate SAML Assertion
-
The SAML assertion should follow the below format and be signed with the signing certificate and
converted to Base64 string - Base64 (Sign (SAML Assertion)).
When using the below SAML assertion, please do the following:
- For class="text-black"> <saml:Issuer> , replace class="text-danger"> <EmpowerID OAuth Application ClientID> with the actual ClientID of the EmpowerID OAuth Application For class="text-black"> < saml:NameID Format="urn:oasis:names:tc:SAML:1.1:nameid-format:unspecified" > , replace
with the thumbprint of your signing certificate The value for class="text-black"><saml:AuthnContextClassRef> is a constant and must not be changed.
class="text-gray"><? class="text-primary">xml class="text-secondary">version class="text-gray">= class="text-success">"1.0" class="text-gray">?>class="text-gray">< class="text-primary">saml:Assertion class="text-secondary">xmlns:saml class="text-gray">= class="text-success">"urn:oasis:names:tc:SAML:2.0:assertion" class="text-secondary">Version class="text-gray">= class="text-success">"2.0" class="text-secondary">ID class="text-gray">= class="text-success">"_2f665070-6a35-4899-a113-234d8ffa7676" class="text-secondary">IssueInstant class="text-gray">= class="text-success">"2019-09-20T14:00:13.357Z" class="text-gray">>> class="text-gray">< class="text-primary">saml:Issuer class="text-gray">>< class="text-primary">EmpowerID class="text-gray">OAuth Application ClientID></ class="text-primary">saml:Issuer class="text-gray">>> class="text-gray">< class="text-primary">Signature class="text-secondary">xmlns class="text-gray">= class="text-success">"http://www.w3.org/2000/09/xmldsig#" class="text-gray">>> class="text-gray">< class="text-primary">SignedInfo class="text-gray">>> class="text-gray">< class="text-primary">CanonicalizationMethod class="text-secondary">Algorithm class="text-gray">= class="text-success">"http://www.w3.org/2001/10/xml-exc-c14n#" class="text-gray">/>> class="text-gray">< class="text-primary">SignatureMethod class="text-secondary">Algorithm class="text-gray">= class="text-success">"http://www.w3.org/2000/09/xmldsig#rsa-sha1" class="text-gray">/>> class="text-gray">< class="text-primary">Reference class="text-secondary">URI class="text-gray">= class="text-success">"#_2f665070-6a35-4899-a113-234d8ffa7676" class="text-gray">>> class="text-gray">< class="text-primary">Transforms class="text-gray">>> class="text-gray">< class="text-primary">Transform class="text-secondary">Algorithm class="text-gray">= class="text-success">"http://www.w3.org/2000/09/xmldsig#enveloped-signature" class="text-gray">/>> class="text-gray">< class="text-primary">Transform class="text-secondary">Algorithm class="text-gray">= class="text-success">"http://www.w3.org/2001/10/xml-exc-c14n#" class="text-gray">>> class="text-gray">< class="text-primary">InclusiveNamespaces class="text-secondary">xmlns class="text-gray">= class="text-success">"http://www.w3.org/2001/10/xml-exc-c14n#" class="text-secondary">PrefixList class="text-gray">= class="text-success">"#default saml ds xs xsi" class="text-gray">/>> class="text-gray"></ class="text-primary">Transform class="text-gray">>> class="text-gray"></ class="text-primary">Transforms class="text-gray">>> class="text-gray">< class="text-primary">DigestMethod class="text-secondary">Algorithm class="text-gray">= class="text-success">"http://www.w3.org/2000/09/xmldsig#sha1" class="text-gray">/>> class="text-gray">< class="text-primary">DigestValue class="text-gray">>dlp3Cn+. . .. . .. .. .. W5hXA=</ class="text-primary">DigestValue class="text-gray">>> class="text-gray"></ class="text-primary">Reference class="text-gray">>> class="text-gray"></ class="text-primary">SignedInfo class="text-gray">>> class="text-gray">< class="text-primary">SignatureValue class="text-gray">>Q+Ftb+nyCD0Ey9qQ. . .... . . OsFtxAfopOcaprm4=</ class="text-primary">SignatureValue class="text-gray">>> class="text-gray"></ class="text-primary">Signature class="text-gray">>> class="text-gray">< class="text-primary">saml:Subject class="text-gray">>> class="text-gray">< class="text-primary">saml:NameID class="text-secondary">Format class="text-gray">= class="text-success">"urn:oasis:names:tc:SAML:1.1:nameid-format:unspecified" class="text-gray">>< class="text-primary">Signing class="text-gray">Certificate Thumbprint></ class="text-primary">saml:NameID class="text-gray">>> class="text-gray"></ class="text-primary">saml:Subject class="text-gray">>> class="text-gray">< class="text-primary">saml:Conditions class="text-gray">/>> class="text-gray">< class="text-primary">saml:AuthnStatement class="text-secondary">AuthnInstant class="text-gray">= class="text-success">"2019-09-20T14:00:13.638Z" class="text-gray">>> class="text-gray">< class="text-primary">saml:AuthnContext class="text-gray">>class="text-gray">< class="text-primary">saml:AuthnContextClassRef class="text-gray">>urn:oasis:names:tc:SAML:2.0:ac:classes:X509</ class="text-primary">saml:AuthnContextClassRef class="text-gray">>> class="text-gray"></ class="text-primary">saml:AuthnContext class="text-gray">>> class="text-gray"></ class="text-primary">saml:AuthnStatement class="text-gray">>class="text-gray"></ class="text-primary">saml:Assertion class="text-gray">>
Client Certificate Grant using .NET Client Library
-
Create a ClientSettings model, which contains span
class="text-black">consumerKey (client_id), consumerSecret
(client_secret),
callbackUrl (redirect_uri), accessUrl,
authorizeUrl, tokenInfoUrl, and
userInfoUrl, and then initialize
a new ClientCertificateGrant, object passing to it the ClientSettings model.
class="text-gray">var clientSettings = new ClientSettings(> class="text-gray">“client_id”,> class="text-gray">“client_secret”,> class="text-gray">“redirect_uri”,> class="text-gray"> "https://<EID Server>/oauth/v2/token”,> class="text-gray"> "https://<EID Server>/oauth/v2/ui/authorize”,> class="text-gray"> "https://<EID Server>/oauth/v2/tokeninfo”,> class="text-gray"> "https://<EID Server>/oauth/v2/userinfo”);>> class="text-gray">var handler = new ClientCertificateGrant (clientSettings);
-
Call the GetAccessToken() method to retrieve the access_token, refresh_token, and other
token related information.
class="text-gray">AccessTokenResponseModel responseModel = >null class="text-gray">;class="text-gray">String certificateThumbprint= “xxxxxxxxxxxxxxxxxxxxx”;>tryclass="text-gray">{> class="text-gray">var signingCert = handler.GetSigningCertificate(certificateThumbprint);> class="text-gray">responseModel = handler.GetAccessToken<AccessTokenResponseModel>> class="text-gray">(RequestMethod.POST,> class="text-gray">ParameterFormat.Json,> class="text-gray">signingCert);class="text-gray">}>catch class="text-gray">(Exception e)class="text-gray">{> class="text-success">//Handle errorclass="text-gray">}
Refresh Token Grant
-
Initiate a request to the EmpowerID Token endpoint, https://
/oauth/v2/token class="text-gray">POST /oauth/v2/token HTTP/1.1class="text-gray">Host: < class="text-primary">EID class="text-gray">Server>class="text-gray">Content-Type: application/x-www-form-urlencodedclass="text-gray">Cache-Control: no-cacheclass="text-gray">client_id={The Client ID of the OAuth app you registered in EmpowerID}class="text-gray">&client_secret={The Client Secret of the OAuth app you registered in EmpowerID}class="text-gray">&grant_type=refresh_tokenclass="text-gray">&refresh_token={The refresh token received when requesting an access token}Headers
- Content-Type -- application/x-www-form-form-urlencoded
Post Body
- client_id -- EmpowerID OAuth application client identitfier
- client_secret -- EmpowerID OAuth application client secret
- grant_type=urefresh_token -- Must be “refresh_token” for refresh token grant type
- refresh_token -- Refresh token string for retrieving a new access token
-
Returns a new access token and refresh token in the response
class="text-gray">{> class="text-gray">"access_token": "xxxxxxxxxxxxxxxxxxxxxx",> class="text-gray">"token_type": "Bearer",> class="text-gray">"expires_in": 3600,> class="text-gray">"refresh_token": "xxxxxxxxxxxxxxxxxxxxxx",> class="text-gray">"id_token": null,> class="text-gray">"id": "00000000-0000-0000-0000-000000000000"class="text-gray">}
Refresh Token Grant using .NET Client Library
-
Create a ClientSettings model, which contains consumerKey (client_id), consumerSecret
(client_secret),
callbackUrl (redirect_uri), accessUrl,
authorizeUrl, tokenInfoUrl, and userInfoUrl, and then initialize
a new RefreshTokenGrant object passing to it the ClientSettings model.
class="text-gray">var clientSettings = new ClientSettings(> class="text-gray">“client_id”,> class="text-gray">“client_secret”,> class="text-gray">“redirect_uri”,> class="text-gray">“https://<EID Server>/oauth/v2/token”,> class="text-gray">“https://<EID Server>/oauth/v2/ui/authorize”,> class="text-gray">“https://<EID Server>/oauth/v2/tokeninfo”,> class="text-gray">“https://<EID Server>/oauth/v2/userinfo”);>> class="text-gray">var handler = new RefreshTokenGrant (clientSettings);
-
Call the GetAccessToken() method to retrieve the access_token,
refresh_token, and other token related
information.
class="text-gray">AccessTokenResponseModel responseModel = class="text-primary">null class="text-gray">;class="text-gray">String refreshToken= “The refresh token you received when requesting the access token”;class="text-primary">tryclass="text-gray">{> class="text-gray">responseModel = handler.GetAccessToken<AccessTokenResponseModel>> class="text-gray">(RequestMethod.POST,> class="text-gray">ParameterFormat.Json,> class="text-gray">refreshToken);class="text-gray">}class="text-primary">catch class="text-gray">(Exception e)class="text-gray">{> class="csharp comments">//Handle errorclass="text-gray">}
Token Info Endpoint
-
Initiate a request to the EmpowerID Token endpoint, https://
/oauth/v2/token class="text-gray">POST /oauth/v2/token HTTP/1.1class="text-gray">Host: < class="text-primary">EID class="text-gray">Server>class="text-gray">Content-Type: application/x-www-form-urlencodedclass="text-gray">Cache-Control: no-cacheclass="text-gray">Authorization: Basic base64Encode(< class="text-primary">ClientID class="text-gray">>:< class="text-primary">ClientSecret class="text-gray">>)class="text-gray">token={Your access token}class="text-gray">&token_type_hint=refresh_token/access_tokenHeaders
- Content-Type -- application/x-www-form-form-urlencoded
- Authorization -— Base64 encoded value of < clientID > : < clientSecret >
Post Body
- token -- Must be access token or refresh token string
- token_type_hint=refresh_token or token_type_hint=access_token -- Set to the value of the refresh token if the “token” is a refresh token string; else set to the value of the access token if the “token” is an access token string
-
Returns token information in the response
class="text-gray">{> class="text-gray">"active": true,> class="text-gray">"client_id": "Bearer",> class="text-gray">"username": {name of the user to whom the token belongs,> class="text-gray">"exp": 1555698438,> class="text-gray">"iat": 1555694839,> class="text-gray">"nbf": 1555694839,> class="text-gray">"sub": "xxxxxxxxxxxxx",> class="text-gray">"iss": "xxxxxxxxxxxxx"class="text-gray">}
User Info Endpoint
-
Initiate a request to the EmpowerID Token endpoint, https://
/oauth/v2/token class="text-gray">POST /oauth/v2/token HTTP/1.1class="text-gray">Host: < class="text-primary">EID class="text-gray">Server>class="text-gray">Content-Type: application/x-www-form-urlencodedclass="text-gray">Cache-Control: no-cacheclass="text-gray">Authorization: Basic base64Encode(< class="text-primary">ClientID class="text-gray">>:< class="text-primary">ClientSecret class="text-gray">>)class="text-gray">access_token={Access token of the user}Headers
- Content-Type -- application/x-www-form-form-urlencoded
Post Body
- access_token application/x-www-form-form-urlencoded
-
Returns token information in the response
class="text-gray">{> class="text-gray">"active": true,> class="text-gray">"client_id": "Bearer",> class="text-gray">"username": {name of the user to whom the token belongs,> class="text-gray">"exp": 1555698438,> class="text-gray">"iat": 1555694839,> class="text-gray">"nbf": 1555694839,> class="text-gray">"sub": "xxxxxxxxxxxxx",> class="text-gray">"iss": "xxxxxxxxxxxxx"class="text-gray">}
-
Returns user information in the response
class="text-gray">{> class="text-gray">"id": "d399765d-fcd7-45c9-913f-2b0c9e65f8b7",> class="text-gray">"username": "xxxxxxxxxxx",> class="text-gray">"first_name": " xxxxxxxxxxx ",> class="text-gray">"last_name": " xxxxxxxxxxx ",> class="text-gray">"email": " xxxxxxxxxxx",> class="text-gray">"organization": "Hosting Organization",> class="text-gray">"business_role_locations": [> class="text-gray">"Any Role in Anywhere",> class="text-gray">"Standard Employee in Anywhere",> class="text-gray">"All Employee Roles in Anywhere",> class="text-gray">"All Employee Roles in All Business Locations",> class="text-gray">"Any Role in All Business Locations",> class="text-gray">"Default Organization All Roles in All Business Locations",> class="text-gray">"Standard Employee in All Business Locations",> class="text-gray">"All Business Roles in Anywhere",> class="text-gray">"All Business Roles in Default Organization",> class="text-gray">"All Employee Roles in Default Organization",> class="text-gray">"Any Role in Default Organization",> class="text-gray">"Standard Employee in Default Organization"> class="text-gray">]class="text-gray">}
Overview of JSON Signing and Encryption
EmpowerID’s REST-based APIs support the arbitrary signing and encryption of JSON content using the JSON Web Signature standard.
Controller actions designated with any one of [JsonWebSignature], [JsonWebEncryption], and [JsonWebSignatureEncryption] attributes and hosted in EmpowerID are assumed to support JSON signing and/or encryption.
- The [JsonWebSignature] attribute signifies JSON signing only.
- The [JsonWebEncryption] attribute signifies JSON encryption only.
- The [JsonWebSignatureEncryption] attribute signifies JSON signing and encryption.
A controller action MAY NOT be decorated with more than one of above attributes.
JSON Web Signature
A controller action expecting signed JSON requests should be decorated with the [JsonWebSignature] attribute in addition to any other action related attributes. The default api controller template in Workflow Studio includes an action decorated with this attribute.
[JsonWebSignature]
[HttpPost]
public
IHttpActionResult GetUserJWS(InputModel model)
{
var results = <results>;
return
this
.Json((
object
)results);
}
To execute the above action, GetUserJWS, successfully, the api request must be signed using the private key of the X509 certificate associated with the OAuth Provider Application in EmpowerID. An OAuth Provider Application in EmpowerID is typically identified by the APIKey specified in the header of the request. You may also override the GetJwsVerifyCertificate method in the api controller to ignore the certificate associated with the OAuth Provider Application and return a preferred certificate for the same purpose. The Workflow Studio API controller template generates the methods you may override.
public
override
X509Certificate2 GetJwsVerifyCertificate(System.Web.Http.Controllers.HttpActionContext actionContext)
{
//TODO: Resolve JWS request verify certificate
return
null
;
}
public
override
X509Certificate2 GetJwsSigningCertificate(System.Web.Http.Controllers.HttpActionContext actionContext)
{
//TODO: Resolve JWS response signing certificate
return
null
;
}
Signing an API request
To sign an API request, call the Sign() static method on the TheDotNetFactory.Framework.JWS class and pass the JSON data and the X509 certificate. The sample code below assumes that the action, getuserjws, is decorated with the [JsonWebSignature] attribute.
The private key certificate is required to sign the JSON data passed to the Sign() method.
Client-side / Sender
X509Certificate2 signing = <your signing certificate>
string
url = https:
//demoserver/api/ services/v1/Users/getuserjws;
string
data = JWS.Sign(json, signing);
using
(WebClient client =
new
WebClient())
{
byte
[] str = System.Text.Encoding.UTF8.GetBytes(data);
byte
[] results = client.UploadData(url,
"POST"
, str);
if
(results !=
null
)
return
System.Text.Encoding.UTF8.GetString(results);
else
return
null
;
}
Server-side / Action
[JsonWebSignature]
[HttpPost]
public
IHttpActionResult GetUserJWS(InputModel model)
{
var results = <results>;
//JWS response
return
this
.Json((
object
)results);
}
Encrypting an API request
To encrypt an API request, you can call the Jose.JWT.Encode() static method. The sample code below assumes that the action, getuserjwe, is decorated with the [JsonWebEncryption] attribute.
Client-side / Sender
JweAlgorithm alg = …
//Specifies the encryption algorithm
JweEncryption enc = …
//Specifies the encryption key size
byte
[] toEncryptionKey = …
//Specifies the encryption key
string
url = https:
//demoserver/api/ services/v1/Users/getuserjwe;
string
data = JWT.Encode(json, toEncryptionKey, alg, enc);
using
(WebClient client =
new
WebClient())
{
byte
[] str = System.Text.Encoding.UTF8.GetBytes(data);
byte
[] results = client.UploadData(url,
" POST"
, str);
if
(results !=
null
)
return
System.Text.Encoding.UTF8.GetString(results);
else
return
null
;
}
Server-side / Action
[JsonWebEncryption(JweAlgorithm.A256KW, JweEncryption.A128CBC_HS256)]
[HttpPost]
public
IHttpActionResult GetUserJWE(InputModel model)
{
var results = <results>;
//JWE response
return
this
.Json((
object
)results);
}
Please note that the Jose.JWT.Decode() static method is called to decrypt the encrypted payload in an encrypted request, therefore, it is important that the encryption algorithm, encryption key, and the encryption key size are all correct and consistent with that of the sender. You must override the GetJWEDecryptionKey() method in the controller to return the encryption key. See the override method below.
public
override
byte
[] GetJWEDecryptionKey(HttpActionContext actionContext)
{
return
ApiControllerBase.DEFAULT_ENCRYPTIONK_KEY;
}
For a walkthrough that demonstrates how to use JSON encryption and signing in EmpowerID, see the walkthrough on JSON Signing and Encryption.
JSON Signing and Encryption Walkthrough
This topic demonstrates how to use JSON signing and encryption in EmpowerID and is comprised of the following activities:
- Creating a Web API application in Workflow Studio
- Generating a signing certificate
- Creating a client application to consume the API Request
- Adding code to encrypt the request in Workflow Studio
- Creating a client application to consume the encrypted API Request
Creating a Web API application in Workflow Studio
- In Workflow Studio, create new Class Library item, TestJWSApi, and enable Web Api Implementation in this item. To enable Web API implementation, go to the Properties tab and from the Property Grid, select Supports and from the list of Supported Types, select WebApi and click OK.
- Switch to the Solution tab and from the Code Tree tab, right-click on the TestJWSApi item and from the context menu, select Add New WebApi Implementation.
-
In the Code Tree, expand the Classes folder. You should see that Workflow Studio generated the following
four classes:
- SignedRequests.cs
- Signed RequestController.cs
- SignedRequestsInputModel.cs
- SignedRequestsRoutes.cs
- From the Code Tree, double-click on SignedRequestsController.cs to open the file in the C# code editor.
-
Modify the SignedRequestsController class so that it appears as shown in
the below code.
Please note the use of this.Json() instead of this.JsonWS().
class="text-success">public class="text-success">class class="text-white">SignedRequestsController : ApiControllerBaseclass="text-white">{> class="text-success">private class="text-white">SignedRequests _implInstance;> class="text-success">public class="text-white">SignedRequestsController()> class="text-white">{> class="text-white">_implInstance = class="text-success">new class="text-white">SignedRequests();> class="text-white">}>> class="text-white">[JsonWebSignature]> class="text-white">[HttpPost]> class="text-success">public class="text-white">IHttpActionResult GetUserJWS(SignedRequestsInputModel model)> class="text-white">{> class="text-white">var results = _implInstance.GetUser(model);> class="text-success">return class="text-success">this class="text-white">.Json(( class="text-success">object class="text-white">)results);> class="text-white">}class="text-white">} - Compile and Publish the TestJWSApi Class Library item.
Creating the Signing Certificate
- Locate and run the EmpowerID Certificate Manager, CertificateManager.exe, from the EmpowerID programs folder.
- Click the Generate tab, select X509 Certificate, provide a Password and an Output Folder path.
-
Select the Import to EmpowerID Certificate Store and Import to Local Certificate Store options and then click Generate
to generate a SHA256 self-signed certificate.
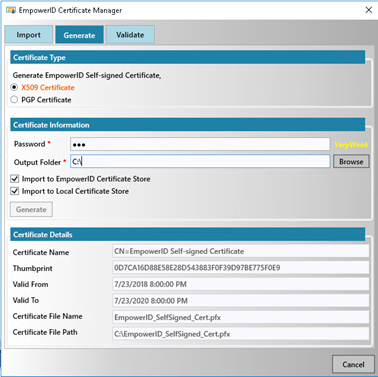
-
From the EmpowerID Web UI, create an OAuth Provider Application, TestOAuth. Through the JSON Web Token
tab, assign a Signing Certificate to the OAuth provider application. The Public Key of this certificate
will be used to verify Signed JSON Requests to this application.
The ClientID, the ApiKey, and the Client Secret of the TestOAuth OAuth Provider Application will be used later in this walkthrough.
Creating a client application to consume the API Request
- Open Visual Studio 2013 or above and create a new Console Application project, TestSignedApiRequests.
-
Locate the following assemblies in the EmpowerID programs folder and add them to the project as
references.
- TheDotNetFactory.Framework.SAML.dll
- Newtonsoft.Json.dll
- Microsoft.Practices.EnterpriseLibrary.Data.dll
- Microsoft.Practices.EnterpriseLibrary.Common.dll
- Microsoft.Practices.EnterpriseLibrary.Caching.dll
- Microsoft.IdentityModel.dll
-
Add a new class, SignedRequestsInputModel, to the TestSignedApiRequests project and modify it
so that it is as shown below.
class="text-success">using class="text-white">System;class="text-success">using class="text-white">System.Collections.Generic;class="text-success">using class="text-white">System.Linq;class="text-success">using class="text-white">System.Text;class="text-success">using class="text-white">System.Threading.Tasks;class="text-success">namespace class="text-white">TestSignedApiRequestsclass="text-white">{> class="text-white">[Serializable]> class="text-success">public class="text-success">class class="text-white">SignedRequestsInputModel> class="text-white">{> class="text-success">public class="text-success">int class="text-white">PersonId { class="text-success">get class="text-white">; class="text-success">set class="text-white">; }> class="text-white">}class="text-white">}
-
In Visual Studio, open the Program.cs file in the code editor and add
the below namespaces to it.
class="text-success">using class="text-white">TheDotNetFactory.Framework;class="text-success">using class="text-white">System.Net;class="text-success">using class="text-white">System.Security.Cryptography.X509Certificates;class="text-success">using class="text-white">TheDotNetFactory.Framework.SAML.Api;class="text-success">using class="text-white">TheDotNetFactory.Framework.SSOIdentity;class="text-success">using class="text-white">Jose;
-
In the body of the Main() method, declare the below variables where
- url is the URL to the EmpowerID Web Server in your environment
- apiKey is the ApiKey from the TestOAuth OAuth Provider Application you created earlier
- clientId is the ClientID from the TestOAuth OAuth Provider Application you created earlier
- clientSecret is the ClientScrent from the TestOAuth OAuth Provider Application you created earlier
- userName is the user requesting access token for the TestOAuth OAuth Provider Application you created earlier
-
password is the password of the user requesting access token for
the TestOAuth OAuth Provider Application you created earlier
Be sure to replace the below values with those for your environment.
class="text-success">string class="text-white">tokenUrl = class="text-white"> "https://sso.empoweriam.com" class="text-white">;class="text-success">string class="text-white">apiKey = class="text-white">"1daa135a-a9de-4a1f-a31f-2e8747c7e0f2" class="text-white">;class="text-success">string class="text-white">clientId = class="text-white">"f9cc6222-2d1c-4802-938a-c6c35aaa38f8" class="text-white">;class="text-success">string class="text-white">clientSecret = class="text-white">"9b474344-2f36-41c1-b7ed-0fddb692edea" class="text-white">;class="text-success">string class="text-white">userName = class="text-white">"aapprover" class="text-white">;class="text-success">string class="text-white">password = class="text-white">"p@$$w0rd" class="text-white">;
-
Add the code below to retrieve the certificate created in part 2 of the walk-through. The private key of
this certificate is required to sign the JSON data in the REST api request. The public key of this
certificate is associated with the TestOAuth OAuth Provider Application, which the REST api request is
intended.
class="text-white"> X509Certificate2 signing = CertificateUtility.GetCertificate(StoreName.My, StoreLocation.LocalMachine, class="text-success">"0D7CA16D88E58E28D543883F0F39D97BE775F0E9" class="text-white">);
-
Add the below code to create a request for an access token to make calls to to the api application you
created earlier.
class="text-white">WebApiContext webApiContext = class="text-success">new class="text-white"> WebApiContext(tokenUrl, userName,password, apiKey, clientId, clientSecret);
-
Add the following code fragment to complete the code in the body of the Main() method.
class="text-success">using class="text-white">(WebClient webClient = webApiContext.CreateWebCreate())class="text-white">{> class="text-white">SignedRequestsInputModel input = class="text-success">new class="text-white">SignedRequestsInputModel { PersonId = 1 };> class="text-success">string class="text-white">json = WebApi.ToJson<SignedRequestsInputModel>(input);> class="text-success">string class="text-white">data = JWS.Sign(json, signing);> class="text-success">byte class="text-white">[] str = System.Text.Encoding.UTF8.GetBytes(data);> class="text-success">string class="text-white">actionUrl = class="text-success"> "https://sso.empoweriam.com/api/services/v1/SignedRequests/GetUserJWS" class="text-white">;> class="text-success">byte class="text-white">[] results = webClient.UploadData(actionUrl, class="text-success">"POST" class="text-white">, str);> class="text-success">string class="text-white">output = System.Text.Encoding.UTF8.GetString(results);> class="text-white">Console.WriteLine(output);class="text-white">}
Notice that the method, JWS.Sign(), is called to sign the json data with the X509 certificate prior to performing the HTTP-POST request to the REST endpoint.
- Compile and run the TestSignedApiRequests console application – the output should state “User1”;
Adding code to encrypt the request in Workflow Studio
-
In Workflow Studio, open the Class Library item, TestJWSApi, created earlier. From the Code Tree
tab, use the context smenu to add a New WebApi Implementation, EncryptRequests.
The Code Tree should appear as shown below.
- From the Code Tree, double-click EncryptRequestsController.cs to open the file in the C# code editor.
-
Modify the EncryptRequestsController class so that it appears as shown
below.
class="text-success">public class="text-success">class class="text-white">EncryptRequestsController : ApiControllerBaseclass="text-white">{> class="text-success">private class="text-white">EncryptRequests _implInstance;> class="text-success">public class="text-white">EncryptRequestsController()> class="text-white">{> class="text-white">_implInstance = class="text-success">new class="text-white">EncryptRequests();> class="text-white">}> class="text-white">[JsonWebEncryption(JweAlgorithm.A256KW, JweEncryption.A128CBC_HS256)]class="text-white">[HttpPost]> class="text-success">public class="text-white">IHttpActionResult GetUserJWE(EncryptRequestsInputModel model)> class="text-white">{> class="text-white">var results = _implInstance.GetUser(model);> class="text-success">return class="text-success">this class="text-white">.Json(( class="text-success">object class="text-white">)results);> class="text-white">}>> class="text-success">public class="text-success">override class="text-success">byte class="text-white">[] GetJWEDecryptionKey(System.Web.Http.Controllers. HttpActionContext actionContext)> class="text-white">{> class="text-success">return class="text-success">new class="text-success">byte class="text-white">[32]> class="text-white"> { 0x20,0x20,0x20,0x20,0x20,0x20,0x20,0x20,0x20,0x20,0x20,0x20,0x20,0x20,0x20,0x20,0x20,0x20,0x20,0x20,> class="text-white">0x20,0x20,0x20,0x20,0x20,0x20,0x20,0x20,0x20,0x20,0x20,0x20> class="text-white">};> class="text-white">}class="text-white">}
Please note that the encryption algorithm and the type of encryption specified in the JsonWebEncryption attribute is determined by the specific encryption technique of interest to you. The above code assumes a Shared Secret Key specified by the GetJWEDecryptionKey() method. It is recommended that you follow the JOSE/JWT algorithm selection guide to determine which encryption algorithm is appropriate for your specific scenario - https://connect2id.com/products/nimbus-jose-jwt/algorithm-selection-guide
- Compile and Re-publish the TestJWSApi Class Library item.
- Recycle IIS and the EmpowerID Web Role Service as necessary to update the Web api.
Creating a client application to consume the encrypted API request
- Open Visual Studio 2013 or above, and create a new Console Application project, TestEncryptApiRequests.
-
Locate the following assemblies in the EmpowerID programs folder and add them to the project as
references.
- TheDotNetFactory.Framework.SAML.dll
- Newtonsoft.Json.dll
- Microsoft.Practices.EnterpriseLibrary.Data.dll
- Microsoft.Practices.EnterpriseLibrary.Common.dll
- Microsoft.Practices.EnterpriseLibrary.Caching.dll
- Microsoft.IdentityModel.dll
-
Add a new class, EncryptRequestsInputModel.cs, to the TestEncryptApiRequests project and
modify it so that it matches that below.
class="text-success">using class="text-white">System;class="text-success">using class="text-white">System.Collections.Generic;class="text-success">using class="text-white">System.Linq;class="text-success">using class="text-white">System.Text;>class="text-success">using class="text-white">System.Threading.Tasks;class="text-success">namespace class="text-white">TestEncryptApiRequestsclass="text-white">{> class="text-white">[Serializable]> class="text-success">public class="text-success">class class="text-white">EncryptRequestsInputModel> class="text-white">{> class="text-success">public class="text-success">int class="text-white">PersonId { class="text-success">get class="text-white">; class="text-success">set class="text-white">; }> class="text-white">}class="text-white">}
-
Open the Program.cs file in the code editor and add the below code to
it.
class="text-success">using class="text-white">TheDotNetFactory.Framework;class="text-success">using class="text-white">System.Net;class="text-success">using class="text-white">System.Security.Cryptography.X509Certificates;class="text-success">using class="text-white">TheDotNetFactory.Framework.SAML.Api;class="text-success">using class="text-white">TheDotNetFactory.Framework.SSOIdentity;class="text-success">using class="text-white">Jose;
-
In the body of the Main() method, declare the below variables where
- url is the URL to the EmpowerID Web Server in your environment
- apiKey is the ApiKey from the TestOAuth OAuth Provider Application you created earlier
- clientId is the ClientID from the TestOAuth OAuth Provider Application you created earlier
- clientSecret is the ClientScrent from the TestOAuth OAuth Provider Application you created earlier
- userName is the user requesting access token for the TestOAuth OAuth Provider Application you created earlier
-
password is the password of the user requesting access token for
the TestOAuth OAuth Provider Application you created earlier
Be sure to replace the below values with those for your environment.
class="text-success">string class="text-white">tokenUrl = class="text-success"> "https://sso.empoweriam.com" class="text-white">;class="text-success">string class="text-white">apiKey = class="text-success">"1daa135a-a9de-4a1f-a31f-2e8747c7e0f2" class="text-white">;class="text-success">string class="text-white">clientId = class="text-success">"f9cc6222-2d1c-4802-938a-c6c35aaa38f8" class="text-white">;class="text-success">string class="text-white">clientSecret = class="text-success">"9b474344-2f36-41c1-b7ed-0fddb692edea" class="text-white">;class="text-success">string class="text-white">userName = class="text-success">"aapprover" class="text-white">;class="text-success">string class="text-white">password = class="text-success">"p@$$w0rd" class="text-white">;
-
Add the code below to request for an access token for making calls to the api application created
earlier.
class="text-white">WebApiContext webApiContext = class="text-success">new class="text-white"> WebApiContext(tokenUrl, userName,password, apiKey, clientId, clientSecret);
-
Add the below cocde to create the JSON input data to encrypt.
class="text-white">EncryptRequestsInputModel input = class="text-success">new class="text-white"> EncryptRequestsInputModel { PersonId = 1 };class="text-success">string class="text-white"> json = WebApi.ToJson<EncryptRequestsInputModel>(input);
-
Add the below code fragment to complete the code in the body of the Main() method.
class="text-success">using class="text-white">(WebClient webClient = webApiContext.CreateWebCreate())class="text-white">{> class="text-success">byte class="text-white">[] encryptionKey = class="text-success">new class="text-success">byte class="text-white">[32]> class="text-white">{ 0x20, 0x20, 0x20, 0x20, 0x20, 0x20, 0x20, 0x20, 0x20,> class="text-white">0x20,0x20,0x20,0x20,0x20,0x20,0x20,0x20,0x20,0x20,0x20,> class="text-white">0x20,0x20,0x20,0x20,0x20,0x20,0x20,0x20,0x20,0x20,0x20,0x20> class="text-white">};> class="text-success">//Encrypt the JSON data with the key specified by encryptionKey> class="text-success">string class="text-white">data = JWT.Encode(json, encryptionKey, JweAlgorithm.A256KW, JweEncryption.A128CBC_HS256);> class="text-success">byte class="text-white">[] str = System.Text.Encoding.UTF8.GetBytes(data);> class="text-success">string class="text-white">actionUrl = class="text-success"> "https://sso.empoweriam.com/api/services/v1/EncryptRequests/GetUserJWE" class="text-white">;> class="text-success">//Call the GetUserJWE endpoint.> class="text-success">byte class="text-white">[] results = webClient.UploadData(actionUrl, class="text-success">"POST" class="text-white">, str);> class="text-success">//Write the output> class="text-success">string class="text-white">output = System.Text.Encoding.UTF8.GetString(results);> class="text-white">Console.WriteLine(output);class="text-white">}
Notice that the method, JWT.Encode(), is called to encrypt the json data with a shared secret prior to performing the HTTP-POST request to the REST endpoint.
- Add the code fragment below to complete the code in the body of the Main()
- Compile and run the TestEncryptApiRequests console application. The output should state “User1”;